[Terraform] 我编写了一个模块,用于在 AWS 上构建三层网络配置。
2018.07.21
 0
0
4,124
![]()
我叫寺冈,是一名基础设施工程师。
这次我们将讨论 Terraform 模块。
我创建了一个模块,可以快速构建将 AWS 网络分为三层(公共/DMZ/私有)的配置,并且
通过运行本文所述的代码,您可以在 AWS 上部署以下配置。
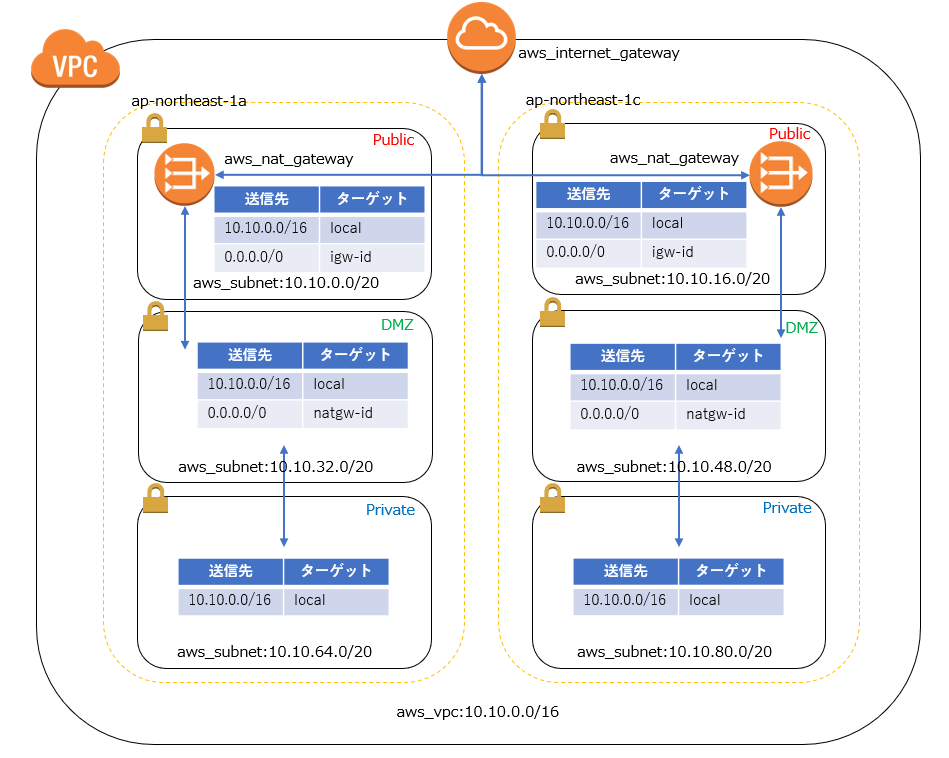
多可用区和DMZ子网通过NAT网关与外部世界通信。
公共子网直接与互联网网关通信,
而私有子网仅用于本地通信。
乍一看可能很复杂,但实际上是一种相当常见的配置。
使用 Terraform 对该配置进行模块化后,结果如下。
■定义要传递给模块的值的变量
首先,将要传递给模块的值定义为一个变量。
变量“vpc_config”{ 默认值 = { project = "tf-moduletest" environment = "stg" cidr_block = "10.10.0.0/16" } } 变量“availability_zones”{ 默认值 = ["ap-northeast-1a","ap-northeast-1c"] } 变量“public_subnets”{ 默认值 = ["10.10.0.0/20","10.10.16.0/20"] } 变量“dmz_subnets”{ 默认值 = ["10.10.32.0/20","10.10.48.0/20"] } 变量“private_subnets”{ 默认值 = ["10.10.64.0/20","10.10.80.0/20"] }
■ 编写模块
这部分是本文的主要内容。
由于只需根据变量中定义的值构建资源,因此它
基本上可以用于任何项目。
###### # VPC ###### resource "aws_vpc" "vpc" { cidr_block = "${var.vpc_config["cidr_block"]}" tags { Name = "vpc-${var.vpc_config["project"]}-${var.vpc_config["environment"]}" } } ################ # 公有子网 ################ resource "aws_subnet" "public" { count = "${length(var.public_subnets)}" vpc_id = "${aws_vpc.vpc.id}" cidr_block = "${element(var.public_subnets, count.index)}" availability_zone = "${element(var.availability_zones, count.index)}" map_public_ip_on_launch = "true" tags { Name = "subnet-${var.vpc_config["project"]}-${var.vpc_config["environment"]}-public-${substr(element(var.availability_zones, count.index),-1,1)}" } } ################ # DMZ 子网 ################ resource "aws_subnet" "dmz" { count = "${length(var.dmz_subnets)}" vpc_id = "${aws_vpc.vpc.id}" cidr_block = "${element(var.dmz_subnets, count.index)}" availability_zone = "${element(var.availability_zones, count.index)}" tags { Name = "subnet-${var.vpc_config["project"]}-${var.vpc_config["environment"]}-dmz-${substr(element(var.availability_zones, count.index),-1,1)}" } } ################ # 私有子网 ################ resource "aws_subnet" "private" { count = "${length(var.private_subnets)}" vpc_id = "${aws_vpc.vpc.id}" cidr_block = "${element(var.private_subnets, count.index)}" availability_zone = "${element(var.availability_zones, count.index)}" tags { Name = "subnet-${var.vpc_config["project"]}-${var.vpc_config["environment"]}-private-${substr(element(var.availability_zones, count.index),-1,1)}" } } ############################### # 公共路由和关联 ############################## resource "aws_route_table" "public" { vpc_id = "${aws_vpc.vpc.id}" tags { Name = "rtb-${var.vpc_config["project"]}-${var.vpc_config["environment"]}-public" } } resource "aws_internet_gateway" "internet_gateway" { vpc_id = "${aws_vpc.vpc.id}" tags { Name = "igw-${var.vpc_config["project"]}-${var.vpc_config["environment"]}" } } resource "aws_route" "public_internet_gateway" { route_table_id = "${aws_route_table.public.id}" destination_cidr_block = "0.0.0.0/0" gateway_id = "${aws_internet_gateway.internet_gateway.id}" } resource "aws_route_table_association" "public" { count = "${length(var.public_subnets)}" subnet_id = "${element(aws_subnet.public.*.id, count.index)}" route_table_id = "${aws_route_table.public.id}" } ############################ # DMZ 路由和关联 ########################### resource "aws_route_table" "dmz" { count = "${length(var.dmz_subnets)}" vpc_id = "${aws_vpc.vpc.id}" tags { Name = "rtb-${var.vpc_config["project"]}-${var.vpc_config["environment"]}-dmz-${substr(element(var.availability_zones, count.index),-1,1)}" } } resource "aws_eip" "nat" { count = "${length(var.dmz_subnets)}" vpc = true } resource "aws_nat_gateway" "nat_gateway" { count = "${length(var.dmz_subnets)}" allocation_id = "${element(aws_eip.nat.*.id, count.index)}" subnet_id = "${element(aws_subnet.public.*.id, count.index)}" tags { Name = "nat-${var.vpc_config["project"]}-${var.vpc_config["environment"]}-public-${substr(element(var.availability_zones, count.index),-1,1)}" } } resource "aws_route" "dmz_nat_gateway" { count = "${length(var.dmz_subnets)}" route_table_id = "${element(aws_route_table.dmz.*.id, count.index)}" destination_cidr_block = "0.0.0.0/0" gateway_id = "${element(aws_nat_gateway.nat_gateway.*.id, count.index)}" } resource "aws_route_table_association" "dmz" { count = "${length(var.dmz_subnets)}" subnet_id = "${element(aws_subnet.dmz.*.id, count.index)}" route_table_id = "${element(aws_route_table.dmz.*.id, count.index)}" } ############################### # 私有路由和关联 ############################## resource "aws_route_table" "private" { vpc_id = "${aws_vpc.vpc.id}" tags { Name = "rtb-${var.vpc_config["project"]}-${var.vpc_config["environment"]}-private" } } resource "aws_route_table_association" "private" { count = "${length(var.private_subnets)}" subnet_id = "${element(aws_subnet.private.*.id, count.index)}" route_table_id = "${aws_route_table.private.id}" }
■ 调用你编写的模块
要在 Terraform 中调用模块,请编写以下代码:
只需指定包含描述源模块的 .tf 文件的目录,并
传递执行变量中指定的模块所需的变量即可。
模块 "vpc" { source = "../modules/network/vpc/" vpc_config = "${var.vpc_config}" availability_zones = "${var.availability_zones}" public_subnets = "${var.public_subnets}" dmz_subnets = "${var.dmz_subnets}" private_subnets = "${var.private_subnets}" }
就这么简单,你只需要决定使用哪个 terraform 脚本即可。
....就这样。
如果您觉得这篇文章有用,请点击【点赞】!
00
4,124
这篇文章的作者
关于作者


