我创建了一个 Ansible Playbook,用于在 AWS 上构建三层网络配置。

大家好,
我是 SS 团队的 Shimeji。
我之前写过一篇关于使用 Ansible 构建两层网络的文章,但在实际项目中,构建三层网络环境更为常见。
因此,我创建了一个 playbook,用于在 AWS 上使用 Ansible 构建三层网络。
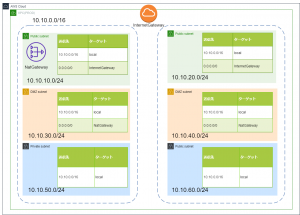
*我们将要构建的实际环境如下:

目录结构
剧本的目录结构如下:
. ├── README.md ├── ansible.cfg ├── hosts ├── roles │ └── aws_vpc │ ├── tasks │ │ └── main.yml │ └── vars │ └── main.yml └── vpc_create.yml
剧本
是的,这是一个剧本。
它基本上与两层架构的剧本相同,但增加了为DMZ子网创建NAT网关和路由表的新功能。
--- # aws_vpc 的任务文件 - name: create_vpc ec2_vpc_net: name: "{{ vpc_name }}" cidr_block: "{{ vpc_cidr }}" region: "{{ region }}" profile: "{{ profile }}" dns_hostnames: yes dns_support: yes register: vpc_info # 创建公有子网 - name: create_public_subnet ec2_vpc_subnet: vpc_id: "{{ vpc_info.vpc.id }}" cidr: "{{ item.pub_subnet_cidr }}" az: "{{ item.subnet_az }}" region: "{{ region }}" resource_tags: { "Name":"{{ item.pub_subnet_name }}" } profile: "{{ profile }}" register: pubsub_info with_items: - "{{ pub_subnet }}" # 创建 DMZ 子网 - 名称:create_dmz_subnet ec2_vpc_subnet: vpc_id:"{{ vpc_info.vpc.id }}" cidr:"{{ item.dmz_subnet_cidr }}" az:"{{ item.subnet_az }}" region:"{{ region }}" resource_tags:{ "名称":"{{ item.dmz_subnet_name }}" } profile:"{{ profile }}" register:pubsub_info with_items:- "{{ dmz_subnet }}" # 创建私有子网 - 名称:create_private_subnet ec2_vpc_subnet: vpc_id:"{{ vpc_info.vpc.id }}" cidr:"{{ item.pri_subnet_cidr }}" az:"{{ item.subnet_az }}" region:"{{ region }}" resource_tags: { "Name":"{{ item.pri_subnet_name }}" } profile: "{{ profile }}" register: prisub_info with_items: - "{{ pri_subnet }}" # 创建 IGW - name: create_igw ec2_vpc_igw: vpc_id: "{{ vpc_info.vpc.id }}" region: "{{ region }}" tags: { "Name":"{{ igw_name }}" } profile: "{{ profile }}" register: igw_info # 创建路由表 (IGW) - name: create_route_table ec2_vpc_route_table: vpc_id: "{{ vpc_info.vpc.id }}" subnets: "{{ atache_igw_subnet }}" routes: - dest: 0.0.0.0/0 gateway_id: "{{ igw_info.gateway_id }}" region: "{{ region }}" profile: "{{ profile }}" resource_tags: { "Name":"{{ rttable_pub_name }}" } # 获取子网 ID 以放置 NGW - name: get_subnet_id shell: aws ec2 describe-subnets --region {{ region }} --profile {{ profile }} --output text | grep -B 1 {{ ngw_subnet_name }} | awk 'NR==1 {print $12}' register: ngw_subnet_id #- name: show # debug: # msg: "{{ ngw_subnet_id.stdout }}" # 创建 NGW - name: create_ngw ec2_vpc_nat_gateway: subnet_id: "{{ ngw_subnet_id.stdout }}" region: "{{ region }}" profile: "{{ profile }}" wait: yes register: ngw_info #- name: show # debug: # msg: "{{ ngw_info.nat_gateway_id }}" # 等待 NGW 创建完成 #- name: wait_for_ngw # pause: # minutes: 5 # 创建路由表 (NGW) - name: create_route_table2 ec2_vpc_route_table: vpc_id: "{{ vpc_info.vpc.id }}" subnets: "{{ atache_ngw_subnet }}" routes: - dest: 0.0.0.0/0 gateway_id: "{{ ngw_info.nat_gateway_id }}" region: "{{ region }}" profile: "{{ profile }}" resource_tags: { "Name":"{{ rttable_dmz_name }}" }
DMZ 子网 ID 是通过格式化 awscli 命令的输出结果获得的。
然后使用该 ID 创建 NATGATEWAY。
创建 NATGATEWAY 需要一些时间,因此使用“pause”模块暂时停止该过程。
*补充说明:
有人在 Twitter 上指出“ec2_vpc_nat_gateway”有一个名为“wait”的选项!
谢谢!
定义变量
--- # aws_vpc 的变量文件 # REGION region: "ap-northeast-1" # PROFILE profile: "default" # VPC vpc_name: "shimeji-3layer-vpc" vpc_cidr: "10.10.0.0/16" # IGW igw_name: "shimeji-3layer-igw" # NGW ngw_name: "shimeji-3layer-ngw" # 将要创建 NGW 的子网名称 ngw_subnet_name: "shimeji-3layer-public-subnet-a" # ROUTETABLE(PUBLIC) rttable_pub_name: "shimeji-3layer-pub-rt" # ROUTETABLE(DMZ) rttable_dmz_name: "shimeji-3layer-dmz-rt" # PUBLIC_SUBNET pub_subnet: - { pub_subnet_cidr: "10.10.10.0/24" ,subnet_az: "ap-northeast-1a" ,pub_subnet_name: "shimeji-3layer-public-subnet-a" } - { pub_subnet_cidr: "10.10.20.0/24" ,subnet_az: "ap-northeast-1c" ,pub_subnet_name: "shimeji-3layer-public-subnet-c" } # DMZ_SUBNET dmz_subnet: - { dmz_subnet_cidr: "10.10.30.0/24" ,subnet_az: "ap-northeast-1a" ,dmz_subnet_name: "shimeji-3layer-dmz-subnet-a" } - { dmz_subnet_cidr: "10.10.40.0/24" ,subnet_az: "ap-northeast-1c" ,dmz_subnet_name: "shimeji-3layer-dmz-subnet-c" } # 私有子网 pri_subnet: - { pri_subnet_cidr: "10.10.50.0/24" ,subnet_az: "ap-northeast-1a" ,pri_subnet_name: "shimeji-3layer-private-subnet-a" } - { pri_subnet_cidr: "10.10.60.0/24" ,subnet_az: "ap-northeast-1c" ,pri_subnet_name: "shimeji-3layer-private-subnet-c" } # 与 IGW 关联的子网 atache_igw_subnet: - "10.10.10.0/24" - "10.10.20.0/24" # 要与 NGW 关联的子网 atache_ngw_subnet: - "10.10.30.0/24" - "10.10.40.0/24"
这次,我们将在每个资源前加上“shimeji-3layer”前缀。
执行
我们来实际试一试。
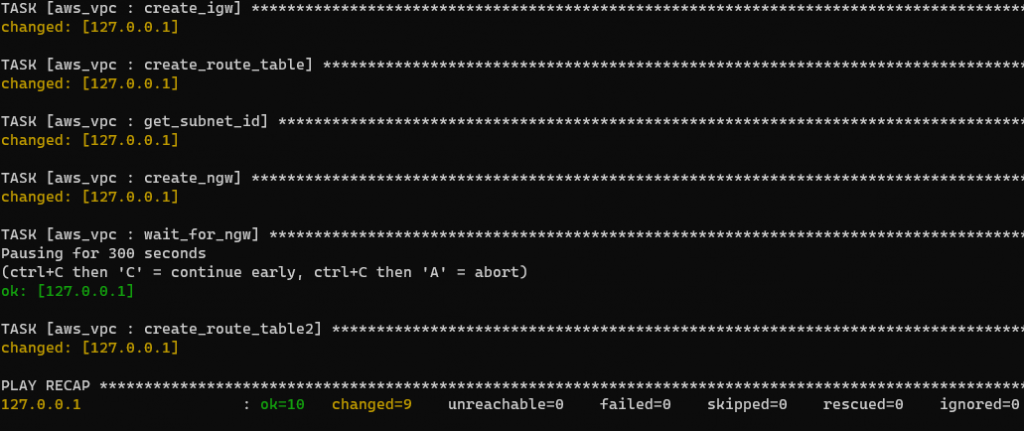
root@BYD-NPC-023:/opt/playbook/aws-vpc-3layer# ansible-playbook -i hosts vpc_create.yml PLAY [创建 VPC 子网 IGW 路由表] ********************************************************************************************************************************************************************************* TASK [aws_vpc : create_vpc] ***************************************************************************************************************************************************** 已更改:[127.0.0.1] TASK [aws_vpc : create_public_subnet] *********************************************************************************************************************************************************************** 已更改:[127.0.0.1] => (item={u'pub_subnet_name': u'shimeji-3layer-public-subnet-a', u'subnet_az': u'ap-northeast-1a', u'pub_subnet_cidr': u'10.10.10.0/24'}) changed: [127.0.0.1] => (item={u'pub_subnet_name': u'shimeji-3layer-public-subnet-c', u'subnet_az': u'ap-northeast-1c', u'pub_subnet_cidr': u'10.10.20.0/24'}) TASK [aws_vpc : create_dmz_subnet] ***************************************************************************************************************************************************************** 已更改:[127.0.0.1] => (item={u'dmz_subnet_cidr': u'10.10.30.0/24', u'dmz_subnet_name': u'shimeji-3layer-dmz-subnet-a', u'subnet_az': u'ap-northeast-1a'}) 已更改:[127.0.0.1] => (item={u'dmz_subnet_cidr': u'10.10.40.0/24', u'dmz_subnet_name': u'shimeji-3layer-dmz-subnet-c', u'subnet_az': u'ap-northeast-1c'}) 任务 [aws_vpc : create_private_subnet] **************************************************************************************************************************************************************** 已更改:[127.0.0.1] => (item={u'pri_subnet_cidr': u'10.10.50.0/24', u'pri_subnet_name': u'shimeji-3layer-private-subnet-a', u'subnet_az': u'ap-northeast-1a'}) 已更改:[127.0.0.1] => (item={u'pri_subnet_cidr': u'10.10.60.0/24', u'pri_subnet_name': u'shimeji-3layer-private-subnet-c', u'subnet_az': u'ap-northeast-1c'}) 任务 [aws_vpc : create_igw] ************************************************************************************************************************************************ 已更改:[127.0.0.1] 任务 [aws_vpc : create_route_table] ***************************************************************************************************************************************************** 已更改:[127.0.0.1] 任务 [aws_vpc : get_subnet_id] ************************************************************************************************************************************************************** 已更改: [127.0.0.1] 任务 [aws_vpc : create_ngw] **************************************************************************************************************************************************************** 已更改:[127.0.0.1] 任务 [aws_vpc : wait_for_ngw] ******************************************************************************************************************************************************** 暂停 300 秒(按 Ctrl+C 然后按 'C' 可提前继续,按 Ctrl+C 然后按 'A' 可中止) 成功:[127.0.0.1] 任务 [aws_vpc : create_route_table2] ********************************************************************************************************************************************************** 已更改:[127.0.0.1] 播放概要 ***************************************************************************************************************************************************** 127.0.0.1:成功=10 已更改=9 无法访问=0 失败=0 已跳过=0 已救援=0 已忽略=0
是的,成功了!
结论
您可以通过离开管理界面来构建 AWS 网络,但这很耗时,而且存在人为错误的风险。
使用 Ansible 可以节省时间并减少错误!
↓顺便说一下,这里是二楼。
如果您觉得这篇文章有用,请点击【点赞】!

 0
0


