Vagrantというコマンドラインツールを使用して自分だけの検証環境を構築する方法
インフラエンジニアの伊藤です。
お客様の環境はおいそれと触れないのは世の常。
本来なら同じような検証環境を用意してそこで検証をしなければいけないのに、
本番環境を勝手にいじって何か起こったなんて、インフラエンジニア失格!ですよね。
今回紹介する「Vagrant」は、用意するのめんどくさい…
な仮想検証環境を簡単に用意することが出来るツールです!
Vagrantとは
Vagrantは仮想マシン(VM)環境を効率的に作成・操作することに特化しており、VirtualBoxやVMware、さらにはAWS(EC2)などの様々な仮想化ソフトウェアと連携して動作するコマンドラインツールです。
今回はVirtualBoxを使ってVagrantをインストールします。
手順
Vagrantをインストールしていきます。
VirtualBoxのインストール
Vagrantには、VitrualBoxというOS上で仮想のOSを起動することが出来るソフトが必要になります。
VirtualBoxは以下のサイトからダウンロードします。
Downloads – Oracle VM VirtualBox
インストーラに従って作業すれば問題ないかと思います。
インストール手順に不安がある方は、以下のサイトを参考にしてみてください。
VirtualBoxをWindowsにインストール | VirtualBox Mania
Vagrantのインストール
続いてVagrantのインストールです。
以下のサイトからダウンロードします。
Download - Vagrant by HashiCorp
VirtualBoxと同じく、インストール手順に不安がある方は以下のサイトを参考にしてみてください。
Vagrant をWindowsにインストールする手順 | WEB ARCH LABO
インストール後、コマンドプロンプトで以下のコマンドを入力してみてください。
Vagrantのバージョンが表示されるはずです。
C:Userstest>vagrant --version
Vagrant 1.7.4
仮想環境を立ち上げてみる
実際にVagrantを使って仮想環境を立ち上げてみましょう。
Vagrantは、「box」と言われるディスクイメージをダウンロードし、
設定ファイルに従ってboxファイルを仮想環境としてつくり上げるようになっています。
boxファイルは以下より入手することが可能です。
公式:Discover Vagrant Boxes | Atlas by HashiCorp
非公式:A list of base boxes for Vagrant - Vagrantbox.es
実際には非公式のvagrantbox.esをよく使うかと思います。
ちなみにboxファイルは自作することも可能です。
まずはboxファイルをダウンロードしましょう。
vagrant box add <boxの名前> <boxのURL>
こんな感じになります。centos70という名前でcentos7のboxファイルをダウンロードします。
$ vagrant box add centos70 https://github.com/tommy-muehle/puppet-vagrant-boxes/releases/download/1.1.0/centos-7.0-x86_64.box
==> box: Box file was not detected as metadata. Adding it directly...
==> box: Adding box 'centos70' (v0) for provider:
    box: Downloading: https://github.com/tommy-muehle/puppet-vagrant-boxes/releases/download/1.1.0/centos-7.0-x86_64.box
    box:
==> box: Successfully added box 'centos70' (v0) for 'virtualbox'!
boxがダウンロードされているか確認します。
$ vagrant box list
centos70 (virtualbox, 0)
「centos70」という名前のboxがダウンロードされていることが確認出来ます。
次に、boxをベースに定義ファイルを作成します。
この定義ファイルを元に、仮想サーバが立ち上がることになります。
$ vagrant init centos70
A `Vagrantfile` has been placed in this directory. You are now
ready to `vagrant up` your first virtual environment! Please read
the comments in the Vagrantfile as well as documentation on
`vagrantup.com` for more information on using Vagrant.
カレントディレクトリに「Vagrantfile」という定義ファイルが作成されます。
この定義ファイルに設定してあげることで、色んな設定を入れて仮想サーバを立ち上げることが可能になります。
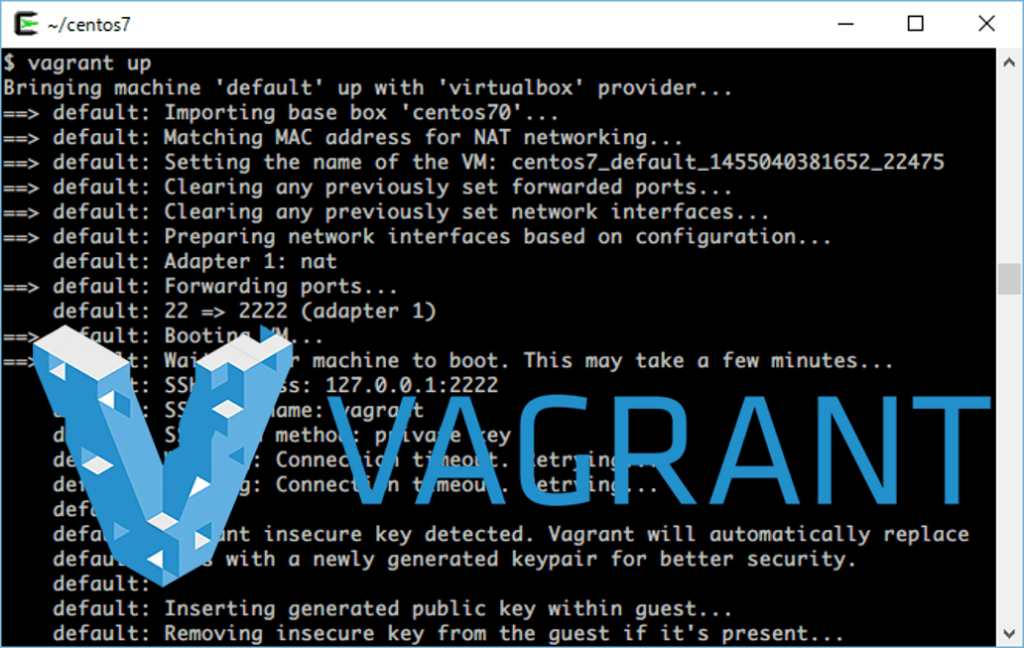
では、いよいよ仮想サーバを立ち上げます。
Vagrantfile内の設定を読み込んで立ち上がります。
$ vagrant up
Bringing machine 'default' up with 'virtualbox' provider...
==> default: Importing base box 'centos70'...
==> default: Matching MAC address for NAT networking...
==> default: Setting the name of the VM: centos7_default_1455040381652_22475
==> default: Clearing any previously set forwarded ports...
==> default: Clearing any previously set network interfaces...
==> default: Preparing network interfaces based on configuration...
    default: Adapter 1: nat
==> default: Forwarding ports...
    default: 22 => 2222 (adapter 1)
==> default: Booting VM...
==> default: Waiting for machine to boot. This may take a few minutes...
    default: SSH address: 127.0.0.1:2222
    default: SSH username: vagrant
    default: SSH auth method: private key
    default: Warning: Connection timeout. Retrying...
    default: Warning: Connection timeout. Retrying...
    default:
    default: Vagrant insecure key detected. Vagrant will automatically replace
    default: this with a newly generated keypair for better security.
    default:
    default: Inserting generated public key within guest...
    default: Removing insecure key from the guest if it's present...
    default: Key inserted! Disconnecting and reconnecting using new SSH key...
==> default: Machine booted and ready!
==> default: Checking for guest additions in VM...
==> default: Mounting shared folders...
    default: /vagrant => D:/system/cygwin64/home/itou/centos7
接続してみます。
$ vagrant ssh
Last login: Sat May 30 12:27:44 2015 from 10.0.2.2
Welcome to your Vagrant-built virtual machine.
[vagrant@localhost ~]$
できた!
上記で出てきたコマンド以外によく使うコマンドを以下に記載します。
#Vagrantの停止
vagrant halt

#Vagrantfileの再読み込み(再起動)
vagrant reload

#Vagrantの廃棄(作成した仮想サーバを捨てる)
vagrant destroy

#Vagrantのステータスチェック
vagrant status
まとめ
以上が簡単なVagrantを使った検証環境の構築方法です!
一番時間がかかるのがboxファイルのダウンロードだけ。
会社としてデフォルトの設定がサーバにはあると思います。
そんな設定を加えた状態の仮想環境をboxファイルにすることも出来るので、
いちいち同じ操作を検証環境ごとにする必要もなくなります。
また、Vagrantfileを使えば、ポートフォワードの設定やプライベートIPのアドレスの設定、
複数の仮想環境を立ち上げることが容易に可能になります。
この辺りを使いこなすことが出来れば、複雑な環境も簡単に構築出来そうです。
みなさんも是非Vagrantを使ってよき検証環境構築ライフを!
クラウドのプロに相談したい場合
弊社ビヨンドでは、創業以来、マルチクラウドインテグレーター・マネージドサービスプロバイダー(MSP)として培った技術力で、AWS や GCP・Azure・Oracle Cloud など、様々なクラウド / サーバーのプラットフォームを駆使した設計・構築・移行を行ってきました。
お客様が求めるシステムやアプリケーションの仕様・機能に応じて、お客様向けに最適化された、オーダーメイド型のクラウド / サーバー環境をご提供いたしますので、クラウドにご興味のある方はお気軽にお問い合わせください。
● クラウド / サーバー設計・構築
● クラウド / サーバー移行・マイグレーション
● クラウド / サーバー運用保守・監視(24時間365日)
 11
11 この記事をかいた人
About the author


