AWSでWord Pressを構築する方法を解説

こんにちは。
先月人生で初めて髪の毛を染めたのですが、段階を踏まず1発目で青に染めてしまったシステムソリューション部の八木谷です。
もう無難な色に染めるという選択肢はなさそうなので、次何色にしようか悩んでいます。
さて、ビヨンドブログ初投稿の今回はAWSのサービスを用いてLAMP環境を構築し、最終的にはWordPressに投稿できるようにするまでの方法について書こうと思います。
それぞれのサービスを細かく書くと長くなってしまうので、設定のみをさくっと書いていきます。
※WebとDBは同居という構成で作成します
AWS
【VPC】
名前:wp-test-vpc
CIDR:10.0.0.0/16
【インターネットゲートウェイ】
タグ Name:wp-test-igw
キー Name 値:wp-test-igw
作成したらwp-test-igwを選択し、アクションから「VPCにアタッチ」
使用可能なVPC:wp-test-vpc
【ルートテーブル】
名前タグ:wp-test-rt
VPC:wp-test-vpc
作成後、wp-test-rtを選択⇒ルートの編集⇒ルートの追加
送信先:0.0.0.0/0 ターゲット:wp-test-igw
【サブネット】
名前:wp-test-public-subnet-1a
VPC:wp-test-vpc
CIDR:10.0.0.0/24
【セキュリティグループ】
セキュリティグループ名:wp-test-sg
説明:wp-test-sg
VPC:wp-test-vpc
インバウンドルール
タイプ:SSH プロコトル:TCP ポート範囲:22 ソース:マイIP
タイプ:HTTP プロコトル:TCP ポート範囲:80 ソース:カスタム 0.0.0.0/0
【EC2】
Amazon Linux2
t2.micro
VPC:wp-test-VPC
サブネット:wp-test-public-subnet-1a
自動割り当てパブリックIP:有効
ストレージ:デフォルトのまま
タグ キー:Name 値:wp-test-ec2
セキュリティグループ:wp-test-sg
キーペア:
新しいキーペアの作成
キーペア名 wp-test-key
AWSコンソールで行う作業は完了したので、サーバ内でミドルウェアのインストールや設定をしていきます。
サーバへはコマンドプロンプトでもWindows Powershellでもなんでもいいので下記のように鍵とユーザー名、パブリックIPを指定してsshで接続します。
ssh -i wp-test.pem ec2-user@【パブリックIP】
Apache
ではまずApacheのインストールから行っていきます。
# yum install httpd -y
最後が「Complete!」となっていればOKです。
Apacheを起動
# systemctl start httpd
インスタンスを再起動しても自動で起動するように以下のようにして自動起動の設定もしておきます。
# systemctl enable httpd
下記で確認、enabledになっていれば大丈夫です
# systemctl is-enabled httpd
VirtualHostを今回は以下の設定で作成していきます。
パス:/etc/httpd/conf.d/wp-test.conf
サーバー名:wp-test
ドキュメントルート:/var/www/html/wp-test
アクセスログ:/var/log/httpd/wp-test-access_log
エラーログ:/var/log/httpd/wp-test-error_log
先にドキュメントルートと確認用のファイルを作成します。
# vi /var/www/html/wp-test/index.html
test
# vi /etc/httpd/conf.d/wp-test.conf
<VirtualHost *:80>
ServerName wp-test
DocumentRoot "/var/www/html/wp-test"
CustomLog "/var/log/httpd/wptest-access_log" combined
ErrorLog "/var/log/httpd/wptest-error_log"
</VirtualHost>
confファイルをいじったので反映させるためにApacheを再起動させます
# systemctl restart httpd
ブラウザでパブリックIPで検索して「test」と表示されればOKです
確認出来たらindex.htmlは消します。
# rm -f /var/www/html/wp-test/index.html
PHP
PHPに移ります。
デフォルトだと5.4系しか入らないのでepelレポジトリとremiレポジトリを先にインストールします。
# yum info php
Loaded plugins: extras_suggestions, langpacks, priorities, update-motd
Available Packages
Name : php
Arch : x86_64
Version : 5.4.16
Release : 46.amzn2.0.2
Size : 1.4 M
Repo : amzn2-core/2/x86_64
Summary : PHP scripting language for creating dynamic web sites
URL : http://www.php.net/
License : PHP and Zend and BSD
Description : PHP is an HTML-embedded scripting language. PHP attempts to make it
: easy for developers to write dynamically generated web pages. PHP also
: offers built-in database integration for several commercial and
: non-commercial database management systems, so writing a
: database-enabled webpage with PHP is fairly simple. The most common
: use of PHP coding is probably as a replacement for CGI scripts.
:
: The php package contains the module (often referred to as mod_php)
: which adds support for the PHP language to Apache HTTP Server.
epelレポジトリインストール
# yum install https://dl.fedoraproject.org/pub/epel/epel-release-latest-7.noarch.rpm
remiレポジトリインストール
# yum install http://rpms.famillecollet.com/enterprise/remi-release-7.rpm
7.3系が入るか確認してみましょう。
# yum info php --enablerepzo=remi-php73
Loaded plugins: extras_suggestions, langpacks, priorities, update-motd
remi-php73 | 3.0 kB 00:00:00
remi-php73/primary_db | 234 kB 00:00:01
261 packages excluded due to repository priority protections
Available Packages
Name : php
Arch : x86_64
Version : 5.4.16
Release : 46.amzn2.0.2
Size : 1.4 M
Repo : amzn2-core/2/x86_64
Summary : PHP scripting language for creating dynamic web sites
URL : http://www.php.net/
License : PHP and Zend and BSD
Description : PHP is an HTML-embedded scripting language. PHP attempts to make it
: easy for developers to write dynamically generated web pages. PHP also
: offers built-in database integration for several commercial and
: non-commercial database management systems, so writing a
: database-enabled webpage with PHP is fairly simple. The most common
: use of PHP coding is probably as a replacement for CGI scripts.
:
: The php package contains the module (often referred to as mod_php)
: which adds support for the PHP language to Apache HTTP Server.
5.4系になっていますね。
原因はamzn2-coreレポジトリのプライオリティが高くなってしまってるためです。
# less /etc/yum.repos.d/amazon-2-core.repo
[amzn2-core]
name=Amazon Linux 2 core repository
mirrorlist=$awsproto://$amazonlinux.$awsregion.$awsdomain/$releasever/$product/$target/$basearch/mirror.list
priority=10
gpgcheck=1
gpgkey=file:///etc/pki/rpm-gpg/RPM-GPG-KEY-amazon-linux-2
enabled=1
metadata_expire=300
mirrorlist_expire=300
report_instanceid=yes
[略]
「priority=10」となっているので「priority=99」にしてプライオリティを下げましょう。
# vi /etc/yum.repos.d/amazon-2-core.repo
[amzn2-core]
name=Amazon Linux 2 core repository
mirrorlist=$awsproto://$amazonlinux.$awsregion.$awsdomain/$releasever/$product/$target/$basearch/mirror.list
priority=99
gpgcheck=1
gpgkey=file:///etc/pki/rpm-gpg/RPM-GPG-KEY-amazon-linux-2
enabled=1
metadata_expire=300
mirrorlist_expire=300
report_instanceid=yes
[略]
再度確認です。
# yum info php --enablerepo=remi-php73
Loaded plugins: extras_suggestions, langpacks, priorities, update-motd
1 packages excluded due to repository priority protections
Available Packages
Name : php
Arch : x86_64
Version : 7.3.27
Release : 1.el7.remi
Size : 3.2 M
Repo : remi-php73
Summary : PHP scripting language for creating dynamic web sites
URL : http://www.php.net/
License : PHP and Zend and BSD and MIT and ASL 1.0 and NCSA
Description : PHP is an HTML-embedded scripting language. PHP attempts to make it
: easy for developers to write dynamically generated web pages. PHP also
: offers built-in database integration for several commercial and
: non-commercial database management systems, so writing a
: database-enabled webpage with PHP is fairly simple. The most common
: use of PHP coding is probably as a replacement for CGI scripts.
:
: The php package contains the module (often referred to as mod_php)
: which adds support for the PHP language to Apache HTTP Server.
7.3系になりました。
ではモジュールも合わせてインストールします。
# yum install php php-mbstring php-xml php-xmlrpc php-gd php-pdo php-pecl-mcrypt php-mysqlnd php-pecl-mysql --enablerepo=remi-php73
ドキュメントルート配下にindex.phpというファイルを作成します。
# vi /var/www/html/index.php
<?php
phpinfo();
?>
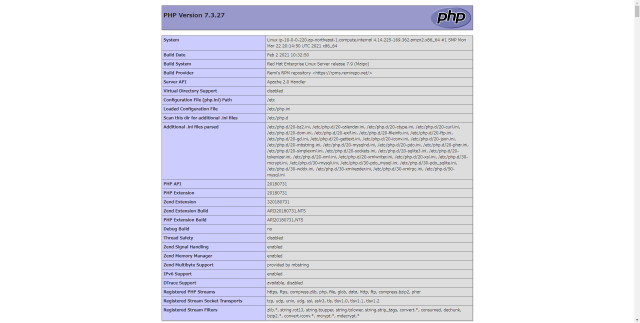
Apacheを再起動し、パブリックIPをブラウザで検索し上記のようなページが表示されればOKです。
MySQL
続いてMySQLです。
まず、インストールです。
# yum localinstall https://dev.mysql.com/get/mysql80-community-release-el7-3.noarch.rpm
下記のコマンドでmysqlのバージョンを確認すると8系が有効になっていると思います。
# yum repolist all
repo id repo name status
[略]
mysql57-community/x86_64 MySQL 5.7 Community Server disabled
mysql80-community/x86_64 MySQL 8.0 Community Server enabled: 229
[略]
今回は5.7系をインストールしたいので、8系を無効化して5.7系を有効化します。
8系を無効化
# yum-config-manager --disable mysql80-community
5.7系を有効化
# yum-config-manager --enable mysql57-community
5.7系が有効になっているか確認します。
# yum repolist all
[略]
mysql57-community/x86_64 MySQL 5.7 Community Server enabled: 484
mysql80-community/x86_64 MySQL 8.0 Community Server disabled
[略]
大丈夫そうなので5.7系をインストールします。
# yum install mysql-community-server
MySQLを起動
# systemctl start mysqld
Apacheと同様、自動起動化しておきます。
# systemctl enable mysqld
確認
# systemctl is-enabled mysqld
enabled
MySQLに入る前にパスワードの変更を先に行います。
現在のパスワード確認
# grep password /var/log/mysqld.log
[Note] A temporary password is generated for root@localhost: xxxxxxxxx
xxxxxx部分がパスワードです。
パスワード変更
# mysql_secure_installation
Securing the MySQL server deployment.

Enter password for user root: 【先程のパスワード】

The existing password for the user account root has expired. Please set a new password.

New password: 【新しいパスワード】

Re-enter new password: 【再入力】
The 'validate_password' component is installed on the server.
The subsequent steps will run with the existing configuration
of the component.
Using existing password for root.

Estimated strength of the password: 100
Change the password for root ? ((Press y|Y for Yes, any other key for No) : y

New password:【新しいパスワード】

Re-enter new password: 【再入力】

Estimated strength of the password: 100
Do you wish to continue with the password provided?(Press y|Y for Yes, any other key for No) : y
By default, a MySQL installation has an anonymous user,
allowing anyone to log into MySQL without having to have
a user account created for them. This is intended only for
testing, and to make the installation go a bit smoother.
You should remove them before moving into a production
environment.

#既存ユーザーの削除
Remove anonymous users? (Press y|Y for Yes, any other key for No) : y
Success.

Normally, root should only be allowed to connect from
'localhost'. This ensures that someone cannot guess at
the root password from the network.

#リモートでのrootログインを禁止
Disallow root login remotely? (Press y|Y for Yes, any other key for No) : y
Success.

By default, MySQL comes with a database named 'test' that
anyone can access. This is also intended only for testing,
and should be removed before moving into a production
environment.

#テストデータベースの削除
Remove test database and access to it? (Press y|Y for Yes, any other key for No) : y
- Dropping test database...
Success.

- Removing privileges on test database...
Success.

Reloading the privilege tables will ensure that all changes
made so far will take effect immediately.

#privilegeテーブルのリロード(設定の反映)
Reload privilege tables now? (Press y|Y for Yes, any other key for No) : y
Success.

All done!
MySQLにログインしてWord Press用のデータベースを作成していきます。
MySQLへログイン
# mysql -u root -p
Enter password:【先程新しく設定したパスワード】
データベース作成
mysql >database wp_test_db;
ユーザー作成
mysql >create user 'wp_user'@'localhost' identified with mysql_native_password by 'パスワード';
このままだと作成したユーザー(wp_user)はデータベース(wp_test_db)の操作が行えないため、権限を付与します。
mysql >grant all privileges on wp_test_db.* to wp_user@'localhost';
mysqlはこれで設定完了です。
Word Press
最後にWord Pressです。
インストール先はどこでもいいですが、今回はec2-userのホームディレクトリにします。
# cd /home/ec2-user
Word Pressパッケージをインストール
# wget https://ja.wordpress.org/latest-ja.tar.gz
インストールされたことを確認します。
# ls
latest-ja.tar.gz
拡張子がgzということは圧縮されているので、tarコマンドで展開します。
# tar -zxvf latest-ja.tar.gz
ls コマンドで展開されたことを確認します。
wordpressというディレクトリが新しくできてますね
# ls
latest-ja.tar.gz wordpress
wordpressディレクトリより下にあるディレクトリとファイルを全部ドキュメントルートに移動させます。
# mv ./wordpress/* /var/www/html/wp-test/
wp-config-sample.phpを下記のように編集
# vi wp-config-sample.php
/** WordPress のためのデータベース名 */
define( 'DB_NAME', 'wp_test_db' );

/** MySQL データベースのユーザー名 */
define( 'DB_USER', 'wp_user' );

/** MySQL データベースのパスワード */
define( 'DB_PASSWORD', '-GrrLr5A7ymN' );
ここまですればあと一息です。
パブリックIPをブラウザで検索すると下のような画面になります。
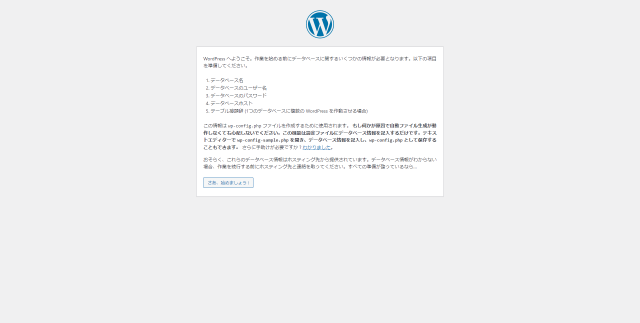
「さあ、始めましょう!」をクリックし、 wp-config-sample.phpで入力した内容を入れていきます(テーブル接頭辞はそのままで大丈夫です)
そうすると、画像のようにwp-config.phpファイルを作って中身を貼り付けろと言われるので、大人しく指示に従います。
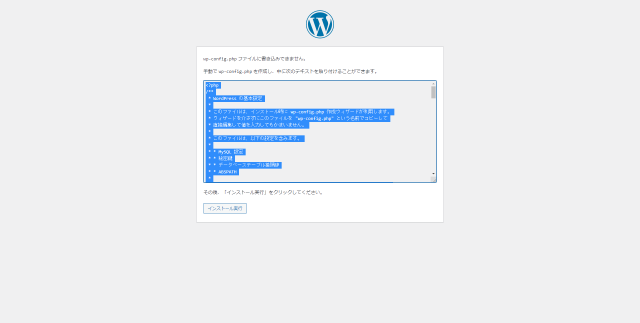
# vi /var/www/html/wp-test/wp-config.php
{コピーしたものを貼り付けてください}
ブラウザに戻り進めます。
最後にタイトルやユーザー名を決めてユーザー名、パスワードを保管して「WordPressをインストール」を押してください。
WordPressにログインして適当に投稿して反映されれば完成です!
 33
33 この記事をかいた人
About the author


