Notes on using fuelphp file upload

table of contents
Hello.
I'm Mandai, the Wild team member in charge of development.
Uploading files using FuelPHP is very easy; you can usually get it working by simply copying and pasting the code from the documentation.
However, modifying it can be a bit tricky, so I've put together this guide.
Preparing for file upload (HTML + CSS + JS)
Before implementing file upload, prepare the front-end materials such as HTML
Let's start with the HTML.
It's an input tag inside a form tag.
<form id="form" name="form" method="post" enctype="multipart/form-data"><input type="file" name="f" class="hidden" id="f" multiple="multiple"> <label for="f"><span class="btn">File selection</span> <span class="selected" id="f_selected">No selection</span></label></form>
Next, CSS
input.hidden { /* display: none;*/ } label > span.btn { display: inline-block; border: 1px solid #999; font: 13.333px arial; height: 21px; line-height: 21px; padding-left: 0.25em; padding-right: 0.25em; border-radius: 2px; background: -webkit-linear-gradient(#fcfcfc, #dcdcdc); background: linear-gradient(#fcfcfc, #dcdcdc); } label > span.btn:active { background: -webkit-linear-gradient(#dcdcdc, #fcfcfc); background: linear-gradient(#dcdcdc, #fcfcfc); } label > span.btn:hover { border: 1px solid #666; } label > span.selected { display: inline-block; font: 13.333px arial; height: 21px; line-height: 21px; } label { -moz-user-select: none; -khtml-user-select: none; -webkit-user-select: none; user-select: none; }
Finally, JavaScript
(function(){ var f = document.getElementById('f'); var label_selected = document.getElementById(f.id + '_selected'); f.addEventListener('change', function(){ if (f.files.length == 0){ label_selected.textContent = 'Not selected'; } else if (f.files.length == 1){ label_selected.textContent = f.files[0].name; } else { label_selected.textContent = f.files.length + 'Files'; } }); })();
If you view this in a browser, it will look like this. Chrome is recommended.
The reason is immediately obvious once you see it.
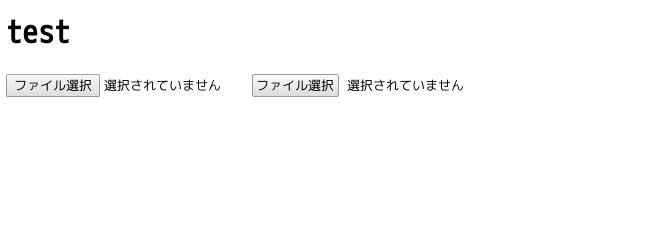
As you can see, there are two file upload buttons.
Pressing either button will perform the action.
The real thing is the one on the left, and the one on the right is a copy using a label tag. I
just wanted to do it.
Since form elements are displayed differently across browsers, and there was a request to make the file upload button itself conform to the design, these little tricks come in handy.
The behavior and appearance are roughly matched using CSS and JS, and in this case, it's made to resemble Chrome's form elements.
Adding `display: none` to an input tag using CSS will make it behave just like a normal form.
(This code is commented out.)
The important thing is not to forget the enctype attribute in the form tag
The front is now ready
Implementing fuelphp (preparation)
Before implementation, we will prepare various settings and models
FuelPHP is configuration-first, so you can significantly change its behavior with the config file.
First, when uploading, prepare a config file for uploads.
The original config file is located in "fuel/core/config/upload.php", so copy it to "fuel/app/config" and change the settings
The essential setting is the path.
While setting the save location to under "public" simplifies the download process, it's dangerous to place PDFs containing personal information under "public" because anyone with the URL could download them freely.
If you need access control, create a directory such as "files" above the "public" directory and specify it there.
In that case, there will be no way to access it from outside, and downloads will not be possible, which raises concerns about overhead, but this can be addressed by creating a separate controller that generates a download URL.
This is a bit different from file uploads, so I hope to write an article about it at another time.
This time, we will create a files directory at the same level as public (directly under the project root) and save the files there
In addition, the file name to be saved is set to a 32-character MD5 hash by setting randomize to true in the config file
The modified config/upload.php now looks like this:
return array( 'path' => '/var/www/html/test/files', 'randomize' => true, );
Next, we create a model.
Its main role is to save the hash value attached to the filename, which will make it impossible to remember the original filename.
The SQL statement to create the uploads table for saving is as follows:
CREATE TABLE `uploads` ( `id` int(11) unsigned NOT NULL AUTO_INCREMENT, `origin_name` varchar(256) NOT NULL, `file_name` varchar(256) NOT NULL, `created_at` timestamp NOT NULL DEFAULT CURRENT_TIMESTAMP ON UPDATE CURRENT_TIMESTAMP, `updated_at` timestamp NOT NULL DEFAULT '0000-00-00 00:00:00', PRIMARY KEY (`id`), KEY `idx_file_name` (`file_name`) ) ENGINE=InnoDB DEFAULT CHARSET=utf8;
After executing this SQL, the quickest way is to create a model using the following oil command:
php /path/to/oil r fromdb:model uploads
Also, since we'll be using ORM packages, we'll need to modify the `always_load` section in `config.php`.
Uncommenting the `packages` section will allow them to be loaded automatically.
fuelphp implementation (controller)
We will now implement the behavior of the controller when data is posted
The source code written in the controller is as follows:
function post_index() { $data = []; $this->template->title = 'test'; /* * After randomizing, the file name will be as follows: * [0-9a-f]{32}.[ext] * Since the original file name will be saved in a separate field, we will introduce a process before saving that will make the file name just a hash value */ Upload::register('before', function(&$file) { $file['filename'] = substr($file['filename'], 0, 32); $file['path'] .= $file['filename'][0]. '/'. $file['filename'][1]. '/'; }); if (Upload::is_valid()) { Upload::save(); foreach (Upload::get_files() as $file) { Model_Upload::add($file); } } foreach (Upload::get_errors() as $file) { // Error handling } $this->template->content = View::forge('upload/index', $data); }
If you set `auto_process` to true in `upload.php` in your config file (the default), you don't need to explicitly write `Upload::process()`.
the documentation, when `'auto_process' => true` is enabled, `Upload::process()` will be executed twice.
Since config can be overwritten with Upload::process(), if file upload processing is described in multiple places, it is preferable to set auto_process to false and run Upload::process() each time
The `Upload::register()` method is used to interrupt the process before saving the file.
The first argument is selected from 'validate', 'before', and 'after'.
In this case, since we are changing the file name and save path before saving, we selected 'before'.
If you set `randomize` to `true` in `config/upload.php`, the filename will be a 32-character hash value, but the original file extension will be retained.
To ensure that filenames are consistently 32 characters long, we've added a process to convert the filename to just the hash value.
Furthermore, regarding the storage location, a directory is created using the first and second characters of the hash value, and this is then reset as the path. This
is not particularly necessary when uploading a small number of files, but when uploading a large number of files, such as tens of thousands of files, the read/write response time will decrease significantly.
To address this, processing has been added to distribute the number of files within a single directory.
The $file argument in the Upload::register() closure is a class located in fuel/vendor/fuelphp/upload/src/File.php, and there doesn't seem to be any way to access this class from outside. However,
if you edit this class before saving, you will be able to manipulate the save path and the file.
If you dump $file, you'll see something like this:
Fuel\Upload\File::__set_state(array( 'container' => array ( 'element' => 'f', 'filename' => 'e9477391cbeefc40e69f7e1bc24868d2', 'name' => 'test.html', 'type' => 'text/html', 'tmp_name' => '/tmp/phpDsDmiL', 'error' => 0, 'size' => 335, 'extension' => 'html', 'basename' => 'test', 'mimetype' => 'text/html', 'path' => '/home/vagrant/workspace/test/files/e/9/', ), 'index' => 0, 'errors' => array ( ), 'config' => array ( 'langCallback' => '\\Upload::lang_callback', 'moveCallback' => NULL, 'max_size' => 0, 'max_length' => 0, 'ext_whitelist' => array ( ), 'ext_blacklist' => array ( ), 'type_whitelist' => array ( ), 'type_blacklist' => array ( ), 'mime_whitelist' => array ( ), 'mime_blacklist' => array ( ), 'prefix' => '', 'suffix' => '', 'extension' => '', 'randomize' => true, 'normalize' => false, 'normalize_separator' => '_', 'change_case' => false, 'path' => '/var/www/html/test/files', 'create_path' => true, 'path_chmod' => 511, 'file_chmod' => 438, 'auto_rename' => true, 'new_name' => false, 'overwrite' => false, ), 'isValidated' => true, 'isValid' => true, 'callbacks' => array ( 'before_validation' => array ( ), 'after_validation' => array ( ), 'before_save' => array ( 0 => Closure::__set_state(array( )), ), 'after_save' => array ( ), ), ))
It's a bit complicated, but the file information obtained with Upload::get_files() is not the class mentioned above, but only the container part of Fuel\Upload\File.
Also, even if you change the information in Upload::get_files(), you cannot change the actual file information, so it seems that the only way to change the information of uploaded files is through the before event.
This is explained in more detail in the documentation under the register method section
That's all
 00
00 The person who wrote this article
About the author


