Build a CI/CD pipeline using GitOps with Terraform Cloud
2020.04.27
 0
0 
table of contents
- 1 Terraform execution environment
- 2 What is Terraform Cloud?
- 3 Configuration diagram
- 4 Reviewing the implementation and workflow
- 4.1 Writing Terraform Modules (SREs)
- 4.2 Importing Modules into Terraform Cloud (SREs)
- 4.3 Create a WordSpace for PROJ B (SREs)
- 4.4 Create a repository for PRJ B and push the Terraform code (Team B)
- 4.5 Add a variable to the WorkSpace for PRJ B (Team B)
- 4.6 Change the WorkSpace settings for PRJ B (Team B)
- 4.7 Check whether GitOps is possible (Team B)
- 5 summary
- 6 Reference URL
Hi, I'm Teraoka, an infrastructure engineer.
As the title suggests, this post is about Terraform Cloud.
I'll go through it step-by-step, from an overview to practical usage.
Terraform execution environment
What environment do you use when running Terraform? The most basic is probably your local environment. This is the pattern where you download the binary from the download page ( *1 ) and run `terraform apply` directly from your local machine. This is fine when you're testing alone, but when you're actually building a system, it's almost always handled by multiple people. In this case, if each person is running it in their own local environment, the following problems arise:
Problem
- Forgetting to push to Git may result in differences in each individual's local code
- Unable to share tfstate files
- There is no mechanism for reviewing the written code
- Anyone can apply freely
- Access keys to cloud platforms must be managed locally
These problems can be solved by using Terraform Cloud
What is Terraform Cloud?
The following is a quote from the official Terraform website ( *2 )
Terraform Cloud is an application that helps teams use Terraform together. It manages Terraform runs in a consistent and reliable environment, and includes easy access to shared state and secret data, access controls for approving changes to infrastructure, a private registry for sharing Terraform modules, detailed policy controls for governing the contents of Terraform configurations, and more.
In summary, Terraform Cloud is an application that helps teams use Terraform together, and
it is a SaaS that provides the necessary features when using Terraform as a team, such as the following:
Key Features
- Consistent and reliable Terraform execution environment
- Sharing secrets such as state files (tfstate) and access keys
- Access control for approving changes to infrastructure
- A private repository for sharing Terraform modules
- Policy controls for managing Terraform configurations
Terraform Cloud is basically free to use, but some features require a paid plan. Determine which features your team needs and choose the appropriate plan. The features and pricing for each plan are summarized on the Terraform pricing page ( *3 )
Note that all of the Terraform Cloud usage methods described below can be set up using the free tier, so
it's best to start with the free tier and then switch to a paid plan later if you need more features.
Configuration diagram
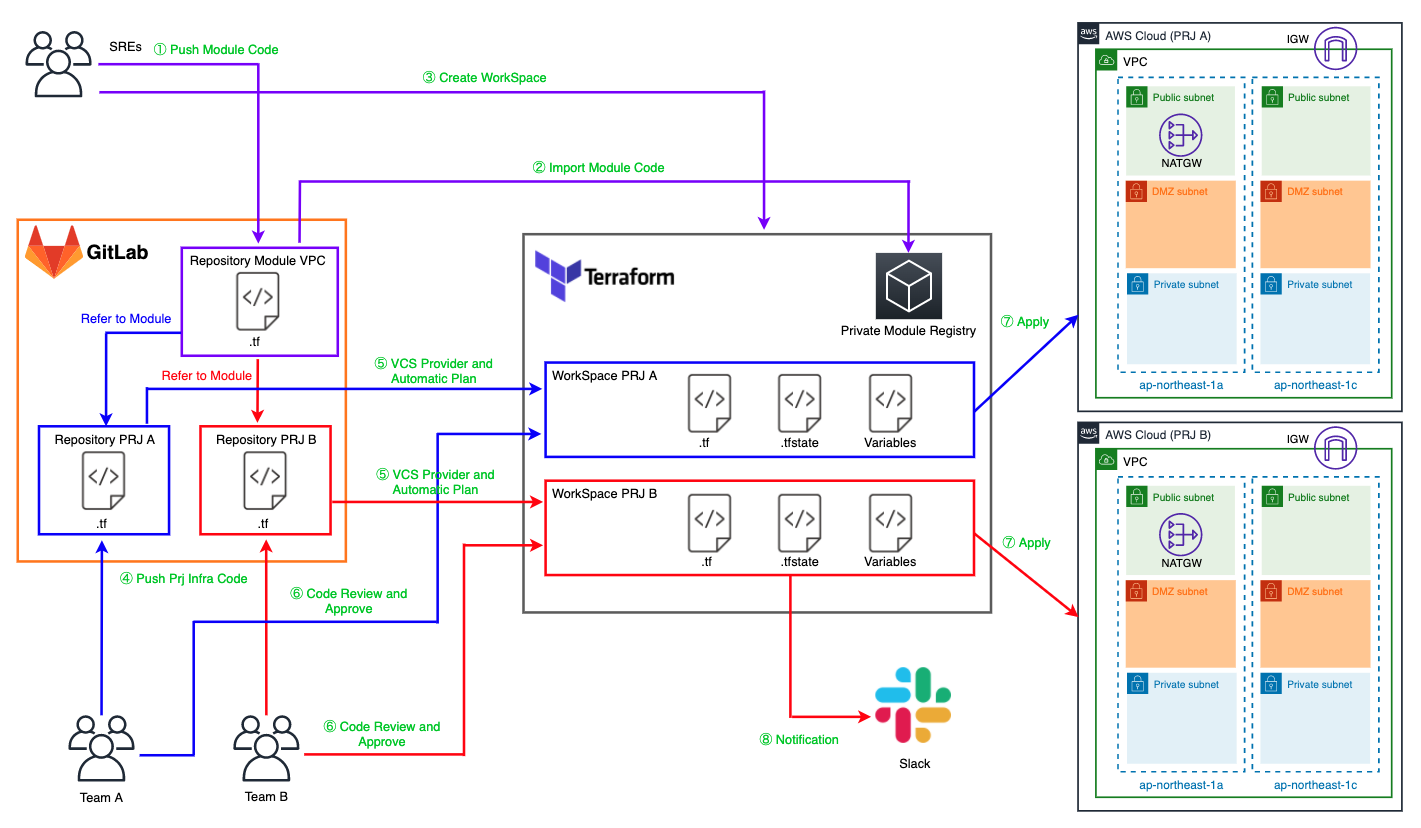
Summarize the characters and workflow on the diagram
Characters
Team A
This team consists of members involved in the development of the system used in Project A (hereinafter referred to as "PRJ A").
They will build the system in the AWS account for PRJ A, utilizing the Terraform modules written by the SREs described below.
Team B
This team consists of members involved in the development of the system to be used in Project B (hereinafter referred to as "PRJ B"). The system
will be built on PRJ B's AWS account using Terraform modules written by the SREs described below.
SREs
This team, which includes Site Reliability Engineers (SREs), is dedicated to assisting other teams with their system development.
It could also be called a Platform Team. This
team writes the Terraform modules used by Teams A and B in their projects.
They also manage the settings for Terraform Cloud itself, including Workspaces, which will be discussed later.
GitLab
This manages the Terraform code written by Team A, Team B, and SREs.
In Terraform Cloud, this source code management service is called a VCS Provider.
This time, we are using GitLab Community Edition.
Of course, Enterprise Edition and GitHub are also supported. (*4)
Repository Module VPC
This is a repository for managing Terraform modules used by SREs to build AWS VPCs.
In Terraform Cloud, repositories within a VCS Provider are called VCS Repositories.
Repository PRJ A
This is a repository for managing the Terraform code written by Team A for Project A.
Its overview is similar to that of a Repository Module VPC.
Repository PRJ B
This is a repository for managing the Terraform code written by Team A for Project B.
Its overview is similar to that of a Repository Module VPC.
WorkSpace PRJ A
This is a workspace for PRJ A in Terraform Cloud.
A WorkSpace is a logical group used to divide configurations written in Terraform code
into meaningful units, such as by PRJ or by service. (*5)
WorkSpace PRJ B
This is a workspace for Project B in Terraform Cloud.
The overview is the same as for WorkSpace Project A.
Private Module Registry
This is a private repository that provides almost the same functionality as Terraform Registry ( *6 ). Terraform modules written by SREs are managed here.
AWS Cloud (PRJ A)
This is the AWS account for Project A.
Team A will be building on this account.
AWS Cloud (PRJ B)
This is the AWS account for Project B.
Team B will be building on this account.
Workflow
The person or tool performing the task is listed in parentheses
1. Push Module Code (SREs)
SREs write Terraform modules locally and push them to Git.
Moduleizing the code allows for a proper division of work between SREs and the team.
2. Import Module Code (SREs)
Import the module you pushed to Terraform Cloud's Private Module Registry
3. Create WorkSpace (SREs)
Create a Terraform Cloud WorkSpace for each team to use
4. Push Prj Infra Code(Team A or Team B)
Each team uses modules written by SREs and pushes the Terraform code they write to Git
5. VCS Provider and Automatic Plan(Terraform Cloud)
Terraform Cloud detects Git push events and automatically runs `terraform plan` on the pushed code.
This mechanism allows you to benefit from GitOps, which automates the CI/CD flow starting with changes to Git.
6. Code Review and Approve(Team A or Team B)
Once the terraform plan is complete, Terraform Cloud will enter a state of waiting to apply.
Before applying the settings, review the plan results and
approve the apply if the changes are as intended.
7. Apply (Terraform Cloud)
The changes are actually applied to the target environment
8. Notification(Terraform Cloud)
When Terraform Cloud performs some action, it notifies you via Slack etc
Reviewing the implementation and workflow
This time, we'll examine the process from SREs pushing a Terraform module to Team B creating a VPC in Project B's AWS account. As a prerequisite, we'll assume you've already created a Terraform Cloud account and organization. Please prepare in advance by going to the sign-up page ( *7 )
Writing Terraform Modules (SREs)
This time, we will write a module for building a VPC.
The directory hierarchy will be as follows:
$ tree . ├── README.md ├── examples │ └── vpc │ ├── main.tf │ ├── outputs.tf │ ├── provider.tf │ ├── terraform.tfstate │ ├── terraform.tfstate.backup │ ├── terraform.tfvars │ └── variables.tf ├── main.tf ├── outputs.tf └── variables.tf 2 directories, 11 files
The three files at the root of the directory constitute the module itself.
Since this will be loaded by the code written by Team A or Team B, it's helpful
to include an overview and specifications of the module in README.md and
leave specific usage examples as code under examples to make it easier for others to use later.
In main.tf, write the resource that creates the VPC
main.tf
resource "aws_vpc" "vpc" { cidr_block = var.vpc_config.cidr_block enable_dns_support = var.vpc_config.enable_dns_support enable_dns_hostnames = var.vpc_config.enable_dns_hostnames tags = { Name = var.vpc_config.name } } resource "aws_subnet" "public" { for_each = var.public_subnet_config.subnets vpc_id = aws_vpc.vpc.id availability_zone = each.key cidr_block = each.value map_public_ip_on_launch = true tags = { Name = "${var.public_subnet_config.name}-${substr(each.key, -2, 0)}" } } resource "aws_subnet" "dmz" { for_each = var.dmz_subnet_config.subnets vpc_id = aws_vpc.vpc.id availability_zone = each.key cidr_block = each.value map_public_ip_on_launch = false tags = { Name = "${var.dmz_subnet_config.name}-${substr(each.key, -2, 0)}" } } resource "aws_subnet" "private" { for_each = var.private_subnet_config.subnets vpc_id = aws_vpc.vpc.id availability_zone = each.key cidr_block = each.value map_public_ip_on_launch = false tags = { Name = "${var.private_subnet_config.name}-${substr(each.key, -2, 0)}" } } resource "aws_route_table" "public" { count = var.public_subnet_config.route_table_name != "" ? 1 : 0 vpc_id = aws_vpc.vpc.id tags = { Name = var.public_subnet_config.route_table_name } } resource "aws_route_table" "dmz" { count = var.dmz_subnet_config.route_table_name != "" ? 1 : 0 vpc_id = aws_vpc.vpc.id tags = { Name = var.dmz_subnet_config.route_table_name } } resource "aws_route_table" "private" { count = var.private_subnet_config.route_table_name != "" ? 1 : 0 vpc_id = aws_vpc.vpc.id tags = { Name = var.private_subnet_config.route_table_name } } resource "aws_internet_gateway" "igw" { count = var.public_subnet_config.internet_gateway_name != "" ? 1 : 0 vpc_id = aws_vpc.vpc.id tags = { Name = var.public_subnet_config.internet_gateway_name } } resource "aws_route" "public" { count = var.public_subnet_config.route_table_name != "" ? 1 : 0 route_table_id = aws_route_table.public[0].id destination_cidr_block = "0.0.0.0/0" gateway_id = aws_internet_gateway.igw[0].id depends_on = [aws_route_table.public] } resource "aws_route" "dmz" { count = var.dmz_subnet_config.route_table_name != "" ? 1 : 0 destination_cidr_block = "0.0.0.0/0" route_table_id = aws_route_table.dmz[0].id nat_gateway_id = aws_nat_gateway.natgw[0].id depends_on = [aws_route_table.dmz] } resource "aws_route_table_association" "public" { for_each = aws_subnet.public subnet_id = each.value.id route_table_id = aws_route_table.public[0].id } resource "aws_route_table_association" "dmz" { for_each = aws_subnet.dmz subnet_id = each.value.id route_table_id = aws_route_table.dmz[0].id } resource "aws_route_table_association" "private" { for_each = aws_subnet.private subnet_id = each.value.id route_table_id = aws_route_table.private[0].id } resource "aws_eip" "natgw" { count = var.dmz_subnet_config.route_table_name != "" ? 1 : 0 vpc = true tags = { Name = var.dmz_subnet_config.nat_gateway_name } } resource "aws_nat_gateway" "natgw" { count = var.dmz_subnet_config.route_table_name != "" ? 1 : 0 allocation_id = aws_eip.natgw[0].id subnet_id = aws_subnet.public[keys(aws_subnet.public)[0]].id tags = { Name = var.dmz_subnet_config.nat_gateway_name } depends_on = [aws_internet_gateway.igw] }
In outputs.tf, write the Output that outputs information about the Resource created in the Module
outputs.tf
output "vpc" { value = aws_vpc.vpc } output "public_subnet" { value = aws_subnet.public } output "dmz_subnet" { value = aws_subnet.dmz } output "private_subnet" { value = aws_subnet.private }
The `variables.tf` file describes the structure of the variables that a Module will receive.
Always include a description and a default value for each variable.
The reason for this will be explained later.
variables.tf
variable "vpc_config" { description = "VPC Config" type = object({ name = string cidr_block = string enable_dns_support = bool enable_dns_hostnames = bool }) default = { name = "" cidr_block = "" enable_dns_support = false enable_dns_hostnames = false } } variable "public_subnet_config" { description = "Subnet Config for Public" type = object({ name = string route_table_name = string internet_gateway_name = string subnets = map(string) }) default = { name = "" route_table_name = "" internet_gateway_name = "" subnets = {} } } variable "dmz_subnet_config" { description = "Subnet Config for DMZ" type = object({ name = string route_table_name = string nat_gateway_name = string subnets = map(string) }) default = { name = "" route_table_name = "" nat_gateway_name = "" subnets = {} } } variable "private_subnet_config" { description = "Subnet Config for Private" type = object({ name = string route_table_name = string subnets = map(string) }) default = { name = "" route_table_name = "" subnets = {} } }
The following section provides concrete usage examples in code form.
This covers how modules are loaded and how variables are passed.
AWS access keys, for example, should be loaded from environment variables rather than from `terraform.tfvars`.
examples/provider.tf
provider "aws" { access_key = var.access_key secret_key = var.secret_key region = var.region assume_role { role_arn = var.role_arn } }
examples/variables.tf
variable "project" { description = "Project Name" } variable "environment" { description = "Environment" } variable "access_key" { description = "AWS Access Key" } variable "secret_key" { description = "AWS Secret Key" } variable "role_arn" { description = "AWS Role ARN for Assume Role" } variable "region" { description = "AWS Region" }
examples/terraform.tfvars
########################## # Project ########################### project = "terraform-vpc-module" environment = "local" region = "ap-northeast-1"
examples/main.tf
module "vpc" { source = "../../" vpc_config = { name = "vpc-${var.project}-${var.environment}" cidr_block = "10.0.0.0/16" enable_dns_support = true enable_dns_hostnames = true } public_subnet_config = { name = "subnet-${var.project}-${var.environment}-public" route_table_name = "route-${var.project}-${var.environment}-public" internet_gateway_name = "igw-${var.project}-${var.environment}" subnets = { ap-northeast-1a = "10.0.10.0/24" ap-northeast-1c = "10.0.11.0/24" ap-northeast-1d = "10.0.12.0/24" } } dmz_subnet_config = { name = "subnet-${var.project}-${var.environment}-dmz" route_table_name = "route-${var.project}-${var.environment}-dmz" nat_gateway_name = "nat-${var.project}-${var.environment}" subnets = { ap-northeast-1a = "10.0.20.0/24" ap-northeast-1c = "10.0.21.0/24" ap-northeast-1d = "10.0.22.0/24" } } private_subnet_config = { name = "subnet-${var.project}-${var.environment}-private" route_table_name = "route-${var.project}-${var.environment}-private" subnets = { ap-northeast-1a = "10.0.30.0/24" ap-northeast-1c = "10.0.31.0/24" ap-northeast-1d = "10.0.32.0/24" } } }
examples/outputs.tf
output "vpc_id" { value = module.vpc.vpc.id }
Once you've written this much, create a repository in GitLab and push to the Master branch.
For this example, we've already created a repository named "Terraform AWS Module VPC".
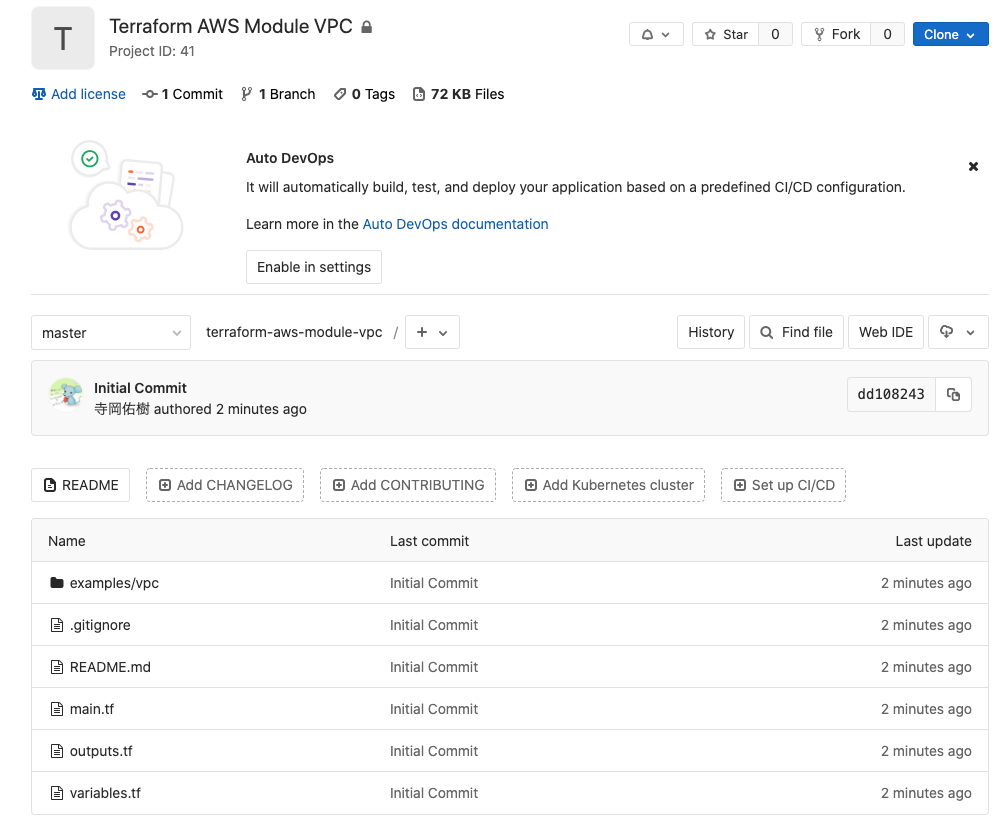
Tags are assigned to Git commits.
Terraform Cloud can then use these tags to version control modules.
$ git tag v1.0.0 $ git push origin v1.0.0
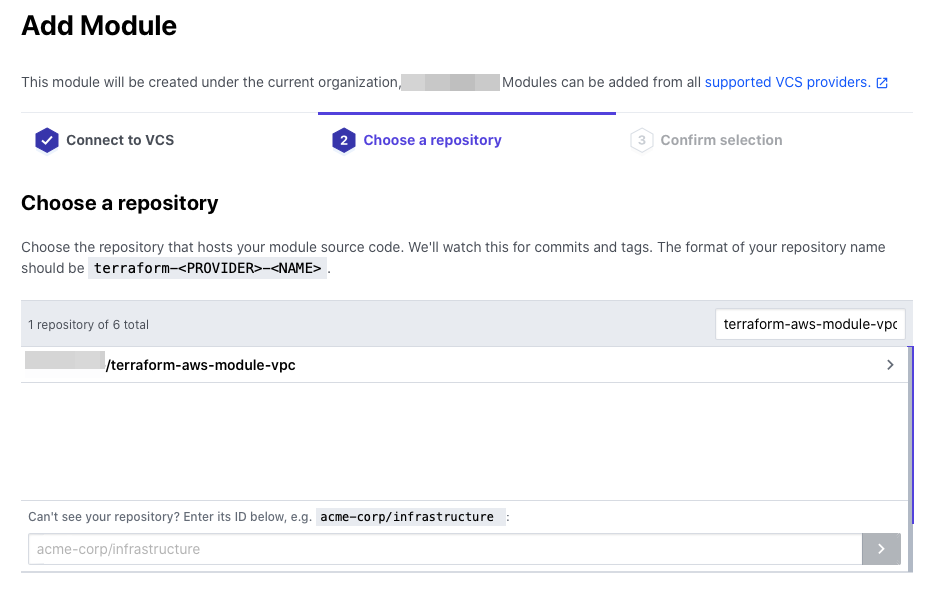
Importing Modules into Terraform Cloud (SREs)
To import a module from GitLab,
you need to add a VCS provider setting to Terraform Cloud.
This time we will be using GitLab, so let's proceed while referring to the setup procedure for GitLab ( *8 ). If you are using a different VCS provider, there is a procedure as well, so please refer to the one applicable to your situation ( *9 ) . After that, it should be added to the Settings > VCS Providers section in the Terraform Cloud console. You can add it by going to Settings > Modules > Add module in the Terraform Cloud console.
The VCS provider you just added will be displayed, so select it

Once selected, the VCS Repository will be displayed, so select the repository where you pushed the module earlier
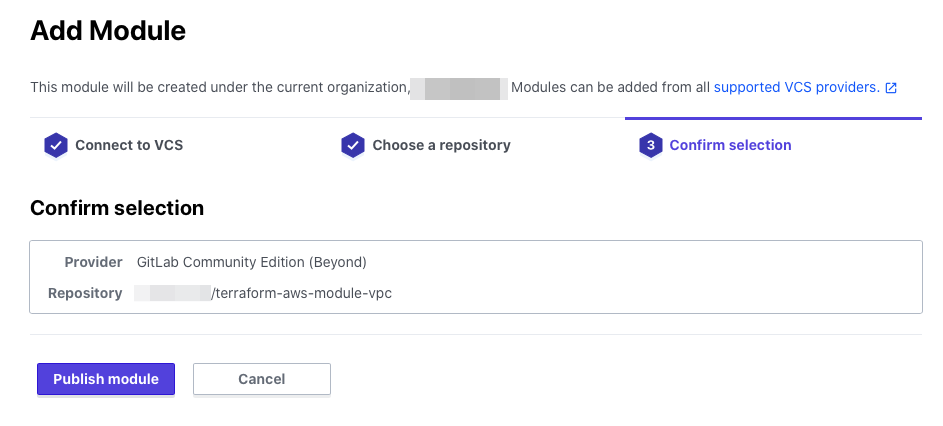
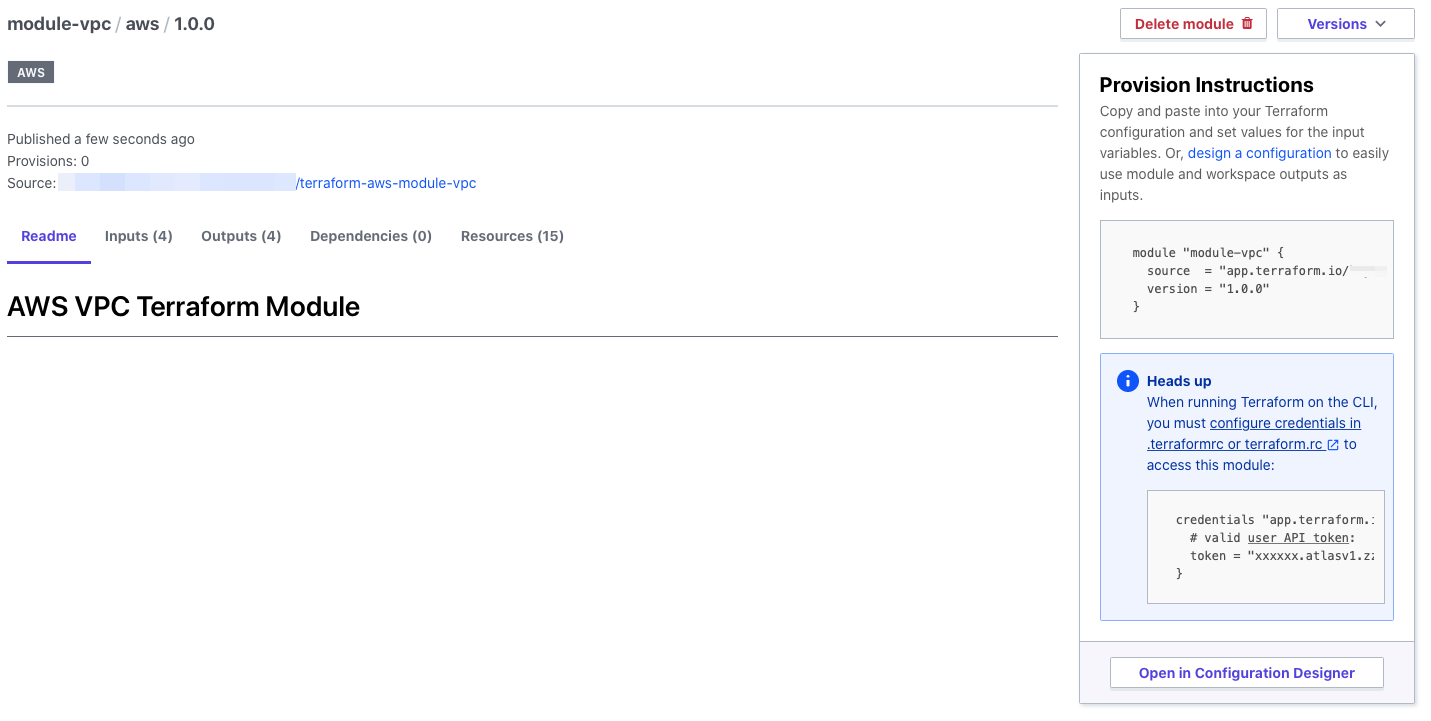
On the confirmation screen, click Publish module
Once publishing is complete, you will see that the Module's README.md and the version tagged in Git have been loaded
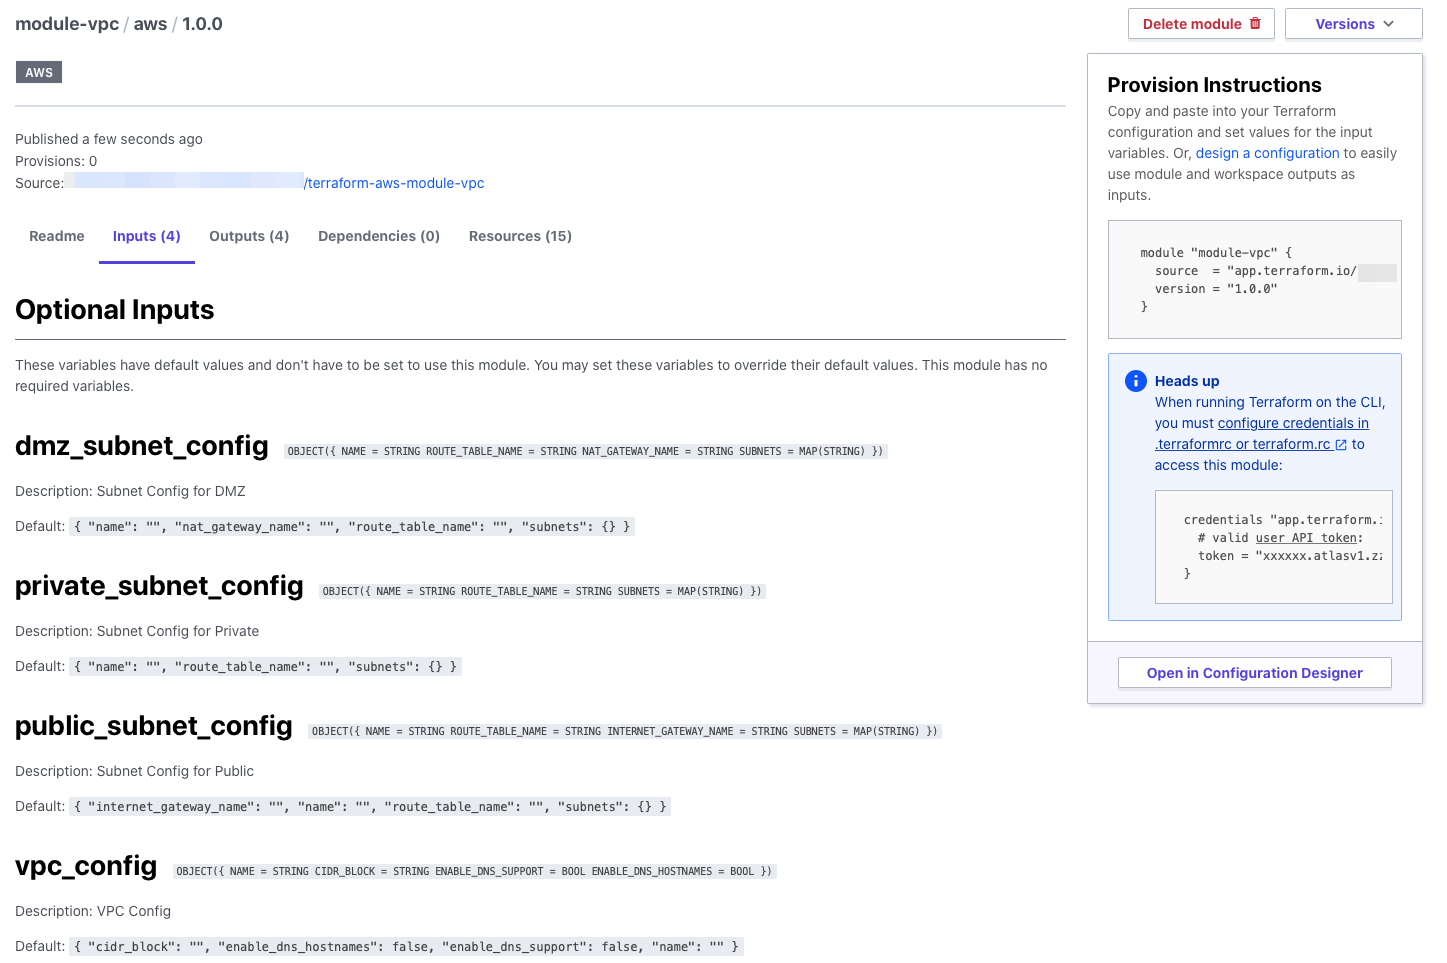
You can also see a list of variables that need to be passed to the module.
If you include a description and a default value when defining a variable,
you can check the details on this screen, which is very convenient.
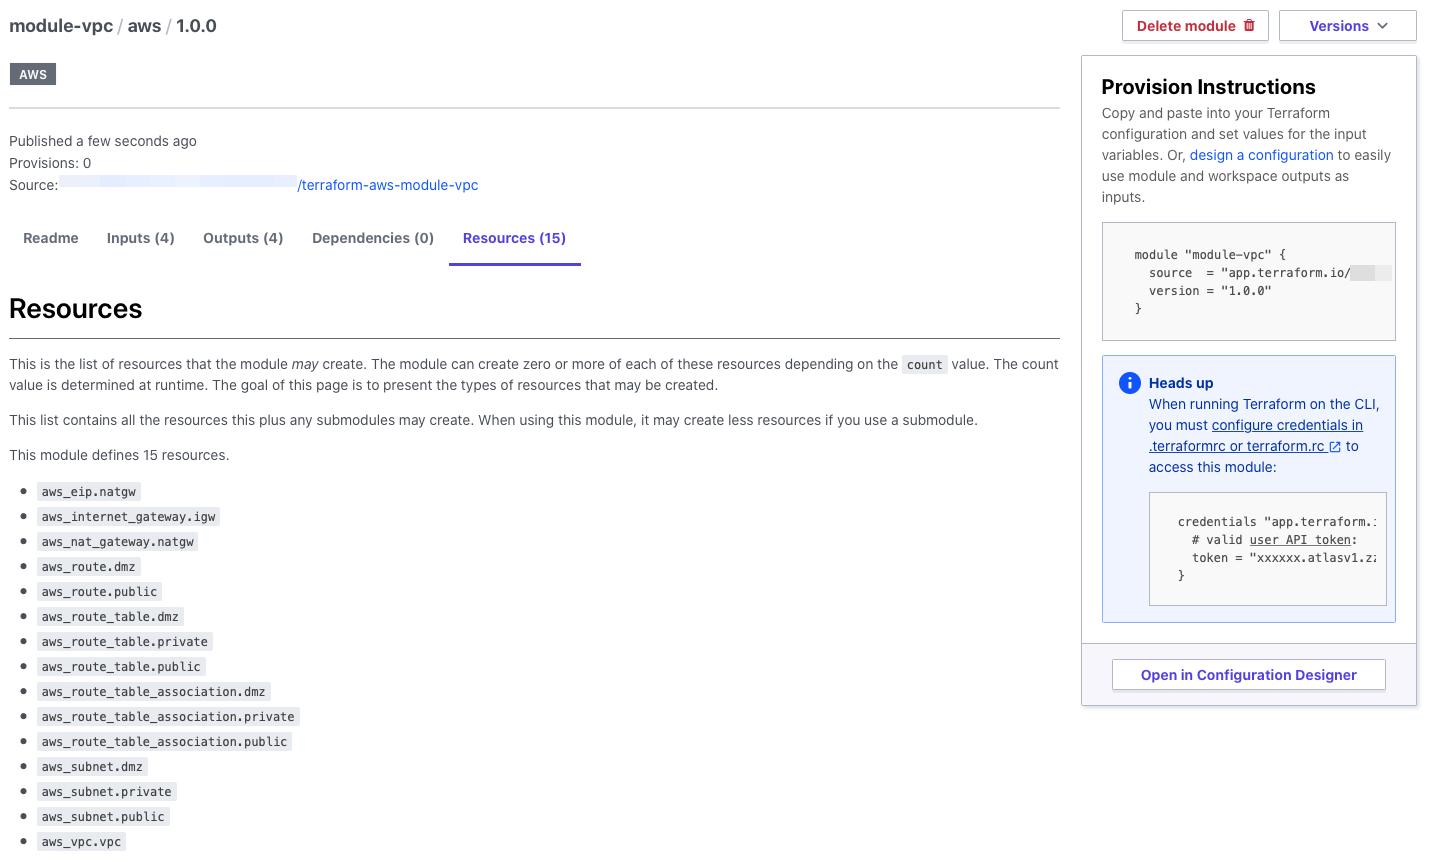
When you run it, you can also see a list of the resources that will be created, which is great
Create a WordSpace for PROJ B (SREs)
Create a Terraform Cloud WordSpace and pass it to Team B.
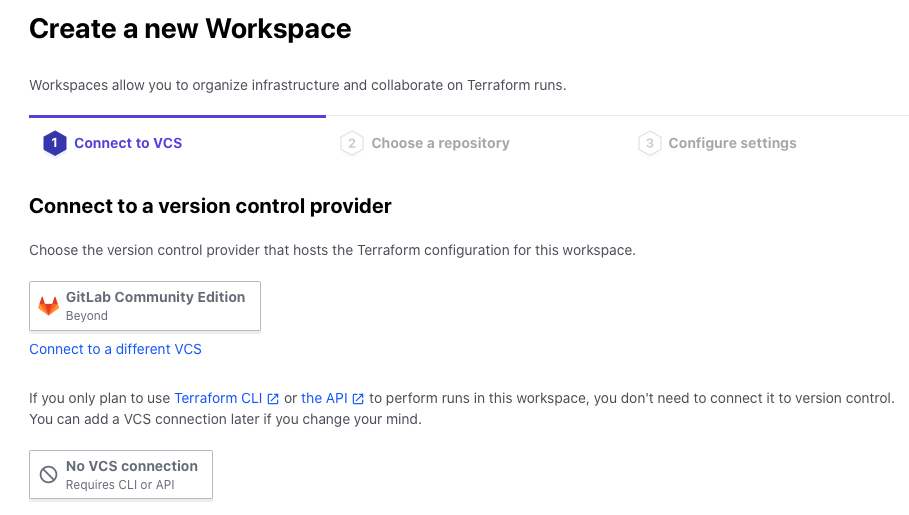
You can create it from the Terraform Cloud console under Wordspaces > New workspace.
Since I want to create only the WorkSpace first and add settings later, I select No VCS connection
Enter a name for your workspace and click Create workspace.
You can use any name format you like, but using something like team-name_prj-name_environment will make it easier to manage.
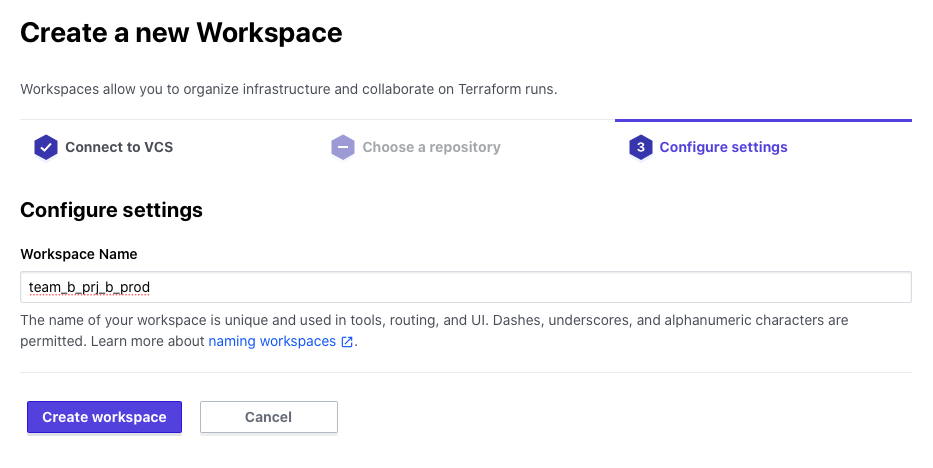
Once created, it will appear in the list like this

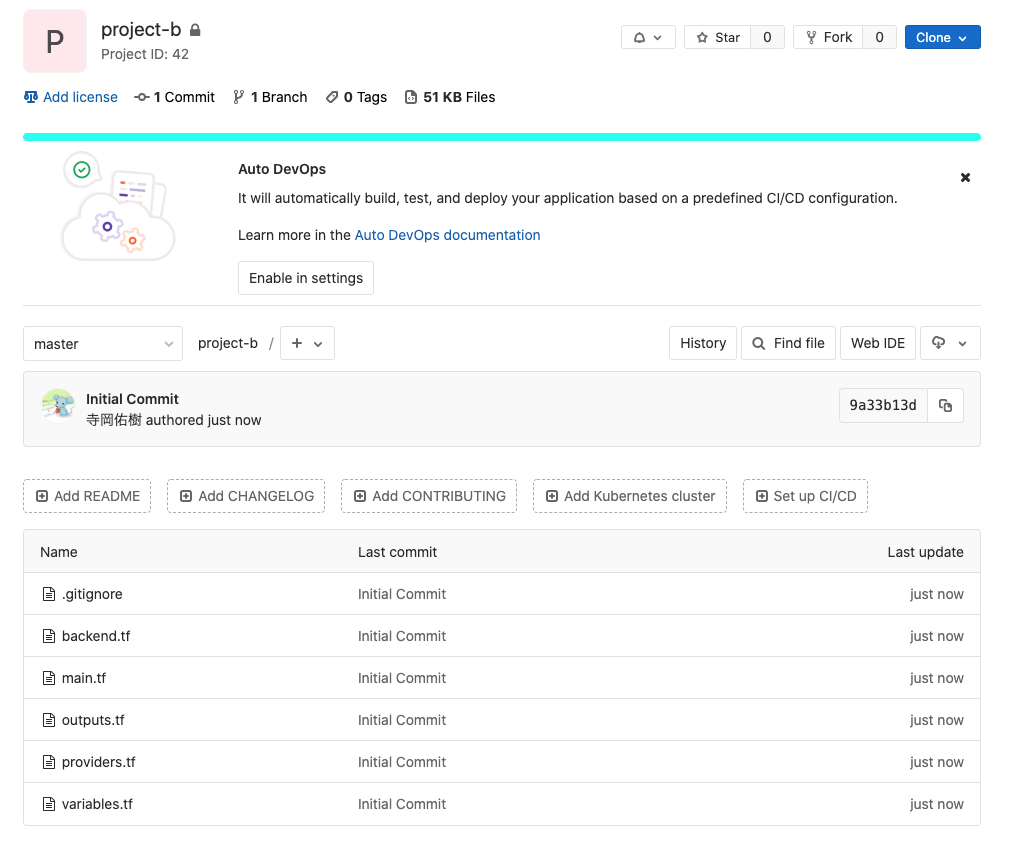
Create a repository for PRJ B and push the Terraform code (Team B)
We will write Terraform code for PRJ B.
Team B will use modules that have already been written by the SREs.
Directory Structure
$ tree . ├── backend.tf ├── main.tf ├── outputs.tf ├── providers.tf └── variables.tf 0 directories, 5 files
First, the important file here is backend.tf.
In this case, the state file (tfstate) after running Terraform will be managed on Terraform Cloud, so
we specify the WorkSpace created in remote backend.
backend.tf
terraform { backend "remote" { hostname = "app.terraform.io" organization = "Org-Name" workspaces { prefix = "team_b_prj_b_prod" } } }
provider.tf
provider "aws" { access_key = var.access_key secret_key = var.secret_key region = var.region assume_role { role_arn = var.aws_role_arn } }
Let's define the variable.
When storing values in a variable, you can either use `terraform.tfvars` or environment variables, but
this time we will manage the values themselves on Terraform Cloud, so we will not prepare either locally.
variables.tf
##################### # Project ##################### variable "project" { description = "Project Name" } variable "environment" { description = "Environment" } #################### # AWS Common #################### variable "access_key" { description = "AWS Access Key" } variable "secret_key" { description = "AWS Secret Key" } variable "role_arn" { description = "AWS Role ARN for Assume Role" } variable "region" { description = "AWS Region" }
In main.tf, specify the module imported into the Private Module Registry in source
main.tf
module "vpc" { source = "app.terraform.io/Org-Name/module-vpc/aws" version = "1.0.0" vpc_config = { name = "vpc-${var.project}-${var.environment}" cidr_block = "10.0.0.0/16" enable_dns_support = true enable_dns_hostnames = true } public_subnet_config = { name = "subnet-${var.project}-${var.environment}-public" route_table_name = "route-${var.project}-${var.environment}-public" internet_gateway_name = "igw-${var.project}-${var.environment}" subnets = { ap-northeast-1a = "10.0.10.0/24" ap-northeast-1c = "10.0.11.0/24" ap-northeast-1d = "10.0.12.0/24" } } dmz_subnet_config = { name = "subnet-${var.project}-${var.environment}-dmz" route_table_name = "route-${var.project}-${var.environment}-dmz" nat_gateway_name = "nat-${var.project}-${var.environment}" subnets = { ap-northeast-1a = "10.0.20.0/24" ap-northeast-1c = "10.0.21.0/24" ap-northeast-1d = "10.0.22.0/24" } } private_subnet_config = { name = "subnet-${var.project}-${var.environment}-private" route_table_name = "route-${var.project}-${var.environment}-private" subnets = { ap-northeast-1a = "10.0.30.0/24" ap-northeast-1c = "10.0.31.0/24" ap-northeast-1d = "10.0.32.0/24" } } }
outputs.tf
output "vpc_id" { value = module.vpc.vpc.id }
Once you've written this, push it to Git
Add a variable to the WorkSpace for PRJ B (Team B)
When you select a WorkSpace you created from the list, you will see an item called Variables
where you can manage the values of the variables used in the WorkSpace.
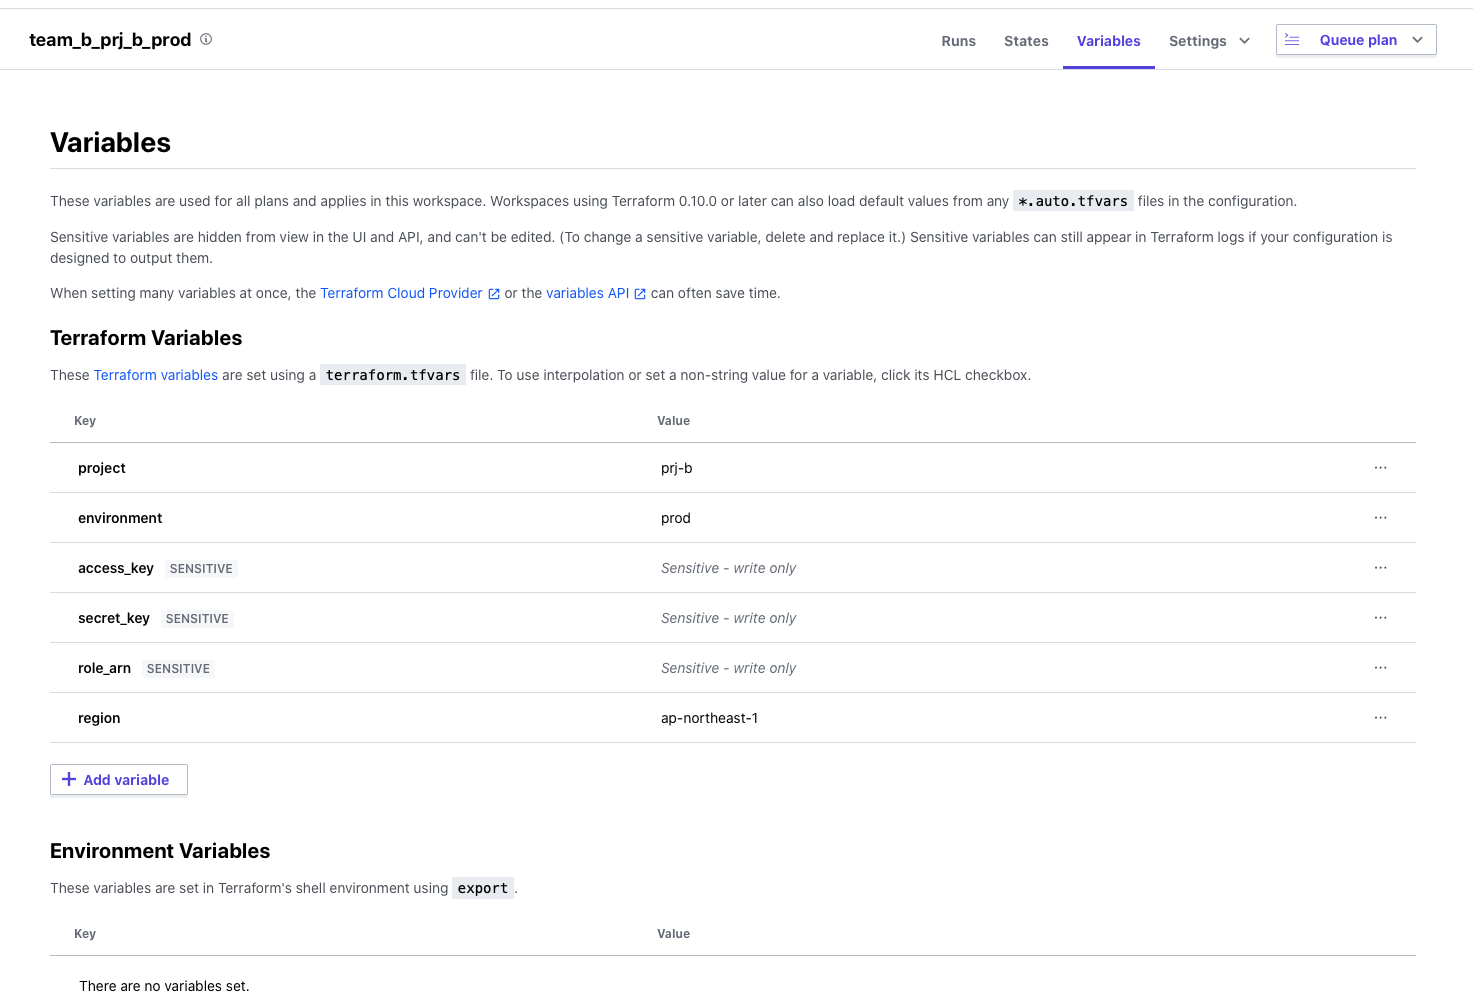
A distinctive feature is that sensitive information, such as AWS access keys, is stored as a Sensitive Value.
This way, you can edit the value, but it won't be displayed on the screen or in API results,
making it very convenient when adding values that you want to keep hidden.
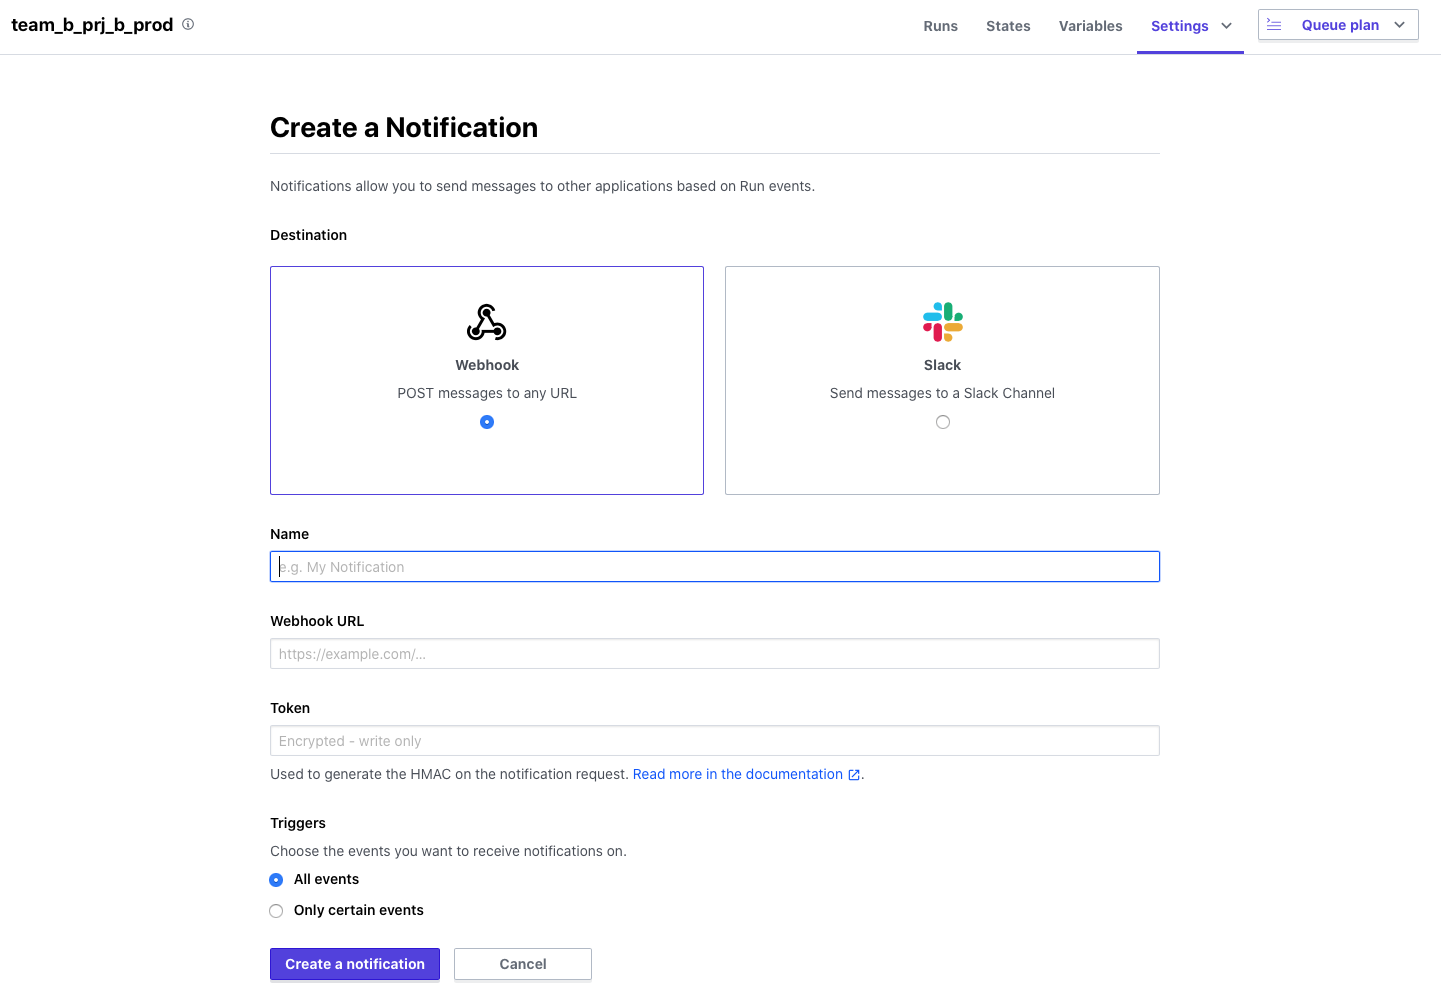
Change the WorkSpace settings for PRJ B (Team B)
Change the following two settings from WorkSpace Settings
Add the settings for the Slack channel you want to send notifications to in the Notifications settings
We will add the settings by referring to the Terraform Cloud procedure ( *8 ). Since we will be using Webhooks, make sure to configure them on the Slack side beforehand.
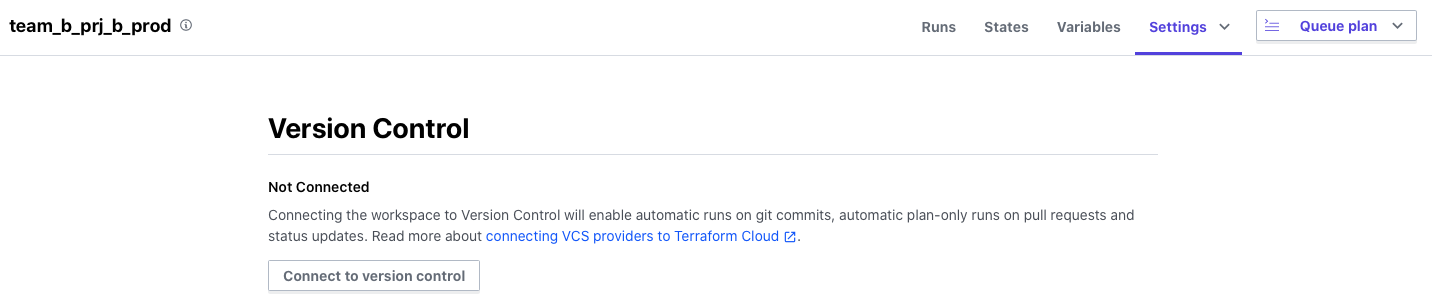
Adding Version Control Settings
Register the repository for PRJ B as a VCS Repository to be read in WorkSpace
From your WorkSpace, go to Settings > Version Control
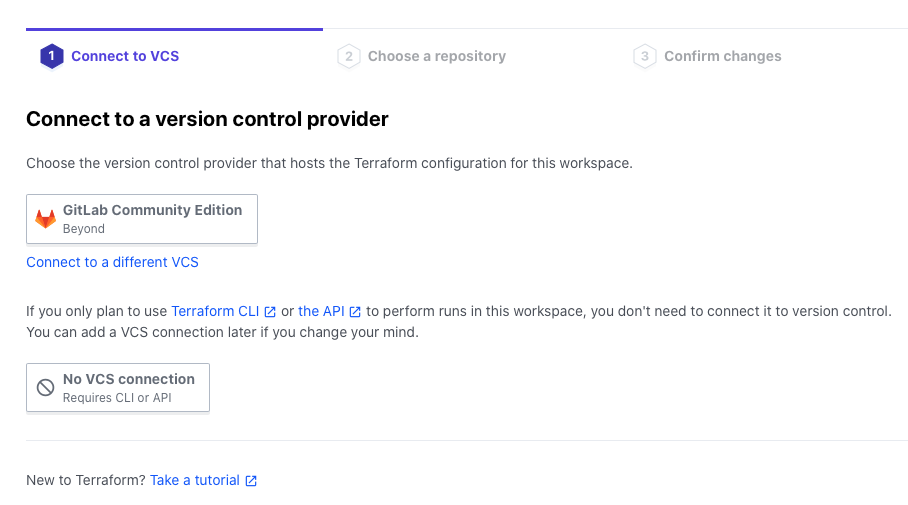
Select the VCS Provider you have registered in advance
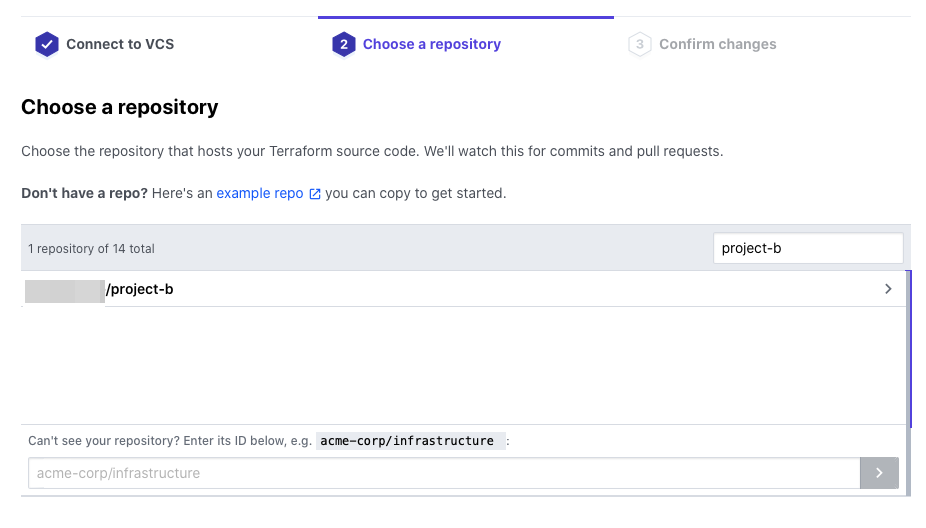
Select the appropriate repository
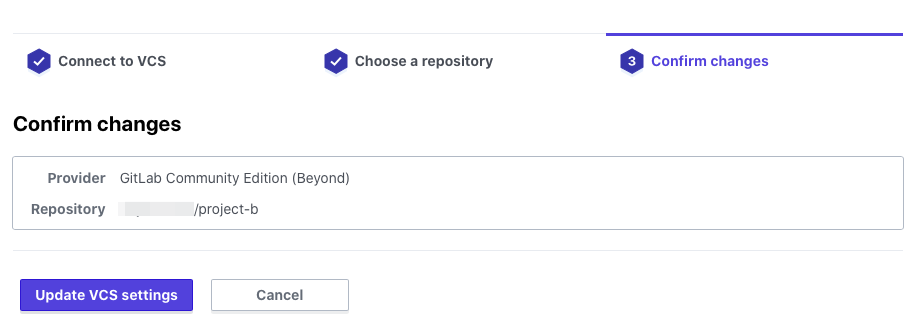
Click Update VCS settings
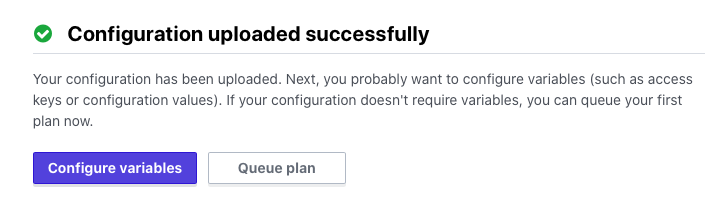
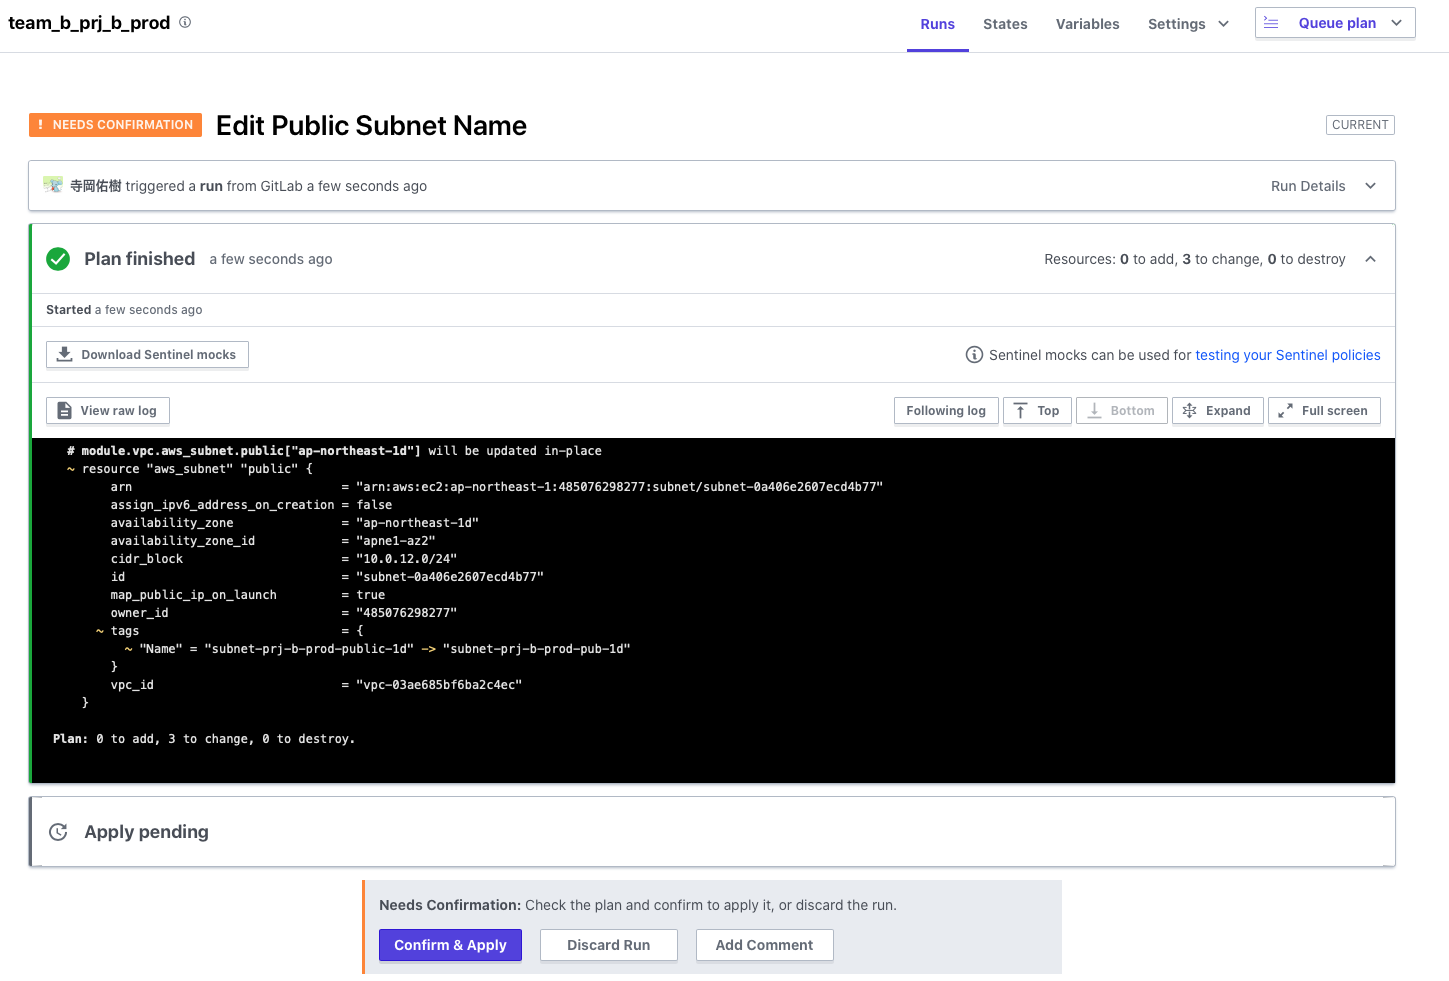
After a short while, the Terraform code will finish loading from the repository.
Since the variables have already been set, let's click Queue plan.
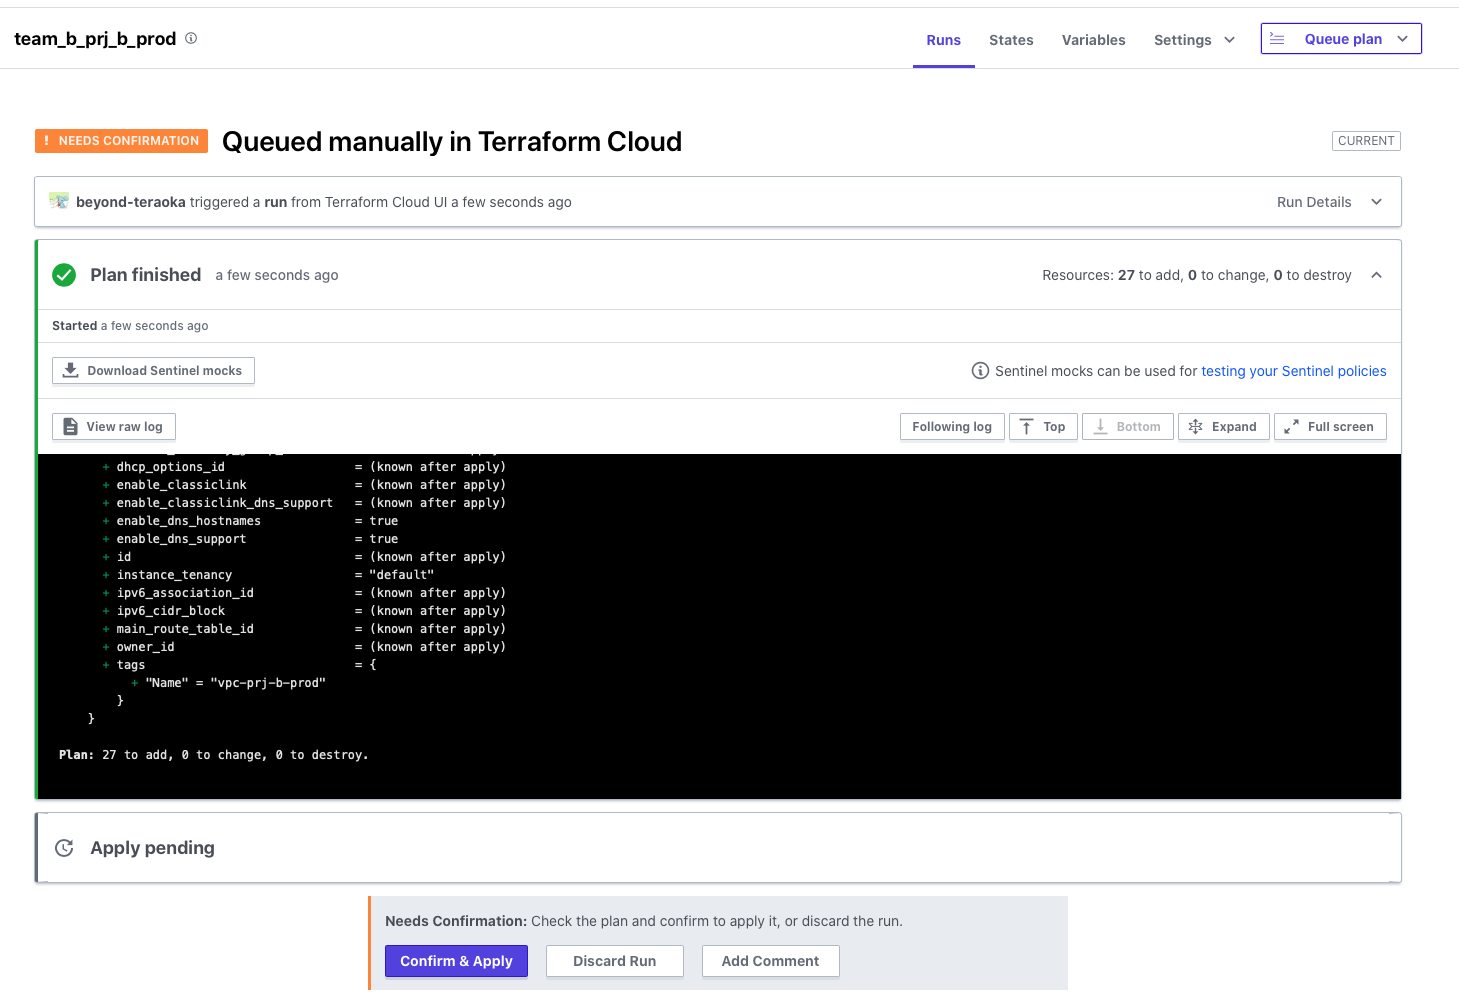
The `terraform plan` command is executed manually on Terraform Cloud.
Once the plan is complete, `Apply` will not be executed immediately; instead, it will stop in a pending approval state as shown below.
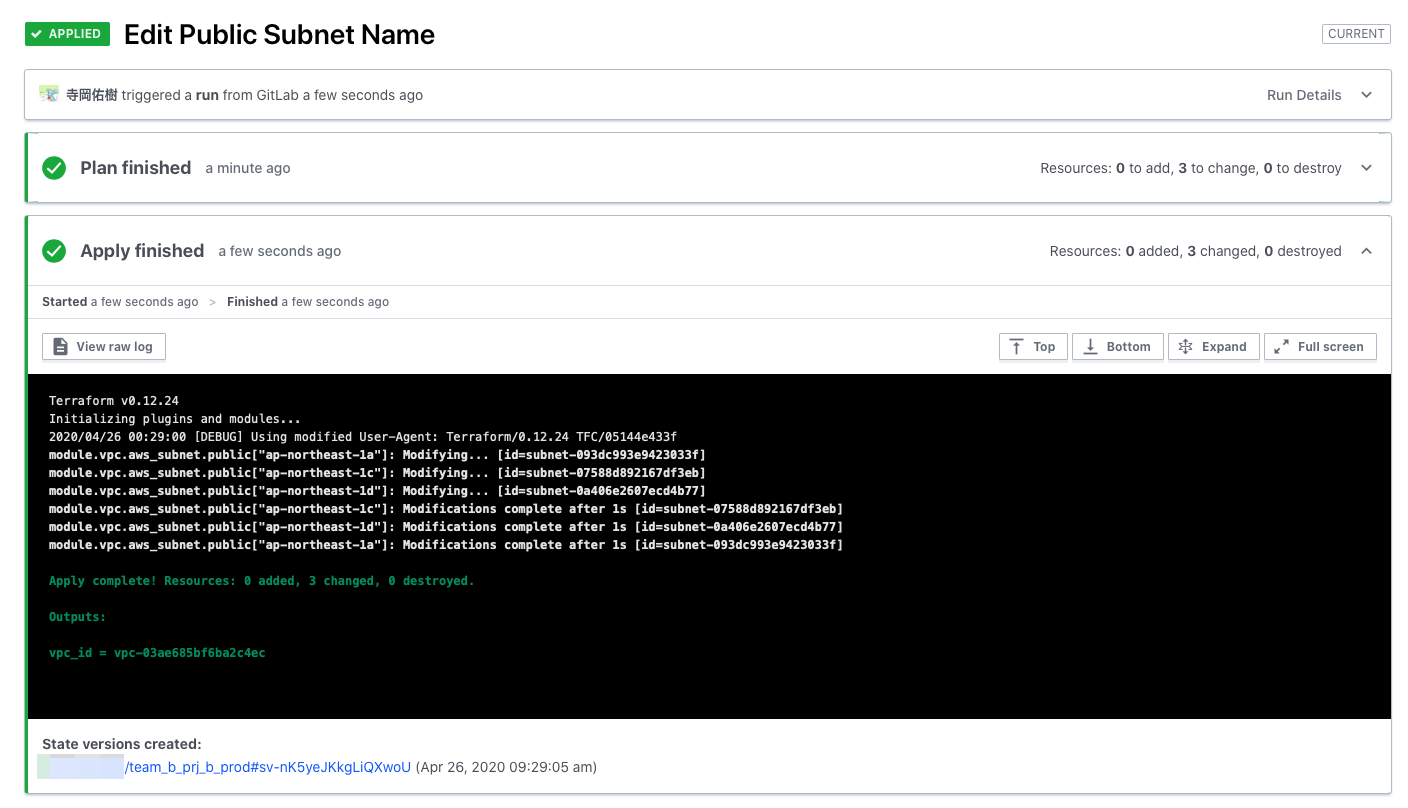
To execute `Apply`, you need to check the plan results and approve it via `Confirm & Apply`.
Once you approve, Apply will be executed as shown below and the settings will be reflected in the target environment
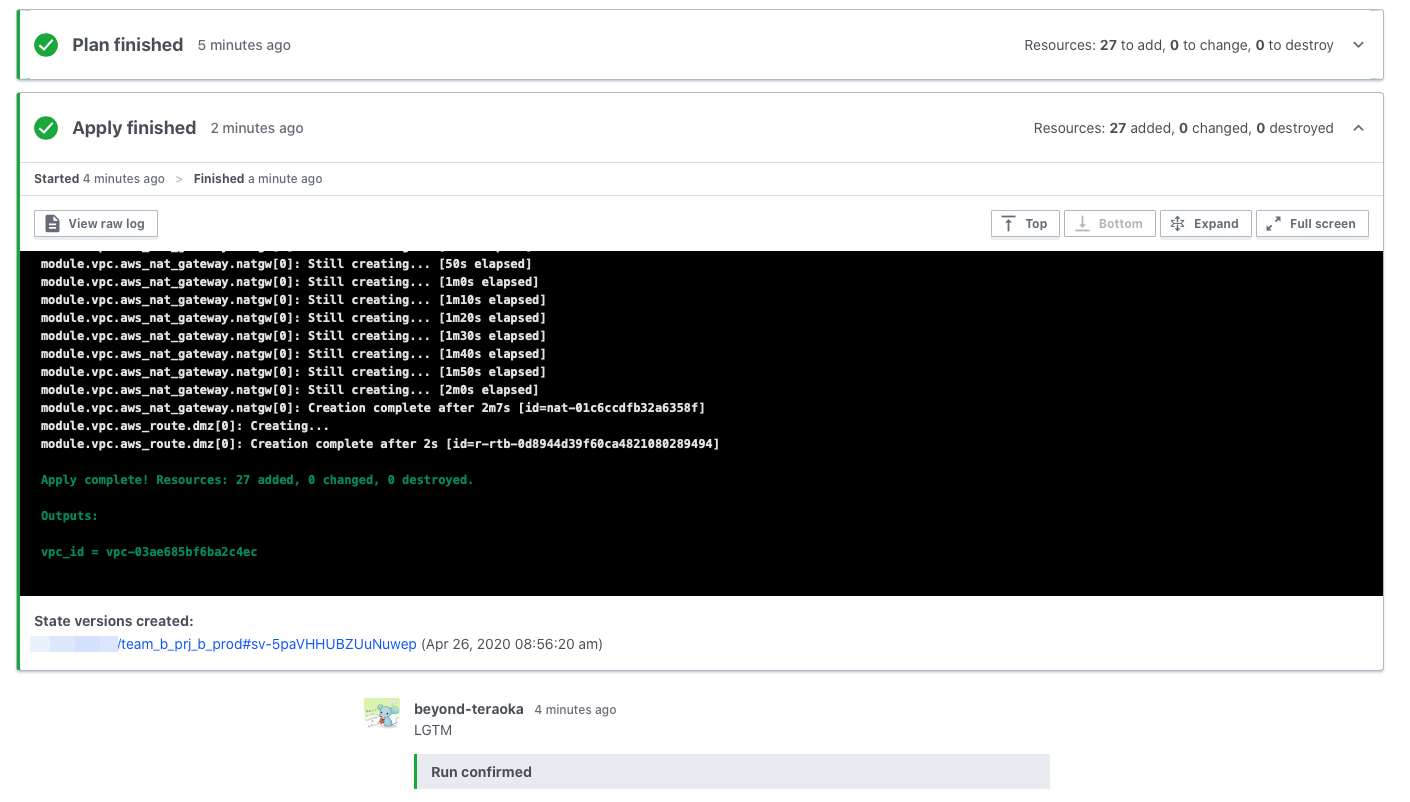
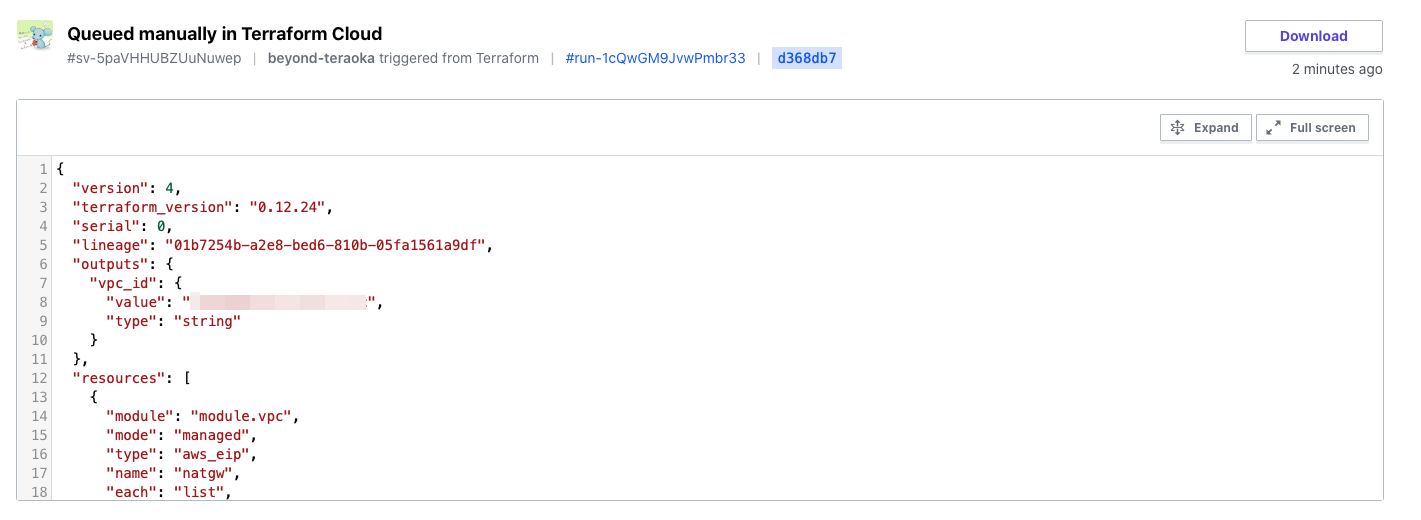
The state file (tfstate) is also managed securely on Terraform Cloud
Since I specified a Slack channel in the Notifications settings, notifications were perfect
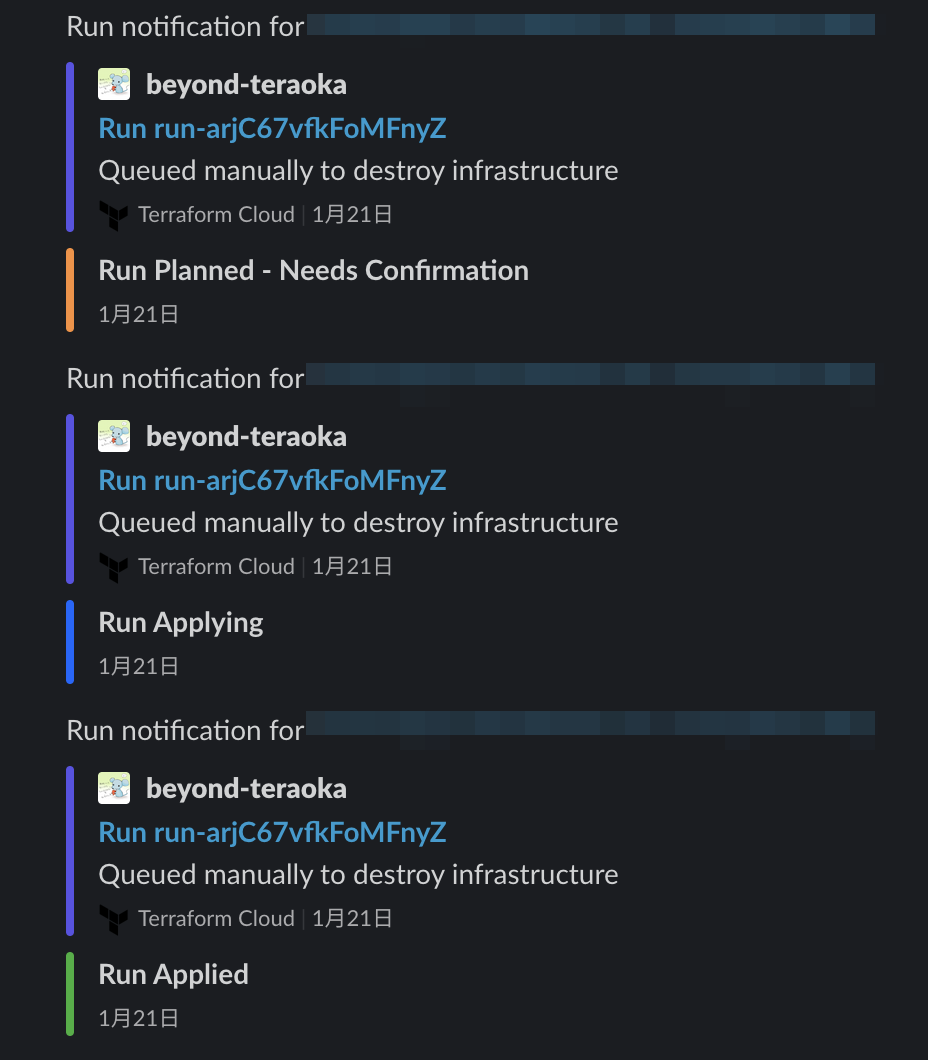
Check whether GitOps is possible (Team B)
We've confirmed that it works fine when run manually.
This time, we want it to run automatically in response to a Git push.
Let's modify some of the Terraform code and check its operation.
We'll change part of the name of the VPC's public subnet and push it to Git.
The Plan started to run automatically in response to the Git push

Naturally, it stops before applying this time as well, and outputs only the changed parts as a difference.
There are no problems, so let's approve and apply.
Apply completed successfully, so there seems to be no problem
summary
So, what did you think?
When using Terraform as a team, you need to consider the issues mentioned at the beginning.
Terraform Cloud has a range of convenient features that strongly support team use.
Many features are available even in the free tier, so please give it a try.
Reference URL
*1 https://www.terraform.io/downloads.html
*2 https://www.terraform.io/docs/cloud/index.html
*3 https://www.hashicorp.com/products/terraform/pricing/
*4 https://www.terraform.io/docs/cloud/vcs/index.html
*5 https://www.terraform.io/docs/cloud/workspaces/index.html
*6 https://registry.terraform.io
7 https://app.terraform.io/signup/account
*8 https://www.terraform.io/docs/cloud/vcs/gitlab-eece.html
*9 https://www.terraform.io/docs/cloud/vcs/index.html
*10 https://www.terraform.io/docs/cloud/workspaces/notifications.html#slack
00 The person who wrote this article
About the author


