First IaC: Building a LAMP environment with Ansible

table of contents
Hello. I'm Daimyojin Chikuwa, and I joined the company as a new graduate last year
Time flies
I think I was excited about writing a blog around August last year
So, I set up a LAMP environment using Ansible, and in this article I will give a brief introduction to it
I don't have deep knowledge yet, so I would like to write a rough outline of how Ansible will work if you do this
Let's run Ansible
premise
environment
Virtualbox: Version 7.0.20
Vagrant: Version 2.4.1
Vagrant box: AlmaLinux 9
Ansible: Version 2.14.17
Ansible is a type of configuration management tool that can be used to build virtual environments as well as clouds such as AWS
This time, we will prepare three virtual environments, one as an Ansible execution server and the other two as servers to set up the LAMP environment
For more information on installation methods and Ansible, please see the article written by a great senior
Getting started with Infrastructure as Code using Ansible (Introduction & Installation)
Configuring Ansible
The basic structure of Ansible is as follows:
/etc/ansible └── roles ├── hosts ├── playbook.yml └── ansible.cfg
hosts
- Name: Inventory File
- Role: Defines the target hosts that Ansible will manage.
- Content: You can group and describe hostnames and IP addresses. You can also classify hosts by category, such as web servers and database servers. In this example, we will describe the IP addresses of the Ansible-compatible servers mentioned earlier.
playbook.yml
- Name: Playbook File
- Role: Defines specific operations and tasks.
- Content: This defines how a series of tasks should be executed on a specific host. It often includes specific instructions, such as packages to install and services to start. This is where we will write the instructions for setting up a LAMP environment.
ansible.cfg
- Role: Controls the overall operation of Ansible through its configuration files.
- Content: You can specify various options such as the inventory path, remote user, SSH key path, and whether to verify the host key. We won't be touching these options this time.
Basically, Ansible will work if the above three files exist
The rolesdirectory will be explained later.
How to write an inventory file
In this section, we'll review how to write an inventory file
This time, it's easy, so we'll finish it quickly
[all:vars] ansible_user=vagrant ansible_password=vagrant [test_ansibleclient] ansibleclients_host=192.168.33.10 [ansibleclients] ansibleclients_host1 ansible_host=192.168.33.30 ansibleclients_host2 ansible_host=192.168.33.40
The inventory file is written in the format shown above
- Group definition : You can group hosts in the format
[XXX]. In this example, the two servers we are targeting are grouped under [ansibleclients] - Group Variables:
The :varssection allows you to define variables that apply to all hosts within that group. In this example, we've defined them for username and password. Additionally, we've[all:vars]to make the settings common to all hosts.
How to write a playbook
The basic playbook structure is as follows:
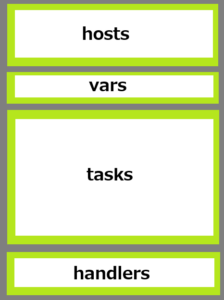
- hosts:Specify the group defined in the inventory file and apply the following processing.
- vars:You can define variables here. It's not necessary, though.
- Tasks:This section describes the processes that will be applied to the target server. The processes described here will be executed in order from top to bottom. This is the core of the playbook.
- Handlers:You can write processes separately from tasks. This is useful when you want to add conditions to the execution of a process, such as "if the result of XX is YY". It's not necessary to have them.
The above four sets constitute one play
A collection of multiple "play" commands forms a playbook file
Now let's take a look at the specific processing
--- #hosts - hosts: ansibleclients become: yes #tasks tasks: - name: install Apache yum: name: httpd state: latest
It's written in yaml format, so it's very easy to understand. Even if you don't have any prior knowledge, you can understand what you want to do by reading it
▼#hosts part
hosts:Specifies the hosts or groups that are the target of the inventory file explained in the previous section.become:Specifies whether to run the task with administrator privileges.
▼#tasks part
tasks:This section describes the tasks to be performed.name:Enter the name of the task.yum: Specifies the module to use . In this case, we want to install Apache, so we use yum. For Ubuntu and other systems, specify aptname:Specifies the name of the package to install.state:Specifies the state of the package.
In other words, this process involves installing the latest version of Apache with administrator privileges
You can also obtain keys and change permissions by changing the module you use
▼Getting the key
- name: Install MySQL GPG key rpm_key: state: present key: https://repo.mysql.com/RPM-GPG-KEY-mysql-2023
▼Change permissions and ownership
- name: chmod and chown for HTML and PHP files file: path: "/var/www/html/{{ item }}" owner: apache group: apache mode: '0644' loop: - test.html - test.php
There is an official list of modules that can be used with Ansible
https://docs.ansible.com/ansible/2.9_ja/modules/modules_by_category.html#modules-by-category
You can write the process by referring to this
...I would like to say that, but there are so many of them that I think it would be better to search for "Ansible module" or something similar and refer to blogs that introduce versatile modules
Let's try it out
Actual machine check
Now let's actually run Ansible
The playbook file I'm using is below:
- hosts: ansibleclients become: true tasks: - name: install httpd yum: name=httpd state=latest - name: Apache start / enable service: name=httpd state=started enabled=yes - name: Add MySQL repository get_url: url: https://repo.mysql.com/mysql80-community-release-el9-5.noarch.rpm dest: /tmp/mysql80-community-release-el9-5.noarch.rpm - name: Install MySQL GPG key rpm_key: state: present key: https://repo.mysql.com/RPM-GPG-KEY-mysql-2022 yum: name: /tmp/mysql80-community-release-el9-5.noarch.rpm state: present - name: Install MySQL server yum: name: mysql-community-server state: latest - name: Start MySQL service service: name: mysqld state: started enabled: yes - name: Import Remi GPG key rpm_key: state: present key: https://rpms.remirepo.net/RPM-GPG-KEY-remi2021 - name: Install Remi repository yum: name: https://rpms.remirepo.net/enterprise/remi-release-9.rpm state: present - name: Install PHP and related packages yum: name: - php - php-devel - php-mbstring - php-mysqli - php-gd state: present notify: - httpd restart # Copy HTML and PHP scripts for testing - name: html copy copy: src: /etc/ansible/test.html dest: /var/www/html - name: PHP copy copy: src: /etc/ansible/test.php dest: /var/www/html - name: chmod and chown for HTML and PHP files file: path: "/var/www/html/{{ item }}" owner: apache group: apache mode: '0644' loop: - test.html - test.php handlers: - name: httpd restart service: name=httpd state=restarted
When running Ansible, an error will occur if an ssh connection cannot be established, so be sure to register it with keyscan in advance
ssh-keyscan XXX.XXX.XXX.XXX /root/.ssh/known_hosts
Here is the command to run the playbook:
ansible-playbook /path to your playbook
If it finishes successfully, the following result will be output:
PLAY RECAP ************************************************************************************************************************************************************************************************* ansibleclients_host1 : ok=15 changed=14 unreachable=0 failed=0 skipped=0 rescued=0 ignored=0 ansibleclients_host2 : ok=16 changed=14 unreachable=0 failed=0 skipped=0 rescued=0 ignored=0
There is no problem if failed and unreachable are 0
All that's left is to check that the test HTML and PHP scripts work and whether you can log in to MySQL
Divide the process into directories
Now, looking at the playbook in the previous section, some of you may have thought that consolidating everything into one file makes it difficult to be flexible
There may be cases where you want to install Apache but don't need MySQL
But creating multiple playbooks is a hassle..
Yes, of course, there is a way to split the processing into smaller parts for people like you
Divide processing by using roles
We will use roles, which we will cover later in the Ansible configuration chapter
By utilizing roles, you can divide the processing of a playbook as shown below
roles └──httpd_install └──tasks └──main.yml └──mysqld_install └──tasks └──main.yml └──php_install └──tasks └──main.yml └──handlers └──main.yml └──remi_repo └──tasks └──main.yml
Create a directory for each process under roles, and then create directories such as tasks and handlers under those
Finally, write the actual processing in main.yml
Below is the processing content of /roles/httpd_install/tasks/main.yml
--- - name: install httpd yum: name=httpd state=latest - name: Apache start / enable service: name=httpd state=started enabled=yes
Then, by writing a playbook as shown below, you can adjust the processing you want to apply
--- - name: select roles hosts: ansibleclient3 remote_user: vagrant become: yes roles: - httpd_install - mysqld_install #- remi_repo #- php_install
With this, the httpd and MySQL processes will be applied, but the other processes that are commented out will not be applied
Using roles allows you to be more agile and easier to manage than creating a single playbook
You can create all of your playbooks at once, but it is recommended to consciously divide them into roles so that you can reuse them later
summary
How was it?
I've only recently started using Ansible, so there are still many things I don't understand, but Ansible is so easy that even someone like me can use it
Why not try it for the first time as casually as going for a walk?
Thank you for watching until the end
 44
44 The person who wrote this article
About the author


