[eSIM] APN Settings Explained ~ iOS Edition ~

table of contents
This time, we will explain how to set up the APN in case your eSIM does not work after you purchase it and arrive at your overseas destination
For information on the initial setup procedure (iOS) after purchasing an eSIM, please see the article below
*Please note that this article is based on iOS 17.5.1 for iPhone 15
For instructions on how to set up the APN for Android, please see the article below
○ [eSIM] APN Settings Explained ~ Android Edition ~
What is APN?
APN stands for "Access Point Name," and it is an identifier used to tell smartphones and tablets which network they should connect to. It plays a very important role in mobile communication.
The APN settings are generally set automatically (Auto-APN), so in the case of eSIMs, they are usually completed simply by scanning a QR code. Therefore, users rarely have to worry about it
However,depending on the version of the device the user is using and its dependencies on the mobile carrier in their destination country, itmay be necessary to manually configure the APN settings.
Conversely, if no other problems are occurring, or if there is no particular purpose,not to tamper with the settings unnecessarily or change them without fully understanding themplease be careful
Overview of the work flow
There are two main steps to manually setting up the APN:
- Check the current settings
- Enter the correct APN value
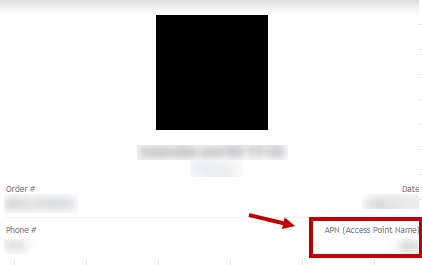
For the APN value, please refer to the sample "QR code link email" below
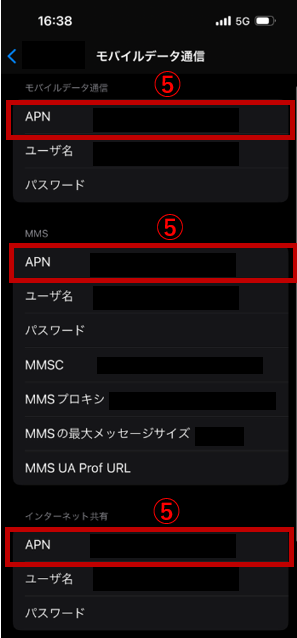
Check the current settings
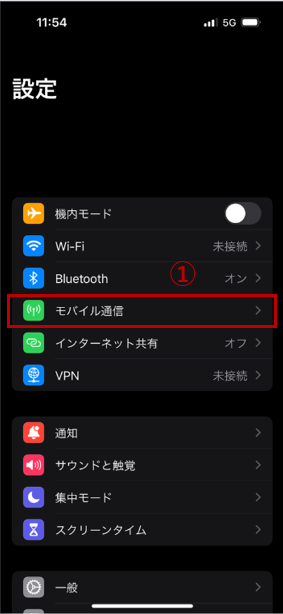
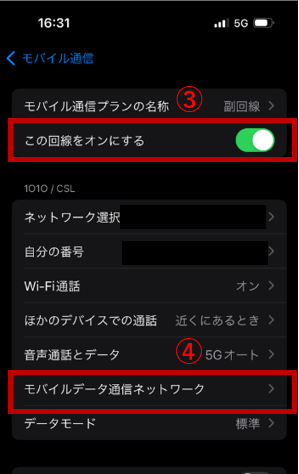
First, tap ① "Settings" > "Mobile Data"
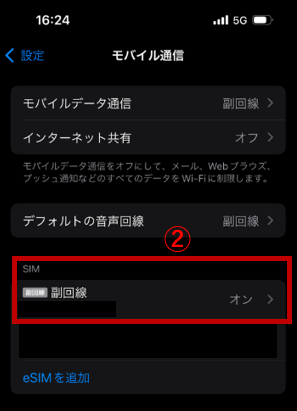
② Select the eSIM for which you want to change the APN
③ Make sure the line is turned on, then tap "Mobile Data Network" in ④
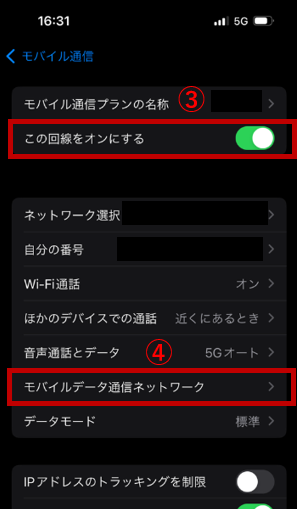
Please check the currently set APN (⑤)
due to factors such as the version of the device the user is using and its dependencies on the mobile carrier in their destination country, anIn rare cases,may be automatically and randomly entered.
In that case, check the APN field in ⑤,delete any unintended APN values, andenter the correct "QR code linking email" value mentioned earlier.
Conversely, if no other problems are occurring or you have no particular purpose,not to tamper with the settings unnecessarily or change them without fully understanding themplease be careful
Enter the correct APN value
Tap ① "Settings" > "Mobile Data" again
② Select the eSIM for which you want to change the APN
③ Make sure the line is turned on, then tap "Mobile Data Network" in ④
Enter the correct APN in ⑤ and optionally enter a username in ⑥
*Other than that, you can leave the fields blank
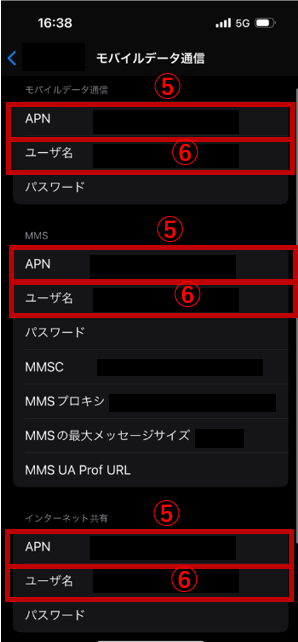
Finally, restart your device to apply the settings and test the connection
Finally
The setup itself is not that complicated; just check the APN listed in the email and enter the value on your iPhone's settings screen
However, if you make a mistake in this setting, you will not be able to communicate with the network, so please be careful when changing the settings
Also, even if you are already able to communicate normally, be careful not to change the settings by mistake
 33
33 The person who wrote this article
About the author


