Display dotted hostname in prompt
2017.05.24
 0
0 
table of contents
This is Nakagawa from the System Solutions Department.
When I built a server the other day, I looked into the prompt display format, so
I'd like to introduce it to you.
The prompt is the following part that appears when you log in to the server.
[root@test ~]#
By default, the username@hostname and current directory are displayed from the left.
Here we will explain how to change the hostname displayed.
This is a method up to CentOS6, so please note that there may be some differences in how things work on CentOS7.
1. Temporarily change the host name
First, here's how to change it temporarily:
hostname {hostname}
After executing the command, if you execute the hostname command without any options, the entered host name will be displayed.
In this case, the setting will be invalid when you reboot, and the host name will return to the previous setting.
2. Make the hostname you set valid even after rebooting
Even if you were able to change the hostname in step 1, the hostname displayed in the prompt will not change.
To change the prompt display while maintaining the changes even after a reboot,
you need to change two configuration files.
・/etc/hosts
127.0.0.1 localhost localhost.localdomain {hostname}・/etc/sysconfig/network
HOSTNAME={hostname}
After setting, restart /etc/init.d/network to reflect the settings.
If the settings are not reflected, you will need to restart the server itself.
3. Set a special hostname
If the host name you want to set contains
, such as __.jp or __.co.jp , the method described above may not work properly.
In this case, change the host name by specifying an environment variable.
The configuration file to edit is as follows:
・Edit or add the environment variable "PS1"
The prompt display format is set by an environment variable called PS1, so
edit this or add a new one if it is not set.
You can check the list of currently set environment variables with the following command:
# env
# printenv
In this case, we want to display the user name, host name, and current directory in the prompt, so
we will set them as environment variables as follows.
export PS1="[\u@\H \W]\$ "
Run the export command to see if any errors are displayed.
Run the env command again to see the settings for the environment variable "PS1".
・~./bashrcThis
is a file that exists in the home directory of the target user.
that was set earlier will be invalid when you restart the system, so
add it to the end of the .bashrc file so that the environment variable "PS1" is automatically read when you log in.
export PS1="[\u@\H \W]\$ "
After setting the above, close the session or switch to another user and then return to the original user
and log in again. The hostname you set will then be displayed in the prompt.
4. Other setting changes
Here are some other examples of setting changes.
If you want to display the date, add "\d" to the environment variable.
export PS1="[\u@\H \d \W]\\$ "
![]()
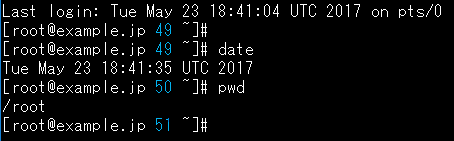
To display the command history number, add "\!"
export PS1="[\u@\H \! \W]\\$ "
Conclusion
I hope this article will give you some ideas on how to customize your own prompts.
Thank you for reading until the end.
00 The person who wrote this article
About the author


