Get weather data using the Weather API

table of contents
Thank you for your hard work.
This is Matsuyama from the System Development Department.
This time, I'm going to create a weather check app using a "Weather API."
Previously, I thought it was necessary to purchase weather information from the Japan Meteorological Agency, but
now there are APIs that can be used for free, so I'll use that.
By the way, the Japan Meteorological Agency also distributes weather data for free, but
it is basically meteorological data (rain, wind, temperature, etc.), so it seems to be different from weather data
(although it did distribute past weather data)
Requirements
① Uses Rakuten Rapid API's Open Weather Map.
② HTTP communication is based on a previously created one.
③ Gets weather data for nearby cities from GPS location information.
④ Displays latitude, longitude, city name, and weather icon on the screen.
* Created with Unity 2019.4.11f1.
Rakuten Rapid API
Rakuten Rapid API is a service that allows you to use and develop APIs with various functions.
You need to register an account, but there are many functions that can be used for free, so it seems like you can try out various things.
Rakuten Rapid API
Open Weather Map
Get weather data using Open Weather Map, available on Rakuten Rapid API.
Open Weather Map
There are several APIs available, but if you want to get the current weather, the Current Weather Data API seems to be sufficient
You can test it on your browser, so try adjusting the parameters.
Please note that the number of calls will be counted even during testing (500 calls per month are free).
The following information seems to be required as API request information:
・Request header (fixed)
request.AddHeader("x-rapidapi-host", "community-open-weather-map.p.rapidapi.com"); // Host address request.AddHeader("x-rapidapi-key", "xxxxxxxxxxxxxxxxxx"); // API key issued for each account
・Request parameter
q: City ID (required)
It seems that there is no problem if other optional parameters are not included.
You can get
the city ID here You can get the weather data for the registered city.
HTTP communication
In accordance with the above requirements, we will proceed with the implementation based on the processing we have created in the past
.
Copy the source code from Scripts/Utility and Scripts/Api
. ApiBase.cs
, CoroutineHandler.cs
, SigletonMonoBehaviour.cs
, Network.cs
, and ApiSample.cs
.
Add/adjust functionality to support OpenWeatherMap
1. Supports GET Method
To support the GET method, the request parameters passed in JSON are converted into a string by connecting them to the URL.
Although it is quite provisional, it is implemented as follows.
private string convGetParam(string json) { string jsonTrim = json.Trim('{', '}'); jsonTrim = jsonTrim.Replace("\"", ""); string[] jsonArry = jsonTrim.Split(','); string retStr = "?"; bool isFirst = true; foreach (var data in jsonArry) { if (!data.Contains(":")) break; if (!isFirst) { retStr += "&"; } else { isFirst = false; } string[] paramAry = data.Split(':'); retStr += paramAry[0] + "=" + paramAry[1]; } return retStr; }
2. Set the request header
As mentioned above, set the host address and API key.
*The values are displayed on the OpenWeatherMap screen.
3. Define HTTP request and response parameters
Create a class for retrieving weather data under Script / Api.
In this example, create WeatherApi.cs.
■ Requests
Requests are for city names only.
[Serializable] public struct Request { public string q; }
■ Response
The response is a bit long, but it will be expanded in the following format.
In fact, the Weather structure alone would be sufficient, but I made it possible to retrieve all of it just in case.
[Serializable] public struct Coord { public float lon; public float lat; } [Serializable] public struct Weather { public int id; public string main; public string description; public string icon; } [Serializable] public struct Main { public float temp; public float fells_like; public float temp_min; public float temp_max; public int pressure; public int humidity; } [Serializable] public struct Clouds { public int all; } [Serializable] public struct Sys { public int type; public int id; public string country; public int sunrise; public int sunset; } [Serializable] public struct Response { public Coord coord; public List<Weather> weather; // public string base; // base cannot be an element name public Main main; public int visibility; public Wind wind; public Rain rain; public Clouds clouds; public int dt; public Sys sys; public int timezone; public int id; public string name; public int cod; }
*Some names cannot be used and are commented out, but we won't need that information this time so we won't worry about it ^^;
For now, I think everything related to communication is ready
Using GPS
For GPS, we will write the necessary code by referring to the code we created in the past
.
The GPS processing required this time is as follows:
Input.location.Start(); Input.compass.enabled = true;
Do this first,
Input.location.lastData.longitude; // Longitude Input.location.lastData.latitude; // Latitude
The latitude and longitude are simply obtained using lastData.
*Strictly speaking, it also checks whether GPS is available.
Input.location.isEnabledByUser; // GPS usage is permitted Input.location.status; // Can be used if in Running state
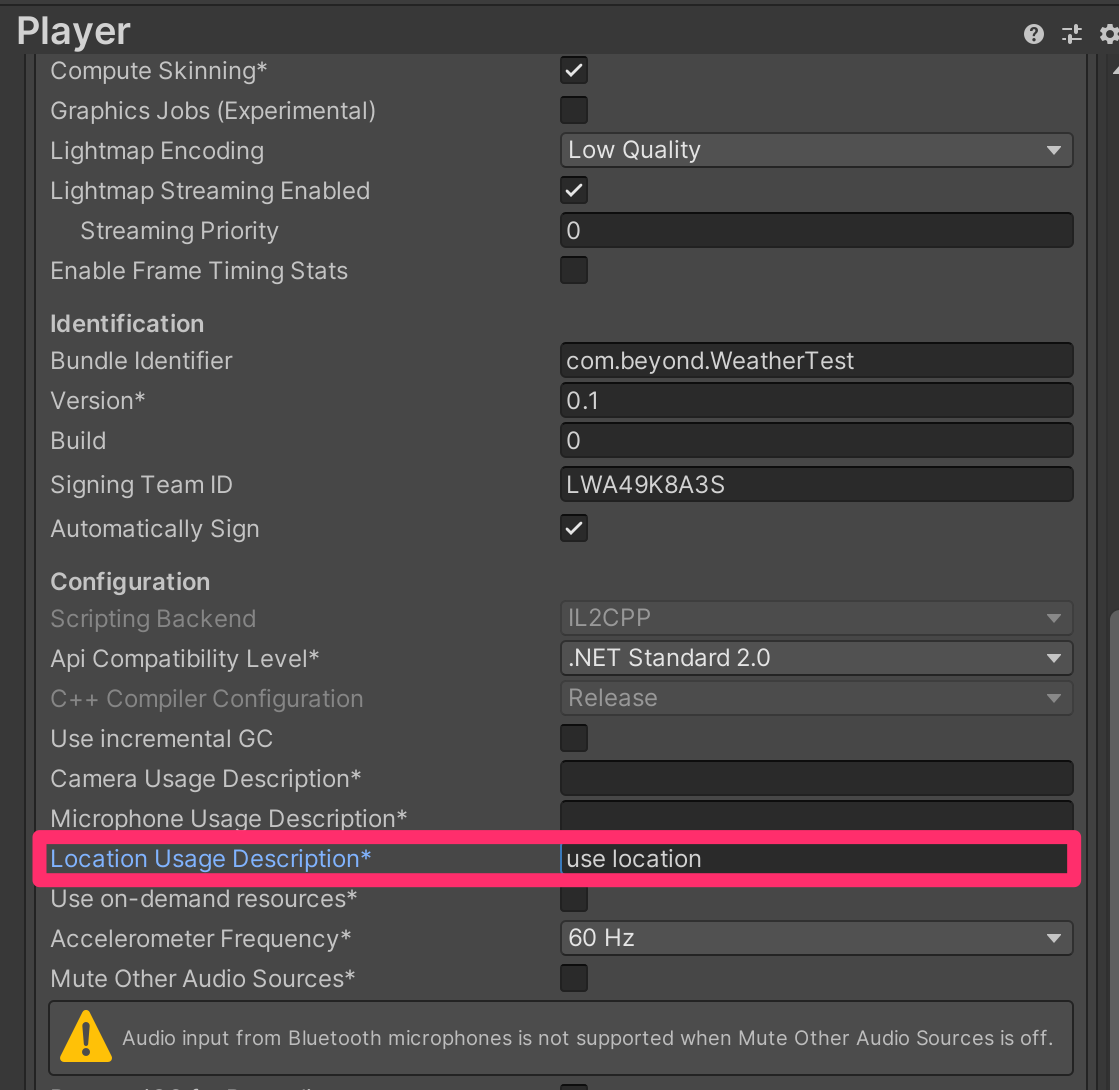
Also, don't forget to fill in the Location Usage Description in Project Settings
Weather Data
As mentioned above, to obtain weather data, it is necessary to specify a registered city, so
for verification purposes we will extract city data from one of the 47 prefectures, and then
implement the process of obtaining weather data for the nearest city using the latitude and longitude obtained by GPS.
First, create the city data.
Define the prefecture name, city name, city name (for API), latitude, and longitude in the following structure.
private struct Data { public string prefecture; // Prefecture name public string city; // City name public string name; // City name passed to API public double lon; // Longitude public double lat; // Latitude }
The data will be formatted like this:
static private List<Data> datas = new List<Data> { new Data { prefecture = "Hokkaido", city = "Sapporo", name = "sapporo", lon = 141.346939, lat = 43.064171 }, new Data { prefecture = "Aomori Prefecture", city = "Aomori City", name = "aomori", lon = 140.740005, lat = 40.82444 }, new Data { prefecture = "Iwate Prefecture", city = "Morioka City", name = "morioka", lon = 141.152496, lat = 39.703609 }, new Data { prefecture = "Miyagi Prefecture", city = "Sendai City", name = "sendai", lon = 140.871933, lat = 38.26889 }, new Data { prefecture = "Akita Prefecture", city = "Akita City", name = "akita", lon = 140.116669, lat = 39.716671 }, new Data { prefecture = "Yamagata Prefecture", city = "Yamagata City", name = "yamagata", lon = 139.821671, lat = 38.721668 }, new Data { prefecture = "Fukushima Prefecture", city = "Fukushima City", name = "fukushima", lon = 140.383331, lat = 37.400002 }, // // Omitted // new Data { prefecture = "Kagoshima Prefecture", city = "Kagoshima City", name = "kagoshima", lon = 130.558136, lat = 31.560181 }, new Data { prefecture = "Okinawa Prefecture", city = "Naha City", name = "naha", lon = 127.681107, lat = 26.2125 } };
All that's left is to search for the nearest city data from the current location (latitude and longitude).
Would a function like this be useful?
static public Info NearbyCity(double lon, double lat) { Info info = new Info(); float dist = 9999f; foreach(Data dat in datas) { double z = (dat.lat - lat) * Lat2Km; // -z is south double x = (dat.lon - lon) * Lat2Km; // +x is east Vector3 v = new Vector3((float)x, 0, (float)z); if(v.magnitude < dist) { dist = v.magnitude; info.city = dat.prefecture + dat.city; info.name = dat.name; } } return info; }
The returned structure will contain the prefecture/city name for display and the city name for the API
public struct Info { public string city; public string name; }
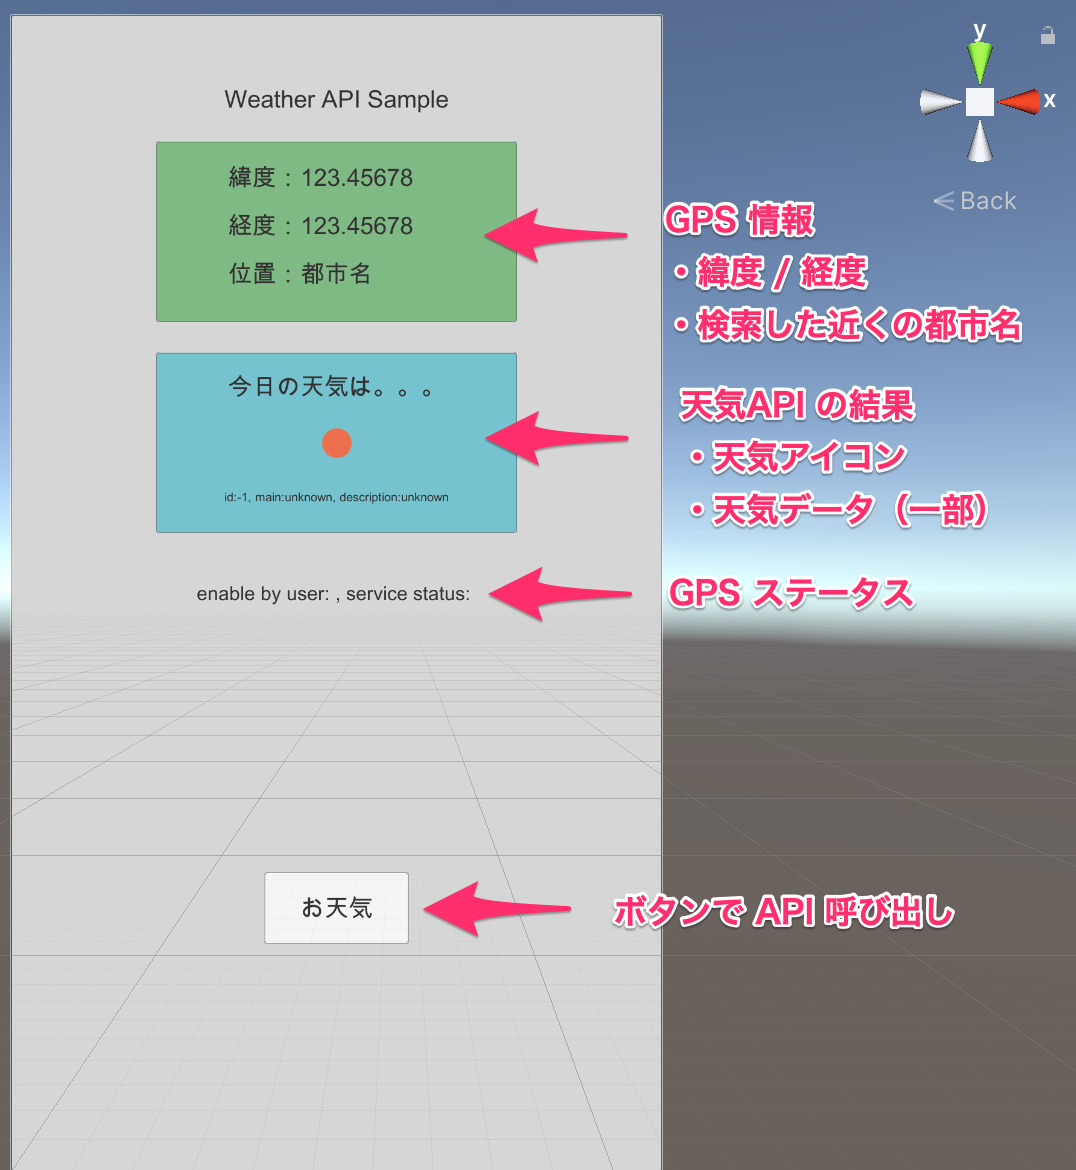
Displays latitude, longitude, city name, and weather icon on the screen
We will create the screen in Unity.
Here's a rough image:
All that's left to do is display the information obtained via GPS and API, and here's the finished product
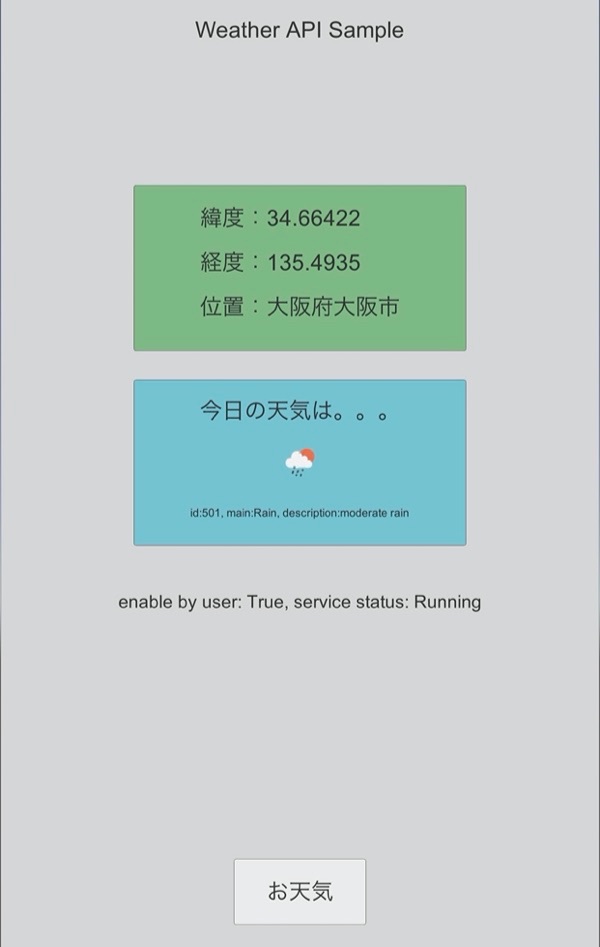
You can check information such as weather ID and weather icons here.
Weather Data Details
summary
It was a quick walk, but I think it's a good example of how to display the weather.
The weather data acquisition itself can be implemented with a single API, but linking the registered city with the current location (data conversion) can be a bit of a hassle. I
've uploaded the sample project to GitHub again this time.
I hope it will be of some use.
Unity Sample
Rakuten Rapid Api has other functions, so I would like to try using it on another occasion
lastly
I am a member of the system development service site "SEKARAKU Lab."
Beyond offers a one-stop service for everything from server design and construction to operation, so if you have any problems with server-side development, please feel free to contact us.
SEKARAKU Lab: [https://sekarakulab.beyondjapan.com/](https://sekarakulab.beyondjapan.com/)
Well, that's all for today
 00
00 The person who wrote this article
About the author


