How to build WordPress on AWS

table of contents
Hello.
I'm Yagiya from the System Solutions Department. I dyed my hair for the first time last month, but I didn't follow any specific steps and ended up dyeing it blue on the first try. It
seems like there's no other option but to go with a safe color, so I'm struggling to decide what color to go with next.
Well, this is the first post on Beyond Blog, and I'm going to write about how to build a LAMP environment using AWS services, and ultimately how to post to WordPress. It would
be too long to go into detail about each service, so I'll just briefly cover the settings.
*The web and database will be created in a coexisting configuration.
AWS
[VPC]
Name: wp-test-vpc
CIDR: 10.0.0.0/16
[Internet Gateway]
Tag Name: wp-test-igw
Key Name Value: wp-test-igw
Once created, select wp-test-igw and select "Attach to VPC" from the Actions menu.
Available VPC: wp-test-vpc
[Route Table]
Name tag: wp-test-rt
VPC: wp-test-vpc
After creating it, select wp-test-rt ⇒ Edit Route ⇒ Add Route
Destination: 0.0.0.0/0 Target: wp-test-igw
[Subnet]
Name: wp-test-public-subnet-1a
VPC: wp-test-vpc
CIDR: 10.0.0.0/24
[Security Group]
Security Group Name: wp-test-sg
Description: wp-test-sg
VPC: wp-test-vpc
Inbound Rule
Type: SSH Protocol: TCP Port Range: 22 Source: My IP
Type: HTTP Protocol: TCP Port Range: 80 Source: Custom 0.0.0.0/0
[EC2]
Amazon Linux2
t2.micro
VPC: wp-test-VPC
Subnet: wp-test-public-subnet-1a
Automatically assigned Public IP: Enabled
Storage: Leave as default
Tag key: Name Value: wp-test-ec2
Security group: wp-test-sg
Key pair:
Create a new key pair
Key pair name: wp-test-key
Now that we have completed the steps in the AWS console, we will install and configure the middleware on the server.
Connect to the server via SSH using either the command prompt or Windows PowerShell, specifying the key, username, and public IP address as shown below:
ssh -i wp-test.pem ec2-user@[public IP address]
Apache
Let's start by installing Apache
# yum install httpd -y
It's OK as long as it says "Complete!" at the end
Start Apache
# systemctl start httpd
Configure the automatic startup as follows so that it will start automatically even if you restart the instance
# systemctl enable httpd
Check below, if it is enabled then it's OK
# systemctl is-enabled httpd
This time, we will create a VirtualHost with the following settings:
Path: /etc/httpd/conf.d/wp-test.conf
Server name: wp-test
Document root: /var/www/html/wp-test
Access log: /var/log/httpd/wp-test-access_log
Error log: /var/log/httpd/wp-test-error_log
First, create a document root and a verification file
# vi /var/www/html/wp-test/index.html test
# vi /etc/httpd/conf.d/wp-test.conf <VirtualHost *:80> ServerName wp-test DocumentRoot "/var/www/html/wp-test" CustomLog "/var/log/httpd/wptest-access_log" combined ErrorLog "/var/log/httpd/wptest-error_log" </VirtualHost>
Since we have made some changes to the conf file, we will need to restart Apache to reflect the changes
# systemctl restart httpd
Search for the public IP in your browser and if it displays "test", then it's OK.
Once you've confirmed this, delete index.html.
# rm -f /var/www/html/wp-test/index.html
PHP
Now let's move on to PHP.
By default, only the 5.4 series is installed, so install the epel and remi repositories first.
# yum info php Loaded plugins: extras_suggestions, langpacks, priorities, update-motd Available Packages Name : php Arch : x86_64 Version : 5.4.16 Release : 46.amzn2.0.2 Size : 1.4 M Repo : amzn2-core/2/x86_64 Summary : PHP scripting language for creating dynamic web sites URL : http://www.php.net/ License : PHP and Zend and BSD Description : PHP is an HTML-embedded scripting language. PHP attempts to make it : easy for developers to write dynamically generated web pages. PHP also : offers built-in database integration for several commercial and : non-commercial database management systems, so writing a : database-enabled webpage with PHP is fairly simple. The most common : use of PHP coding is probably as a replacement for CGI scripts. : : The php package contains the module (often referred to as mod_php) : which adds support for the PHP language to Apache HTTP Server.
Install the epel repository
# yum install https://dl.fedoraproject.org/pub/epel/epel-release-latest-7.noarch.rpm
remi repository installation
# yum install http://rpms.famillecollet.com/enterprise/remi-release-7.rpm
Let's check if the 7.3 series is installed
# yum info php --enablerepzo=remi-php73 Loaded plugins: extras_suggestions, langpacks, priorities, update-motd remi-php73 | 3.0 kB 00:00:00 remi-php73/primary_db | 234 kB 00:00:01 261 packages excluded due to repository priority protections Available Packages Name : php Arch : x86_64 Version : 5.4.16 Release : 46.amzn2.0.2 Size : 1.4 M Repo : amzn2-core/2/x86_64 Summary : PHP scripting language for creating dynamic web sites URL : http://www.php.net/ License : PHP and Zend and BSD Description : PHP is an HTML-embedded scripting language. PHP attempts to make it : easy for developers to write dynamically generated web pages. PHP also : offers built-in database integration for several commercial and : non-commercial database management systems, so writing a : database-enabled webpage with PHP is fairly simple. The most common : use of PHP coding is probably as a replacement for CGI scripts. : : The php package contains the module (often referred to as mod_php) : which adds support for the PHP language to Apache HTTP Server.
It's 5.4 series.
This is because the amzn2-core repository has a higher priority.
# less /etc/yum.repos.d/amazon-2-core.repo [amzn2-core] name=Amazon Linux 2 core repository mirrorlist=$awsproto://$amazonlinux.$awsregion.$awsdomain/$releasever/$product/$target/$basearch/mirror.list priority=10 gpgcheck=1 gpgkey=file:///etc/pki/rpm-gpg/RPM-GPG-KEY-amazon-linux-2 enabled=1 metadata_expire=300 mirrorlist_expire=300 report_instanceid=yes [omitted]
It is set to "priority=10", so change it to "priority=99" to lower the priority
# vi /etc/yum.repos.d/amazon-2-core.repo [amzn2-core] name=Amazon Linux 2 core repository mirrorlist=$awsproto://$amazonlinux.$awsregion.$awsdomain/$releasever/$product/$target/$basearch/mirror.list priority=99 gpgcheck=1 gpgkey=file:///etc/pki/rpm-gpg/RPM-GPG-KEY-amazon-linux-2 enabled=1 metadata_expire=300 mirrorlist_expire=300 report_instanceid=yes [omitted]
Just to confirm
# yum info php --enablerepo=remi-php73 Loaded plugins: extras_suggestions, langpacks, priorities, update-motd 1 packages excluded due to repository priority protections Available Packages Name : php Arch : x86_64 Version : 7.3.27 Release : 1.el7.remi Size : 3.2 M Repo : remi-php73 Summary : PHP scripting language for creating dynamic web sites URL : http://www.php.net/ License : PHP and Zend and BSD and MIT and ASL 1.0 and NCSA Description : PHP is an HTML-embedded scripting language. PHP attempts to make it : easy for developers to write dynamically generated web pages. PHP also : offers built-in database integration for several commercial and : non-commercial database management systems, so writing a : database-enabled webpage with PHP is fairly simple. The most common : use of PHP coding is probably as a replacement for CGI scripts. : : The php package contains the module (often referred to as mod_php) : which adds support for the PHP language to Apache HTTP Server.
It has been updated to the 7.3 series
Now let's install the module as well
# yum install php php-mbstring php-xml php-xmlrpc php-gd php-pdo php-pecl-mcrypt php-mysqlnd php-pecl-mysql --enablerepo=remi-php73
Create a file called index.php under the document root
# vi /var/www/html/index.php <?php phpinfo(); ?>
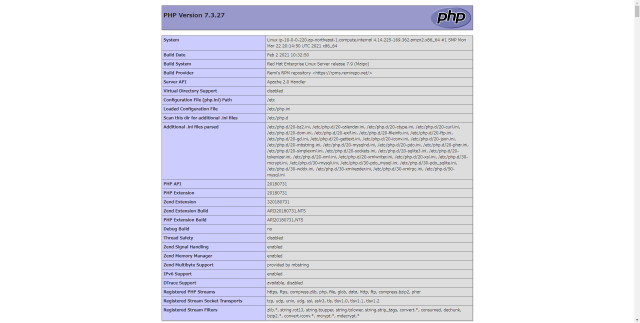
Restart Apache, search for your public IP in your browser, and if you see a page like the one above, then you're good to go
MySQL
Next is MySQL
First, installation
# yum localinstall https://dev.mysql.com/get/mysql80-community-release-el7-3.noarch.rpm
If you check the MySQL version with the command below, you will see that the 8 series is enabled
# yum repolist all repo id repo name status [Omitted] mysql57-community/x86_64 MySQL 5.7 Community Server disabled mysql80-community/x86_64 MySQL 8.0 Community Server enabled: 229 [Omitted]
This time, I want to install 5.7, so I will disable 8 and enable 5.7.
Disable 8
# yum-config-manager --disable mysql80-community Enable 5.7 series # yum-config-manager --enable mysql57-community
Check if 5.7 is enabled
# yum repolist all [omitted] mysql57-community/x86_64 MySQL 5.7 Community Server enabled: 484 mysql80-community/x86_64 MySQL 8.0 Community Server disabled [omitted]
It seems fine, so I'll install the 5.7 series
# yum install mysql-community-server
Start MySQL
# systemctl start mysqld
Just like Apache, set it to start automatically
# systemctl enable mysqld
confirmation
# systemctl is-enabled mysqld enabled
Before entering MySQL, change your password first.
Check your current password
# grep password /var/log/mysqld.log [Note] A temporary password is generated for root@localhost: xxxxxxxxx
The xxxxxx part is the password
Change Password
# mysql_secure_installation Securing the MySQL server deployment. Enter password for user root: The existing password for the user account root has expired. Please set a new password. New password: Re-enter new password: The 'validate_password' component is installed on the server. The subsequent steps will run with the existing configuration of the component. Using existing password for root. Estimated strength of the password: 100 Change the password for root ? ((Press y|Y for Yes, any other key for No) : y New password:【New password】 Re-enter new password: 【Reenter】 Estimated strength of the password: 100 Do you wish to continue with the password provided?(Press y|Y for Yes, any other key for No) : y By default, a MySQL installation has an anonymous user, allowing anyone to log into MySQL without having to have a user account created for them. This is intended only for testing, and to make the installation go a bit Smoother. You should remove them before moving into a production environment. #Remove existing users Remove anonymous users? (Press y|Y for Yes, any other key for No) : y Success. Normally, root should only be allowed to connect from 'localhost'. This ensures that someone cannot guess at the root password from the network. #Disallow root login remotely? (Press y|Y for Yes, any other key for No) : y Success. By default, MySQL comes with a database named 'test' that anyone can access. This is also intended only for testing and should be removed before moving into a production environment. #Remove test database and access to it? (Press y|Y for Yes, any other key for No) : y - Dropping test database... Success. - Removing privileges on test database... Success. Reloading the privilege tables will ensure that all changes made so far will take effect immediately. #Reload privilege tables now? (Press y|Y for Yes, any other key for No) : y Success. All done!
Log in to MySQL and create a database for WordPress.
Log in to MySQL
# mysql -u root -p Enter password: [The new password you just set]
Database creation
mysql >database wp_test_db;
User Creation
mysql>create user 'wp_user'@'localhost' identified with mysql_native_password by 'password';
If left as is, the created user (wp_user) will not be able to operate the database (wp_test_db), so we will grant it permissions
mysql >grant all privileges on wp_test_db.* to wp_user@'localhost';
The mysql setup is now complete
Word Press
Finally, we have WordPress.
You can install it anywhere, but in this case we will install it in the home directory of the ec2-user.
# cd /home/ec2-user
Install the WordPress package
# wget https://ja.wordpress.org/latest-ja.tar.gz
Verify that it's installed
# ls latest-ja.tar.gz
The extension is gz, which means it is compressed, so use the tar command to extract it
# tar -zxvf latest-ja.tar.gz
Use the ls command to confirm that it has been expanded.
A new directory called wordpress has been created
# ls latest-ja.tar.gz wordpress
Move all directories and files under the wordpress directory to the document root
# mv ./wordpress/* /var/www/html/wp-test/
Edit wp-config-sample.php as follows:
# vi wp-config-sample.php /** Database name for WordPress */ define( 'DB_NAME', 'wp_test_db' ); /** MySQL database username */ define( 'DB_USER', 'wp_user' ); /** MySQL database password */ define( 'DB_PASSWORD', '-GrrLr5A7ymN' );
Once you get this far, you're almost there.
If you search for your public IP in your browser, you'll see the screen below.

Click "Let's get started!" and enter the information you entered in wp-config-sample.php (you can leave the table prefix as is).You
will then be prompted to create a wp-config.php file as shown in the image and paste the contents into it, so just follow the instructions obediently.
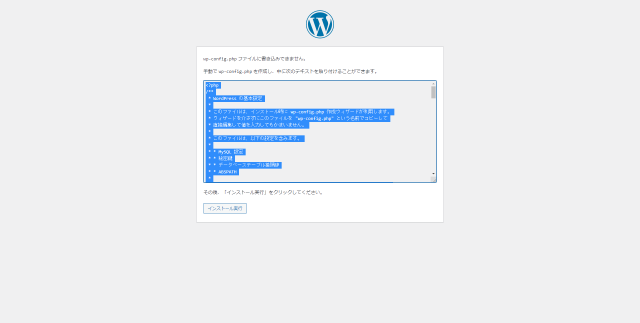
# vi /var/www/html/wp-test/wp-config.php {Paste what you copied}
Return to your browser and proceed.
Finally, decide on a title and username, save your username and password, and click "Install WordPress."
Log in to WordPress, post as you like, and once it's reflected, you're done!
 33
33 The person who wrote this article
About the author


