How to install xdebug with vagrant + vscode
table of contents
Good evening!
This is Nagato from the Systems Development Department.
This time, I'll explain in an easy-to-understand way how to install xdebug, a favorite tool among PHP programmers, into a Vagrant + VS Code environment.
The environment used is as follows:
Vagrant: 2.2.9
, PHP: 8.0.3
, VS Code: 1.55.1,
xdebug: 3.0.4
Advance preparation
The version of xdebug that is compatible depends on your PHP version, so please check beforehand.
To check, copy and paste all the information output by "php -i" into the following website:
https://xdebug.org/wizard
Copy the download link for the resulting xdebug file
Install xdebug
Use wget to get the file from the download link you copied in advance
cd /usr/local/src wget http://xdebug.org/files/xdebug-3.0.4.tgz
Install php-devel to use the phpize command
sudo yum install php-devel
After extracting the downloaded file, execute the commands in order
tar -xzvf xdebug-3.0.4.tgz phpize ./configure make sudo make install
After executing the make command, the xdebug.so file will be created in the modules directory in the current directory, so copy it
sudo cp modules/xdebug.so /usr/lib64/php/modules
The installation is now complete
Add the setting to php.ini
Next, we'll add the xdebug settings to the php.ini file.
Instead of directly writing the settings to the php.ini file, we'll create a new ini file for xdebug and load that instead.
sudo vi /etc/php.d/15-xdebug.ini
Add the following settings to the newly created ini file.
Note that the content and method of specifying the settings will differ depending on the version of xdebug.
Also, in version 2, the default port number for xdebug is "9000," but
this may already be in use, so it is recommended to set it to something other than "9000."
In version 3, the default has changed to "9003," so it should be fine without specifying anything.
For version 2
[xdebug] zend_extension=/usr/lib64/php/modules/xdebug.so xdebug.defaul_enable=1 xdebug.remote_enable=1 xdebug.remote_port=9001 xdebug.remote_handler=dbgp xdebug.remote_autostart=1 xdebug.remote_connect_back=1
For version 3
[xdebug] zend_extension=/usr/lib64/php/modules/xdebug.so xdebug.client_port=9003 xdebug.mode=debug xdebug.start_with_request=yes
Setting in vscode
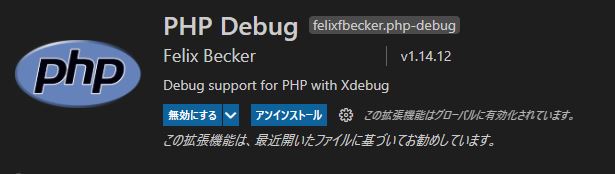
In VS Code, open the extensions installation screen by pressing "Ctrl+Shift+X",
search for "php debug", and install it.
Once the extension is installed,
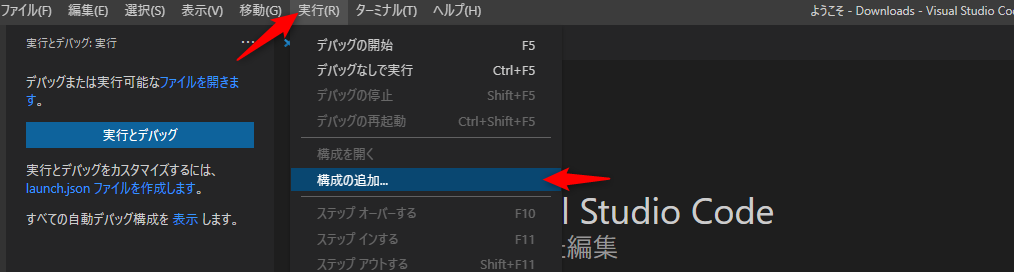
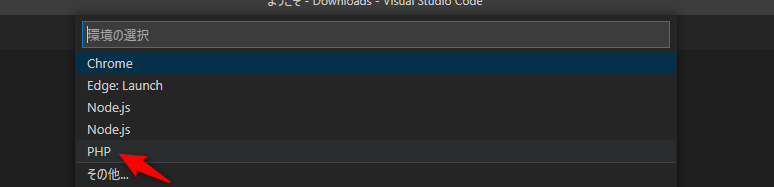
click "Run" > "Add Configuration" in the toolbar at the top of VS Code, select "PHP",
and open the ".vscode/launch.json" file that will be created in the current directory.
The initial settings are probably as follows:
{ // Use IntelliSense to learn available attributes. // Hover over existing attributes to see their descriptions. // For more information, see: https://go.microsoft.com/fwlink/?linkid=830387 "version": "0.2.0", "configurations": [ { "name": "Listen for Xdebug", "type": "php", "request": "launch", "port": 9001 }, { "name": "Launch currently open script", "type": "php", "request": "launch", "program": "${file}", "cwd": "${fileDirname}", "port": 9000 } ] }
Here, specify the port number you set in your php.ini file in the "port" field under "Listen for Xdebug".
If you haven't set one, use the default port number.
xdebug2: 9000
xdebug3: 9003
lastly
I have launched "SEKARAKU Lab," a service site for the system development company I belong to.
Beyond offers a one-stop service for everything from server design and construction to operation, so please feel free to contact us if you have any problems with server-side development.
SEKARAKU Lab:[https://sekarakulab.beyondjapan.com/](https://sekarakulab.beyondjapan.com/)
All settings are now complete, and xdebug is ready to use.
That's all, thank you for your hard work.
 33
33 The person who wrote this article
About the author


