[WordPress] Display related articles in conjunction with CPT UI! YARPP Modification Notes
![]()
table of contents
Hello,
I'm Mandai, the Wild Team member of the development team.
Have you noticed that Beyond Inc.'s technology blog has recently started displaying related articles?
As the number of articles has increased, linking to related articles is a great way to increase site traffic, and I think it's a common technique.
Our company's website is managed entirely with WordPress, and we
initially tried implementing Similar Posts when we had multiple categories lined up, but it didn't work as expected, perhaps because it wasn't compatible with the CPT UI.
In this article, we will take a look at the YARPP settings one by one to make use of the CPT UI settings and retrieve related articles as desired
First, install
We will proceed under the assumption that CPT IU has been pre-installed and that multiple categories have been registered
Next, we will install YARPP, which can also be found by searching for YARPP in the admin panel plugins.
There is a warning that the latest version has not been tested with the WordPress version, but it ultimately worked without any problems, so it seems like you don't need to worry too much about it.
Register the category you want to publish related articles in on YARPP
This is the key part of the configuration, but since there is no setting area on the configuration screen, we will modify the source code
First, display the list of custom post types you have registered in the CPT UI under "Registered Types/Taxes" in the side menu of the admin panel
Information for each Post Type will be displayed, so find the "Get code" link in the category you want to display (blog in our case) and click it
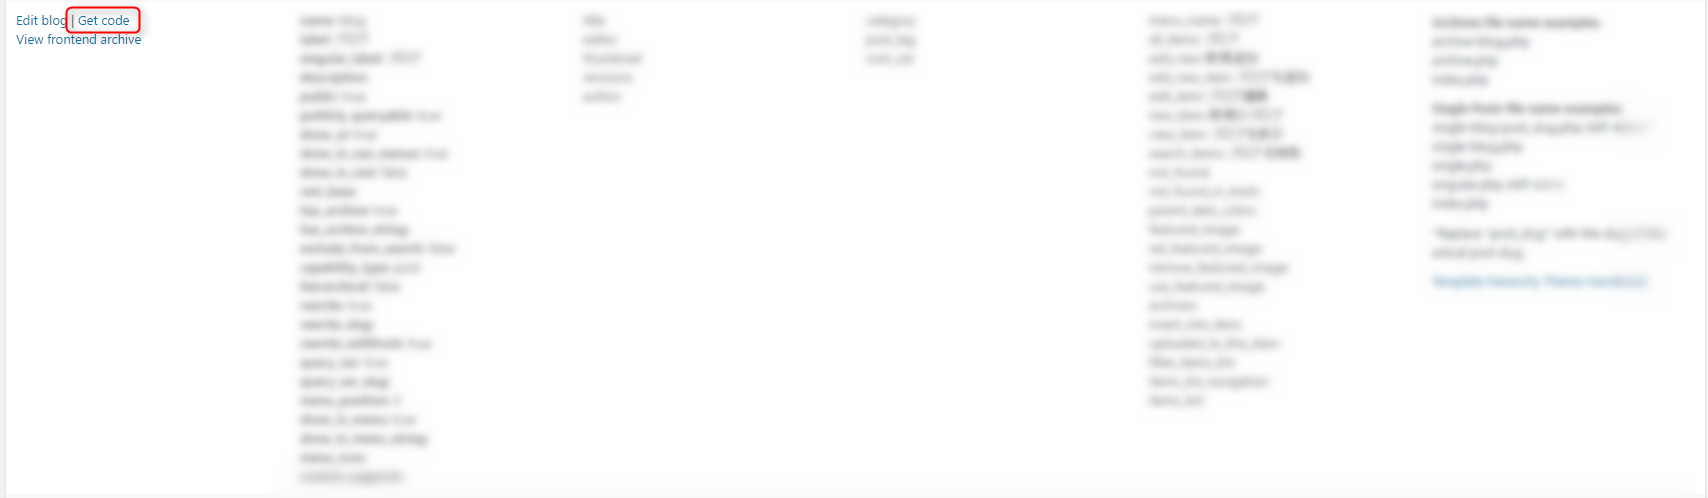
The link will display code to copy and paste into functions.php, so copy it
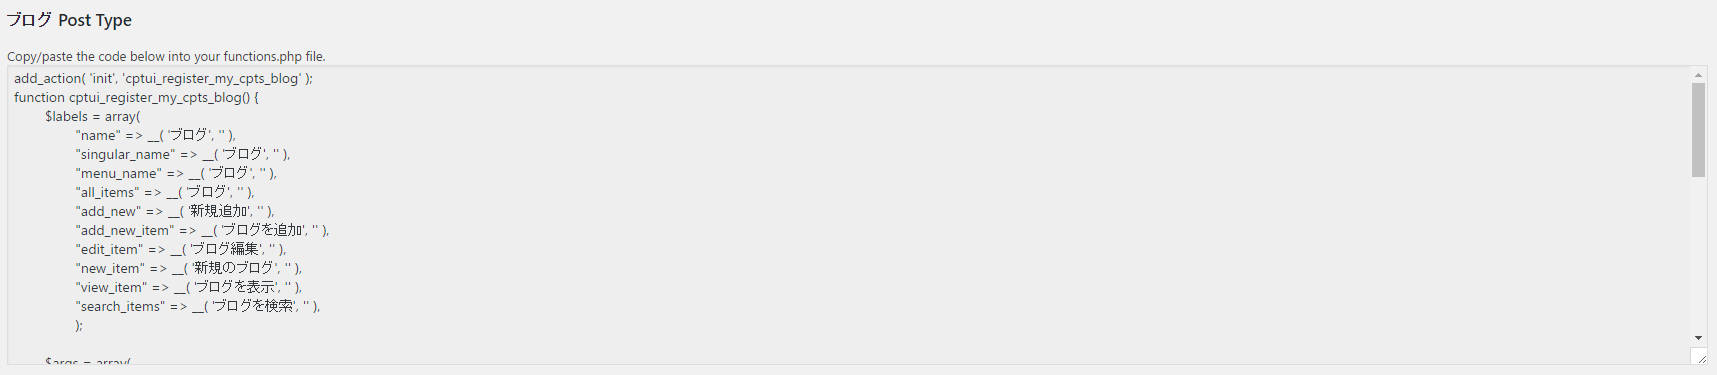
The code prepared for the blog is as follows:
add_action( 'init', 'cptui_register_my_cpts_blog' ); function cptui_register_my_cpts_blog() { $labels = array( "name" => __( 'Blog', '' ), "singular_name" => __( 'Blog', '' ), "menu_name" => __( 'Blog', '' ), "all_items" => __( 'Blog', '' ), "add_new" => __( 'Add New', '' ), "add_new_item" => __( 'Add Blog', '' ), "edit_item" => __( 'Edit Blog', '' ), "new_item" => __( 'New Blog', '' ), "view_item" => __( 'View Blog', '' ), "search_items" => __( 'Search blog', '' ), ); $args = array( "label" => __( 'Blog', '' ), "labels" => $labels, "description" => "", "public" => true, "publicly_queryable" => true, "show_ui" => true, "show_in_rest" => false, "rest_base" => "", "has_archive" => true, "show_in_menu" => true, "exclude_from_search" => false, "capability_type" => "post", "map_meta_cap" => true, "hierarchical" => false, "rewrite" => array( "slug" => "blog", "with_front" => true ), "query_var" => true, "menu_position" => 5, "supports" => array( "title", "editor", "thumbnail", "revisions", "author" ), "taxonomies" => array( "category", "post_tag", "com_cat" ), ); register_post_type( "blog", $args ); // End of cptui_register_my_cpts_blog() }
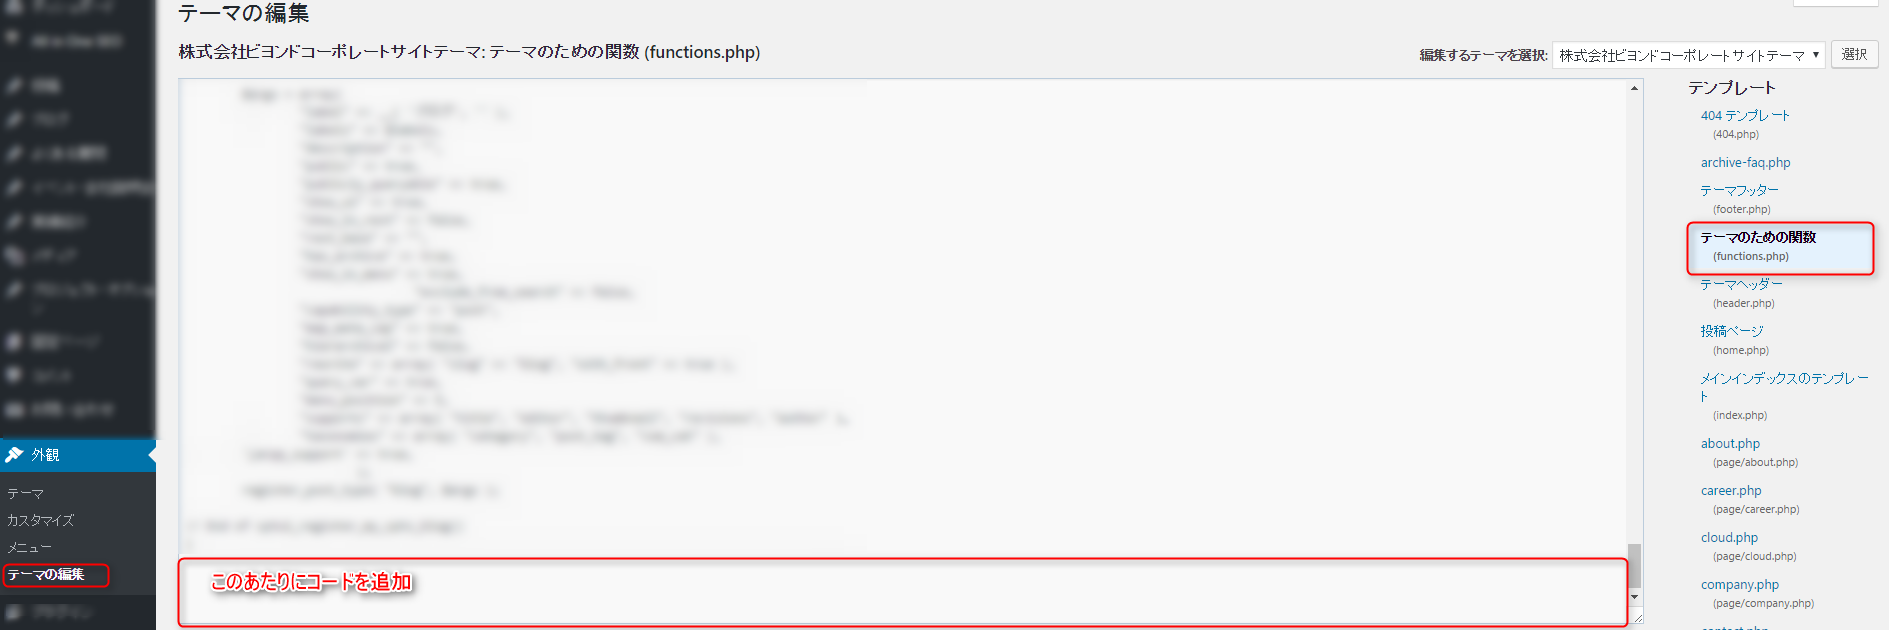
Now go to "Edit Theme" in Appearance and paste the code above into functions.php.
It doesn't matter where you paste it, so I'll paste it at the very end.
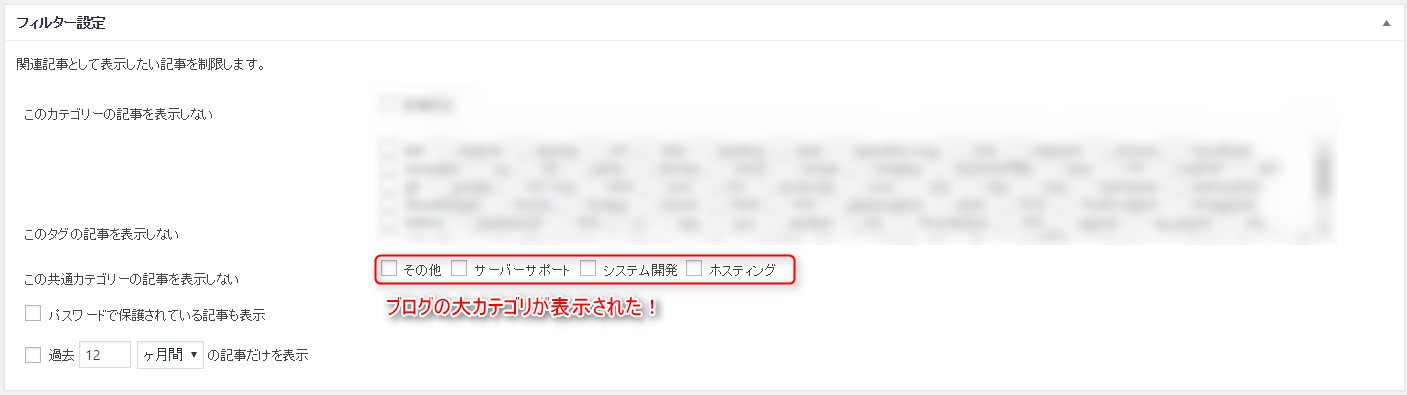
Once you paste and save it, the blog you registered will appear as a setting item on the YARPP settings screen, so
check it out.
At this point, related articles were displayed on each blog, so the setup was basically complete, but
there were some parts that disrupted the existing layout, so we will fix those as well.
Where's the CSS?
The YARPP-related files are stored under “path/to/wp-content/plugins/yet-another-related-posts-plugin” (where path/to is the absolute path to wp-content)
I decided to simply remove the "yarpp-related" class from the div tag that encloses the area where related articles are displayed, and
This part is in a file called YARPP_Core.php.
In the plugin editor, select "Yet Another Related Posted Plugin", then find and click YARPP_Core.php on the left.
In the version I modified (4.3.1), I simply deleted the string on line 1105
If you search for yarpp-related, it will come up right away
$output .= "
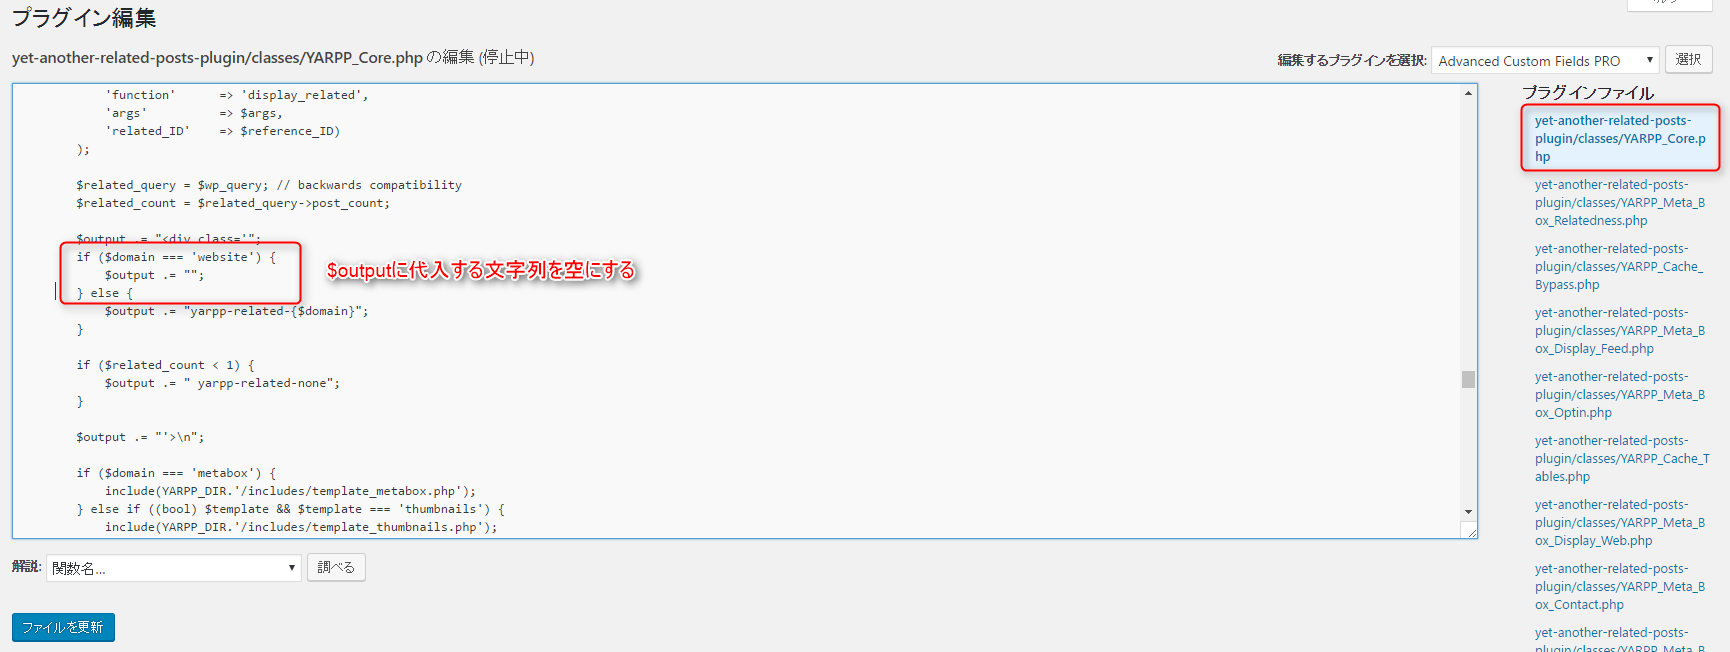
This will prevent the CSS related to yarpp from being applied, so a design that matches the layout of the site will be applied
Once you have finished setting up the articles and categories to be associated, the setup is complete
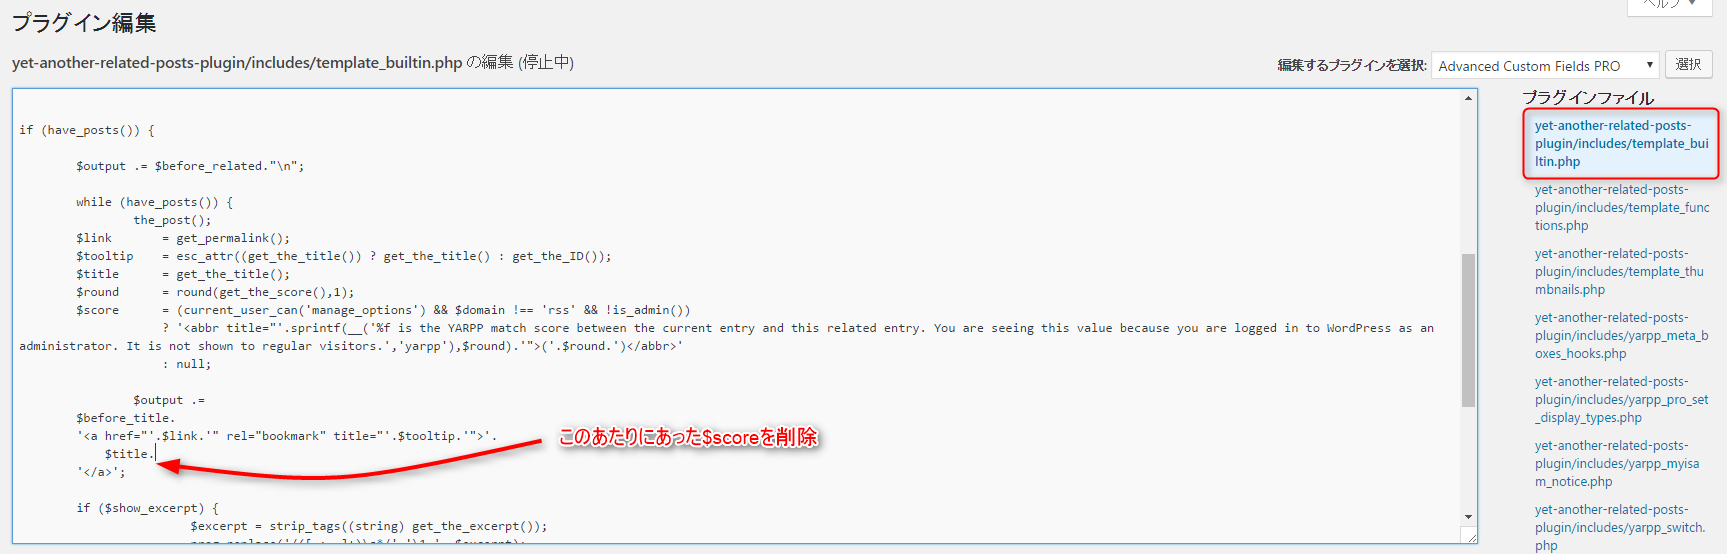
I want to turn off the score display for associations
I deleted the score information for association because I didn't think it was necessary.
The processing is written in the file "yet-another-related-posts-plugin/includes/template_builtin.php", so I think there should be no problem if you delete or comment out the relevant part.
That's all
 00
00 The person who wrote this article
About the author


