Let's create a VPN connection between AWS and your home network (RTX1100)
2019.10.09
 0
0 
Hello everyone.
I'm Hirata from the Operations Management Division of the System Solutions Department.
This time, we will introduce how to connect AWS and your home network (RTX1100) via VPN
background
The other day, I was in charge of a local VPN connection to AWS for a certain project, and I became interested in it myself, so I tried setting up a VPN connection between my home network and AWS
It went so well that I decided to write about it in a blog post
AWS side
*This procedure assumes that an EC2 instance has already been created on the VPC
Create a virtual private gateway
Follow the steps below to enter the virtual private gateway creation screen
AWS Management Console -> VPC -> Virtual Private Gateway -> Create Virtual Private Gateway
Set it up as shown in the screen below
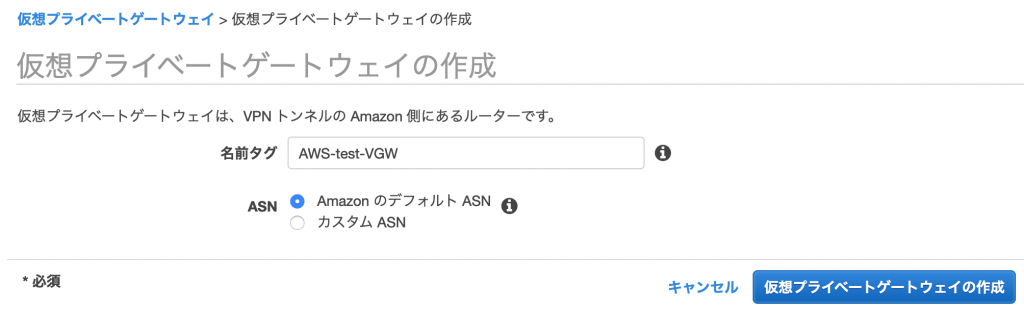
Set the name tag as you like. Select "Amazon Default ASN" for the ASN
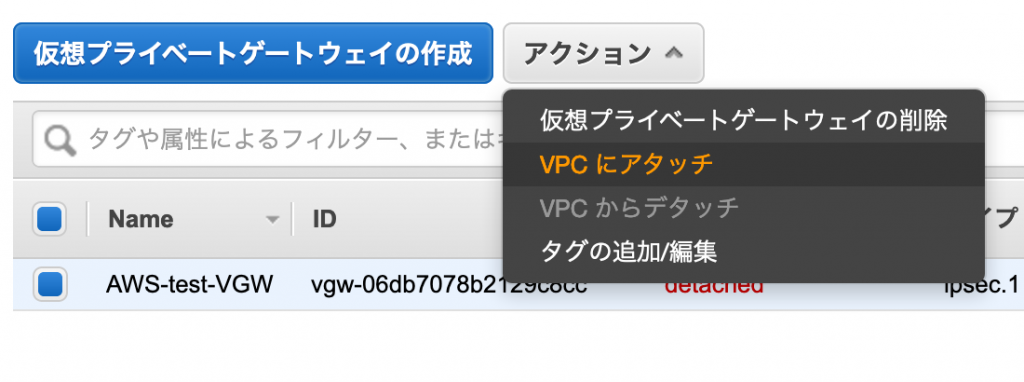
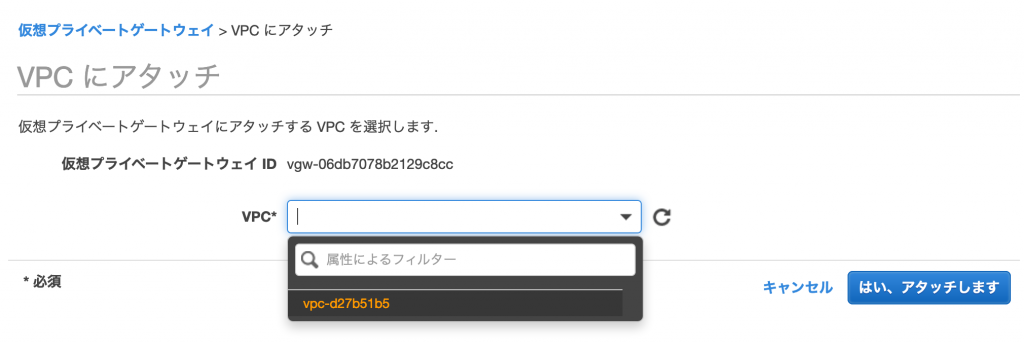
After creating the virtual private gateway, attach it to your existing VPC as shown in the following screen
Creating a customer gateway
Follow the steps below to enter the customer gateway creation screen
AWS Management Console -> VPC -> Customer Gateway -> Create Customer Gateway
Set it up as shown in the screen below
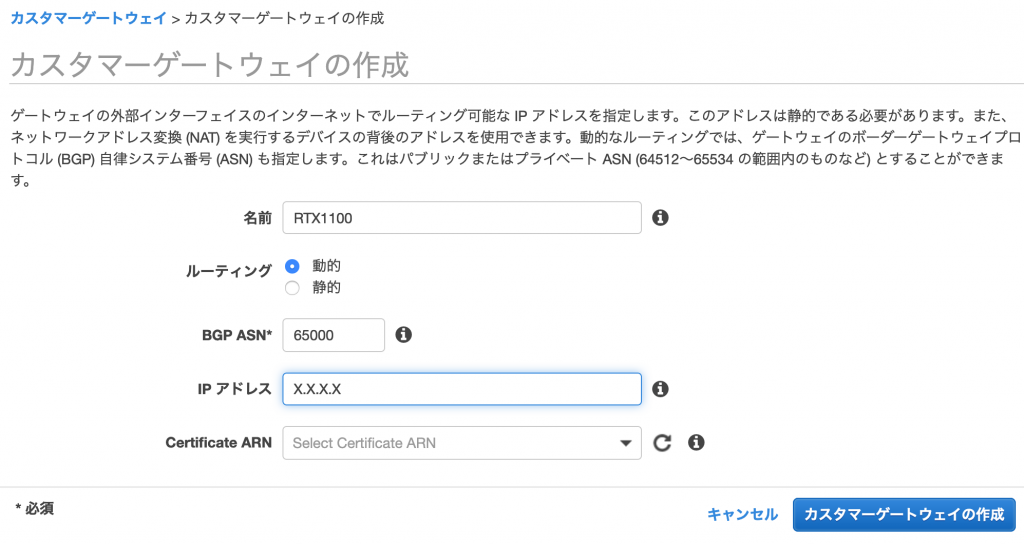
Set the name as you like. Select "Dynamic" for routing since we will be using BGP as the routing protocol this time. Leave the BGP ASN as the default 65000. Enter the public IP address of your home network as the IP address
Setting up a VPN connection
Follow the steps below to enter the VPN connection creation screen
AWS Management Console -> VPC -> Site-to-Site VPN Connections -> Create VPN Connection
Set it up as shown in the screen below
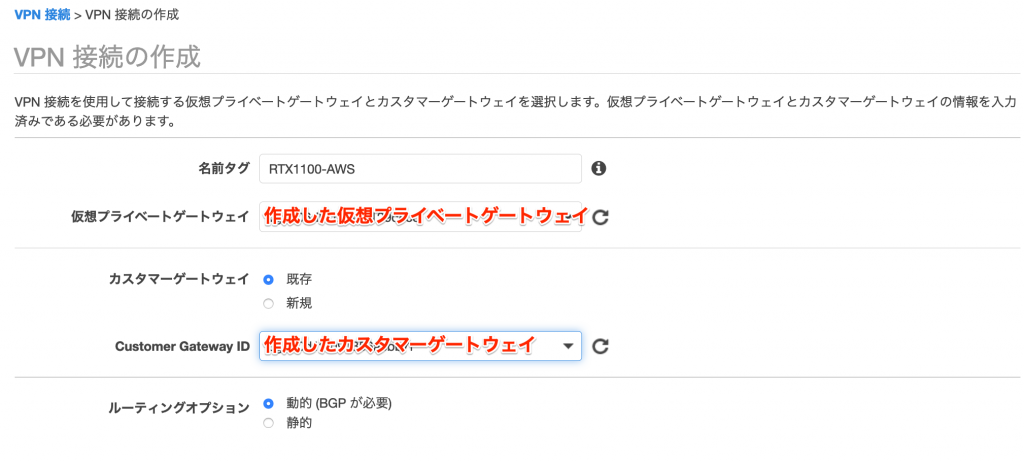
Set the name as you like. For Virtual Private Gateway, select the virtual private gateway you created earlier. For Customer Gateway ID, select the customer gateway you created earlier. For Routing Option, select Dynamic.
There is an item called Tunnel Options, but in this case, it was fine to leave it blank.
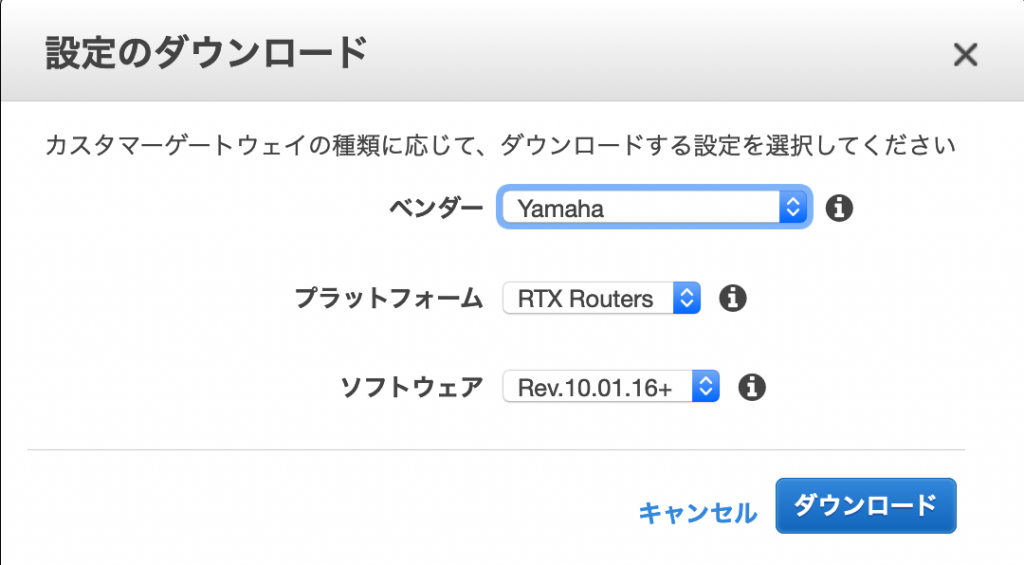
Download the config to set up your home network router
Follow the steps below to download the config to set on your home network router
AWS Management Console -> VPC -> Site-to-Site VPN Connection -> Download Configuration
Since we will be using YAMAHA's RTX1100 this time, download the config as shown in the screen below
Configure the route table
Follow the steps below to go to the route table screen
AWS Management Console -> VPC -> Route Tables
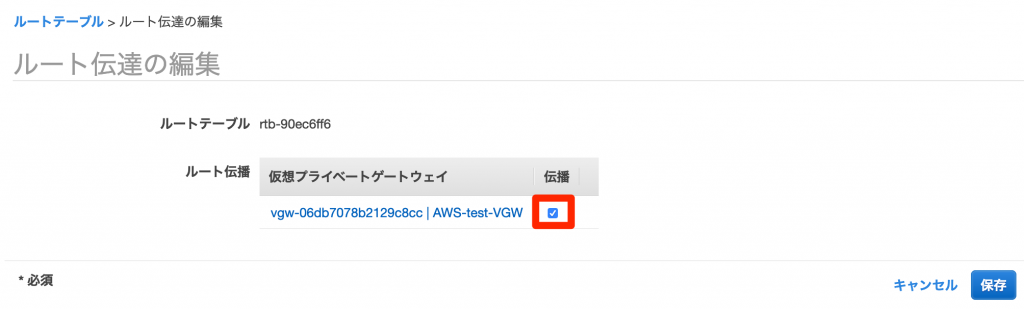
Click the "Route Propagation" tab and then click the "Edit Route Propagation" button, as shown in the screen below
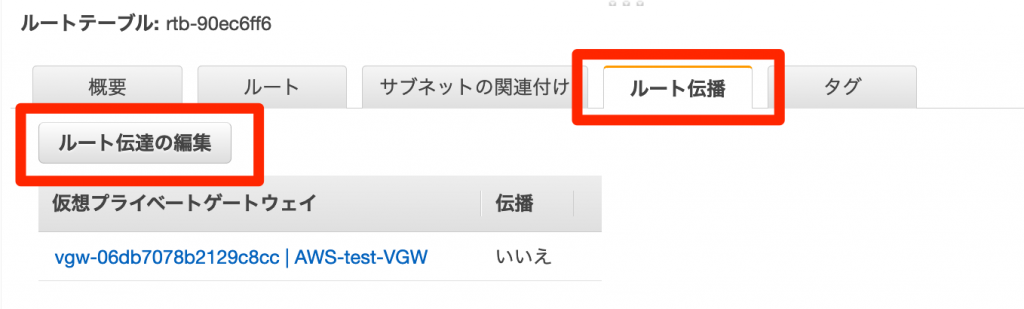
The virtual private gateway you just created will be displayed, so click the check box to configure it
Home network router settings
Modifying the downloaded config
Set the config you just downloaded on your home network router
However, there are two parts of the config that need to be modified
Correction point 1
ip tunnel remote address (public IP address of your home network)
Change this (your home network's public IP address) to the private IP address set on your router's LAN
In my case I change it to 192.168.253.1
Correction point 2
bgp import filter 1 equal 0.0.0.0/0
Change this "0.0.0.0/0" to the network address set in your LAN
In my case, I will change it to 192.168.253.0/24
Set config
Configure the above modified config on the router
Here we will write the final router configuration
show config # RTX1100 Rev.8.03.94 (Thu Dec 5 19:06:16 2013) # Memory 32Mbytes, 3LAN, 1BRI # Reporting Date: Jan 1 10:03:57 1980 timezone +09:00 console character ascii console prompt [aws_test] login timer 1000 ip route default gateway pp 1 ip lan1 address 192.168.253.1/24 ip lan1 proxyarp on pp select 1 pp name FLETS pp always-on on pppoe use lan2 pppoe auto connect on pppoe auto disconnect on pp auth accept pap chap pp auth myname (ISP connection ID) (ISP connection password) ppp lcp mru on 1454 ppp ipcp ipaddress on ip pp mtu 1454 ip pp secure filter in 1 ip pp secure filter out 2 ip pp nat descriptor 1000 pp enable 1 tunnel select 1 ipsec tunnel 201 ipsec sa policy 201 1 esp aes-cbc sha-hmac ipsec ike duration ipsec-sa 1 3600 ipsec ike encryption 1 aes-cbc ipsec ike group 1 modp1024 ipsec ike hash 1 sha ipsec ike keepalive use 1 on dpd 10 3 ipsec ike local address 1 192.168.253.1 ipsec ike pfs 1 on ipsec ike pre-shared-key 1 text (VPN private key passphrase 1) ipsec ike remote address 1 52.193.39.138 ipsec tunnel outer df-bit clear ip tunnel address 169.254.24.102/30 ip tunnel remote address 169.254.24.101 ip tunnel tcp mss limit 1379 tunnel enable 1 tunnel select 2 ipsec tunnel 202 ipsec sa policy 202 2 esp aes-cbc sha-hmac ipsec ike duration ipsec-sa 2 3600 ipsec ike encryption 2 aes-cbc ipsec ike group 2 modp1024 ipsec ike hash 2 sha ipsec ike keepalive use 2 on dpd 10 3 ipsec ike local address 2 192.168.253.1 ipsec ike pfs 2 on ipsec ike pre-shared-key 2 text (VPN private key passphrase 2) ipsec ike remote address 2 52.196.197.66 ipsec tunnel outer df-bit clear ip tunnel address 169.254.25.218/30 ip tunnel remote address 169.254.25.217 ip tunnel tcp mss limit 1379 tunnel enable 2 ip filter 1 pass * * * * * ip filter 2 pass * * * * * nat descriptor type 1000 masquerade nat descriptor address outer 1000 ipcp nat descriptor address inner 1000 auto bgp use on bgp autonomous-system 65000 bgp neighbor 1 64512 169.254.24.101 hold-time=30 local-address=169.254.24.102 bgp neighbor 2 64512 169.254.25.217 hold-time=30 local-address=169.254.25.218 bgp import filter 1 equal 192.168.253.0/24 bgp import 64512 static filter 1 ipsec auto refresh on tftp host any dhcp service server dhcp scope 1 192.168.253.100-192.168.253.200/24 dns server 8.8.8.8 8.8.4.4
By the way, this time I set it on a router that I initialized for testing purposes, and the filter was set to allow all. Please be careful when actually using it
Operation check
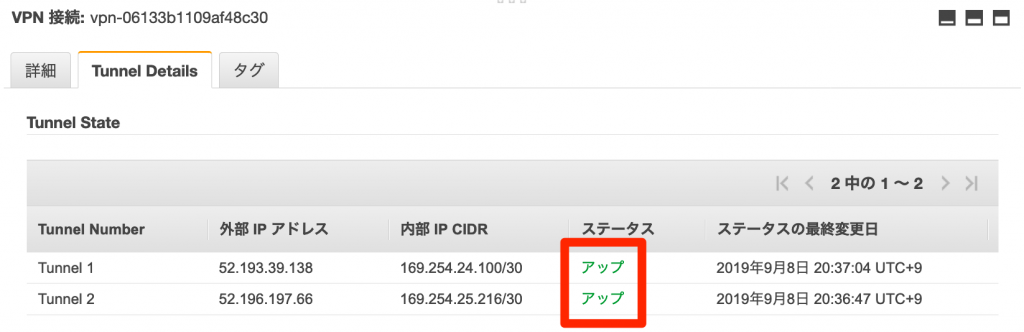
Checking AWS tunnel status
Follow the steps below to access the VPN connection screen
AWS Management Console -> VPC -> Site-to-Site VPN Connection
Click the Tunnel Details tab
Verify that the status is up
Check the tunnel status of the router (RTX1100)
Check the tunnel status using the RTX1100 command
[aws_test]# show status tunnel 1 TUNNEL[1]: Description: Interface type: IPsec Current status is Online. from 1980/01/01 09:52:26. 1 hour 26 minutes 51 seconds connection. Received: (IPv4) 894 packets [65571 octets] (IPv6) 0 packet [0 octet] Transmitted: (IPv4) 1289 packets [85905 octets] (IPv6) 0 packet [0 octet] [aws_test]# show status tunnel 2 TUNNEL[2]: Description: Interface type: IPsec Current status is Online. from 1980/01/01 09:52:52. 1 hour 26 minutes 27 seconds connection. Received: (IPv4) 1004 packets [62349 octets] (IPv6) 0 packets [0 octet] Transmitted: (IPv4) 847 packets [54026 octets] (IPv6) 0 packet [0 octet]
Checking connectivity to the EC2 instance
Now that the connection between AWS and your home network VPN is complete, let's check communication
Ping check
Check that you can ping the EC2 instance (172.31.37.121) from your home network device
~ $ ping 172.31.37.121 PING 172.31.37.121 (172.31.37.121): 56 data bytes 64 bytes from 172.31.37.121: icmp_seq=0 ttl=253 time=20.483 ms 64 bytes from 172.31.37.121: icmp_seq=1 ttl=253 time=40.084 ms 64 bytes from 172.31.37.121: icmp_seq=2 ttl=253 time=26.764 ms
ssh confirmation
Check that you can ping the EC2 instance (172.31.37.121) from your home network device
~ $ ssh -i .ssh/aws.pem [email protected] Last login: Sun Sep 8 11:42:56 2019 from ip-192-168-253-100.ap-northeast-1.compute.internal __| __|_ ) _| ( / Amazon Linux 2 AMI ___|\___|___| https://aws.amazon.com/amazon-linux-2/ 4 package(s) needed for security, out of 14 available Run "sudo yum update" to apply all updates. [ec2-user@ip-172-31-37-121 ~]$
summary
This time, I was able to connect AWS and my home network via VPN
The RTX1100 can be purchased second-hand for a few thousand yen, so I think it's perfect for this type of test
Also, please note that there is a charge for VPN connections with AWS
00 The person who wrote this article
About the author


