[Introduction to Scraping] Obtaining table data on a website using Python
2022.04.27
 9
9 
table of contents
Hello, nice to meet you.
I'm Kawai from the System Solutions Department, and lately I've been completely hooked on Kirby Discovery.
It's already hot, but it's spring! I've started seeing quite a few fresh-faced new employees in their work attire on my commute (though I've forgotten what it was like back then).
This time, I'm writing an article about Python web scraping, which might be (maybe) a little useful for those new employees' work.
What is scraping?
Data analysis has gained attention in recent years, and scraping is a fundamental technique used to obtain specific data, primarily from websites.
The word "scrape" originally meant "to gather together," and it seems to have been derived from that.
In this article, we will use the programming language Python to automatically retrieve table information within a page

Preparation
If Python is not installed, please download and install the package for your operating system from the official website: https://www.python.org/downloads/
After completion, install the libraries we will be using, " BeautifulSoup4 " and " html.parser "
This article assumes a Windows environment, so open the command prompt by pressing [CTRL] + [R], entering [cmd], and executing the following command. The installation will begin
pip install bs4 html.parser
This time, I would like to try to automatically obtain information such as domains and IP addresses used in Office 365 from the following Microsoft page and then write it out to a CSV file (it is quite a hassle to obtain this information manually)
"Office 365 URL and IP address ranges" > "Microsoft 365 Common and Office Online"
https://docs.microsoft.com/ja-jp/microsoft-365/enterprise/urls-and-ip-address-ranges?view=o365-worldwide
Operating environment and full code
Operating System: Microsoft Windows 10 Pro
Python Version: 3.10
from bs4 import BeautifulSoup from html.parser import HTMLParser import csv from urllib.request import urlopen headers = {"User-Agent": "Mozilla/5.0 (X11; Linux x86_64; rv:61.0) Gecko/20100101 Firefox/61.0"} html = urlopen("https://docs.microsoft.com/ja-jp/microsoft-365/enterprise/urls-and-ip-address-ranges?view=o365-worldwide") bsObj = BeautifulSoup(html, "html.parser") table = bsObj.findAll("table")[4] rows = table.findAll("tr") with open(r"C:\Users\python\Desktop\python\2022\microsoft.csv", "w", encoding="cp932", newline="") as file: writer = csv.writer(file) for row in rows: csvRow = [] for cell in row.findAll(["td", "th"]): csvRow.append(cell.get_text()) writer.writerow(csvRow)
Code explanation
from bs4 import BeautifulSoup from html.parser import HTMLParser import csv from urllib.request import urlopen
Import each library
headers = {"User-Agent": "Mozilla/5.0 (X11; Linux x86_64; rv:61.0) Gecko/20100101 Firefox/61.0"} html = urlopen("https://docs.microsoft.com/ja-jp/microsoft-365/enterprise/urls-and-ip-address-ranges?view=o365-worldwide") bsObj = BeautifulSoup(html, "html.parser")
→ We add user agent information (in this case, we'll use Firefox).
We specify the page we want to open with urlopen and declare it here so that BeautifulSoup can read it.
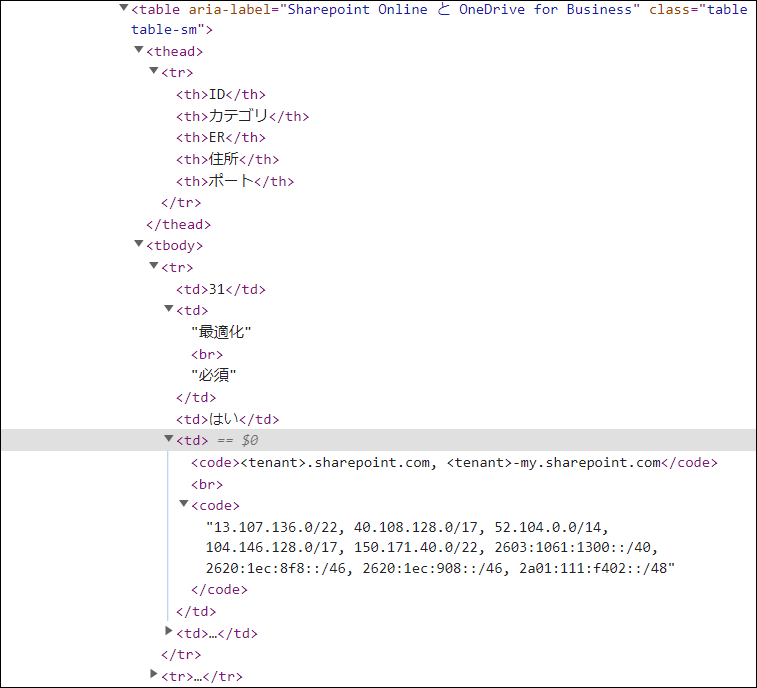
table = bsObj.findAll("table")[4] rows = table.findAll("tr")
→ Based on the HTML structure (using the web developer tools of each browser), specify [4] as the fourth table. Also, use findAll to find the "tr" tag
with open(r"C:\Users\python\Desktop\python\2022\microsoft.csv", "w", encoding="cp932", newline="") as file: writer = csv.writer(file) for row in rows: csvRow = [] for cell in row.findAll(["td", "th"]): csvRow.append(cell.get_text()) writer.writerow(csvRow)
→ Specify the character code, etc. with the desired path and file name (if the file does not exist, it will be created in the specified path)
You can write using "w" and output the retrieved information with a newline after each column using "newline="". The program
searches for td and th within the rows (tr tags) specified in the previous column, retrieves the values of those columns using a loop, and writes them to the CSV file.
Output results
This is what I got. This time, I only got a few pieces of information, but the more information you get, the more efficient it will be
If I have another opportunity, I would like to write an article that will be useful to someone

99 The person who wrote this article
About the author


