[Introduction] Building the Linux kernel

table of contents
Hello, this
is Infrastructure Wasshoi Man from the System Solutions Department.
my last blog , I experimented with using a larger font size, but I went too far , so I've decided to use normal font size this time.
Do you know what a kernel is?
In a computer, the OS acts as a bridge between the hardware and software.
This OS is not a single piece of software, but is made up of multiple pieces of software, and the core part of that is called the kernel.
That was the extent of my prior knowledge of the kernel; I had only vaguely heard of it
After that, even though I was busy with my daily work, I would secretly think about the mysterious "Colonel," and
the shadow of the Colonel could be seen in every corner of my work.
"Adjust kernel swappiness to adjust swap usage."
"Tune connections with net.ipv4.tcp_max_syn_backlog."
"If you make a mistake in your fstab, a kernel panic will occur."
As a casual infrastructure engineer, I occasionally pass this person in the hallway and feel a strong desire to get closer to him, and before I knew it, I had begun to feel the same way that I'm sure everyone else feels
Isn't it cool to understand the kernel?
So what exactly lies in the depths of the OS that I long for?
To unravel this mystery, our research team headed into the depths of the OS.
What is a build?
And by the way, the great thing is that the kernel is open source,
so you can see the code. That's cool.
However, since it is written in C language (*), it cannot be used as is.
It must be converted into binary before use.
This building or compiling.
When building, you can add features that weren't originally included in the kernel, or conversely, remove unnecessary features to reduce memory consumption, or even tweak and modify the source code itself to create "the strongest kernel I can imagine."
It's nice to be the best, isn't it? I'm sure that the Linux distributions out there are created with that same feeling. Probably (of course, there are also distributions that were born as a result of various circumstances
(*) Recently, there has been a growing trend to adopt the programming language "Rust," which is famous for its concept of "ownership," as a second language for kernel development, so we may see an increase in packages that are not written in C in the future
Let's try building it
to gain a better understanding So, as the title suggests, practice is key.
Prepare for the build
There are several ways to build, but this time I
'll be building on CentOS 7 Installing source code and messing around with it can be a pain, especially in terms of management, but I've chosen this method because it allows you to install any version you want and reduces the chance of encountering issues related to specific distributions.
The following steps are performed in a virtual environment using Vagrant's Bento Box
First, let's download the kernel source code.
The kernel is available at the link below (or a mirror site of this site).
*In this article, we will use long-term version 5.15.58.
The Linux Kernel Archives
https://www.kernel.org/
# Download the tar file [root@localhost]# cd /tmp [root@localhost tmp]# curl -O https://cdn.kernel.org/pub/linux/kernel/v5.x/linux-5.15.58.tar.xz
# Extract [root@localhost tmp]# tar xvf linux-5.15.58.tar.xz
The extracted directory contains many related files.
Please refer to the following URL for the structure:
https://linuxjf.osdn.jp/JFdocs/The-Linux-Kernel-15.html
Next, we will add the necessary items to the environment.
There are several items required, but the most important ones are as follows:
- Compiler "GCC"
- Build tool "make"
- Header files required for libraries used to build tools around the kernel
- Other Libraries
These will be installed using the command:
# Install a set of tools for source build [root@localhost ~]# yum groupinstall "Development tools"
When you run the command, many tools will be installed.
Important tools such as "GCC" are included in the "Development tools" group package, and are installed all at once using the "groupinstall" option.
However, this alone is not enough, so we will install a few more.
are listed in Documentation/process/changes.rst in the directory we just unzipped (hereafter referred to as the source directory)
# Install required packages [root@localhost ~]# yum install clang squashfs-tools pcmciautils quota ppp nfs-utils procps-ng kernel-devel udev mcelog python-sphinx openssl-devel dwarves elfutils-libelf-devel ncurses-devel
"ncurses-devel" is used for console screen control, and is included because it is required when executing the "make menuconfig" command that will be performed later
Let's change the build settings
Now that the tools are ready, we want to tweak the kernel settings. There are several ways to change the settings.
While it is possible to change the settings by directly editing the ".config" file, this is a bit of a pain, so this time we will use a setting method called "menuconfig," which allows you to change the settings by selecting them from a menu.
Now, go to the source directory and run the necessary commands
[root@localhost linux-5.15.58]# make menuconfig ~~~ *** Compiler is too old. *** Your GCC version: 4.8.5 *** Minimum GCC version: 5.1.0
I got scolded. Sorry.
The GCC version is old.
I see, updating the current GCCbothersomeBecause it's difficult,softwarecollections We will use a newer GCC using the system provided by Red Hat
# Package installation [root@localhost linux-5.15.58]# yum install scl-utils centos-release-scl # Install the toolset containing gcc [root@localhost linux-5.15.58]# yum install devtoolset-8 # Configure to use gcc8 in the current shell [root@localhost linux-5.15.58]# source scl_source enable devtoolset-8 # Check the version [root@localhost linux-5.15.58]# gcc -v
Now it looks like I can finally use menuconfig, so let's try running it
[root@localhost linux-5.15.58]# make menuconfig
Here it is
! A settings window has appeared.
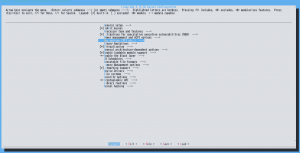
It is written at the top of the screen, but to summarize the operation method and screen explanation,
- Select to select Exit to return Use the Tab key to switch between Select and Exit
- Y key enables the function N key disables the function M key modularizes the function (a state that is called only when necessary) Space key moves between these states
- Enabled features are marked with "<*>", disabled features are marked with "<>", and modular features are marked with "<M>"
whopping 20,000
configurable kernel variables . That's a huge number.
Open source is amazing.
There are so many that I will skip over the topics. (I hope to learn more and write about them on my blog. I will, I promise.)
documentation . My training has only just begun.
Now that I've finished making excuses, select "Exit" to leave the "make menuconfig" screen. You'll be asked
if you want to save, so save and exit, and you should see a file called ".config" created at the top level of the source directory. If you
look inside, you'll see that this is the kernel build configuration file.
As I mentioned above, you can edit this file directly without using "menuconfig" or other tools.
Let's build it
Once you get this far, the rest is easy.
Change to the source directory and try building the kernel. This
may take a long time depending on your specs, so it's a good idea to run it in parallel.
# Check the number of processors [root@localhost linux-5.15.58]# nproc
In my virtual environment the result was "2"
# Use the number of processors confirmed with the nproc command as an optional argument and run the make command to build the kernel in parallel. [root@localhost linux-5.15.58]# make -j2
Once you enter the command, some processing will begin.
It will take quite a while, so have a snack while you wait.
After waiting for a few hours, it was completed.
During that time, the PC became as hot as a car hood in summer.
Maybe it was a CPU benchmark?
If you check the source directory, you will see that various related files have been created, such as "vmlinux" and "modules.builtin".
At this point, the build is finally complete.
Let's install the built kernel
Since I have the chance, I will try installing it
Before that, I did some research and found out that there is a convention to place the Linux source directory under "/usr/src/". (It seems to be a question on LPIC as well. Hmm? I have Level 1???)
So I quickly decided to move the directory.
The location varies depending on the distribution, so it would be interesting to look into it.
# Change directory [root@localhost]# mv /tmp/linux-5.15.58 /usr/src/ # Create symbolic link [root@localhost]# ln -s /usr/src/linux-5.15.58 /usr/src/linux
Compliance complete!
Now, let's finally install the kernel.
# Install module files [root@localhost linux]# make modules_install # Check the current kernel version first [root@localhost linux]# uname -r 3.10.0-1160.71.1.el7.x86_64 # Install kernel and initialization disk image [root@localhost linux]# make install
So let's try rebooting once
[root@localhost linux]# reboot
So, when I start up VirtualBox again,
/sbin/mount.vboxsf: mounting failed with the error: No such device
Yeah...
he won't stand up...
I don't know why he's angry, but I know he's angry about something.
That kind of thing happens in real life too.
Apparently, due to a change in the kernel version, there is a discrepancy between the version managed by VirtualBox and the version being updated, which is causing the shared folder to fail to mount
.
It seems like if you add some kind of plugin it will do a good job in that regard.
There are many pioneers, really.
# Install the plugin vagrant plugin install vagrant-vbguest # Run vagrant vbguest # Reload after everything is done vagrant reload
Let's ssh in and check the version
[root@localhost ~]# uname -r 3.10.0-1160.71.1.el7.x86_64
Hmm?
Nothing has changed.
Check the kernel versions available when booting the OS
[root@localhost ~]# sudo awk -F\' '$1=="menuentry " {print i++ " : " $2}' /etc/grub2.cfg 0 : CentOS Linux (5.15.58) 7 (Core) 1 : CentOS Linux 7 Rescue f9788dcfa7cdc542bad786c12fab4a3c (3.10.0-1160.71.1.el7.x86_64) 2 : CentOS Linux (3.10.0-1160.71.1.el7.x86_64) 7 (Core) 3 : CentOS Linux (3.10.0-1160.66.1.el7.x86_64) 7 (Core) 4 : CentOS Linux (0-rescue-62851673ae88124499bf281ce5a57918) 7 (Core)
There is
"0: CentOS Linux (5.15.58) 7 (Core)" ← This is it. It seems that the build
didn't switch automatically. Is this also a VirtualBox specification? (I'm suspicious)
For now, let's use the ``grub2-set-default'' command to set booting from list number ``0'' as the default
[root@localhost ~]# grub2-set-default 0
Then reboot and try ssh again
[root@localhost ~]# uname -r 5.15.58
Woahhhh
this is the version we built this time!
That's good!
thoughts
Linux is a deep subject.
There was so much I didn't know, and I learned a lot, including troubleshooting.
If I were to create my own Linux distribution, I
would probably have to install the kernel and other packages myself.
It sounds like a lot of work, but it sounds fun!
I feel like my inadequate writing was quite evident in my writing, but
I'm satisfied because I was able to learn a little bit about Linux.
thank you very much!
 2727
2727 The person who wrote this article
About the author


