[WordPress] How to display a site displayed in a subdirectory on the top page
2022.12.05
 2
2 
table of contents
Hello!
I'm Hide, the Ramen King from Beyond Inc.'s Osaka office.
This is my 11th post.
Last time, I wrote about how to add multiple rules to a security group with Terraform!
There are various ways to add security groups with Terraform, but using them in combination can sometimes cause problems.
I also introduced a solution to that problem, so if you're interested, be sure to check it out.
https://beyondjapan.com/blog/2022/10/terraform-how-to-use-security-group/
overview

"I used to have my site displayed in both Japanese (/jp) and English (/en), but I
no longer need the English (/en) site, so I want the Japanese site to be displayed at the top...
how do I do this...?"
Have you ever found yourself in a situation like the one above? You may
have initially displayed two sites to users, but then
realized they were no longer needed and wanted to display one at the top.
Setting it up like this is easy, but
if you do it incorrectly, you may encounter problems such as a blank screen.
We'll also introduce some points where you might make a mistake in your settings to prevent problems, so let's work together!
How to set it up
The configuration before work is as follows:
| [Before changing settings] | ||
| Site Contents | URL | Directory Path |
| Nothing is displayed | http://localhost/ | /var/www/html |
| Japanese site | http://localhost/jp/ | /var/www/html/jp |
| English site | http://localhost/en/ | /var/www/html/en |
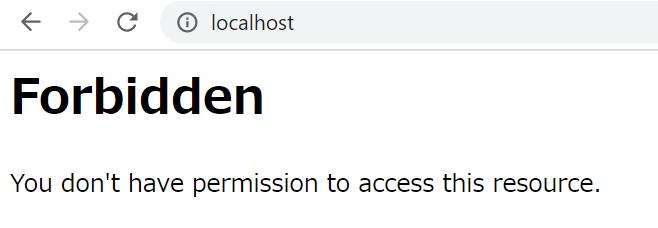
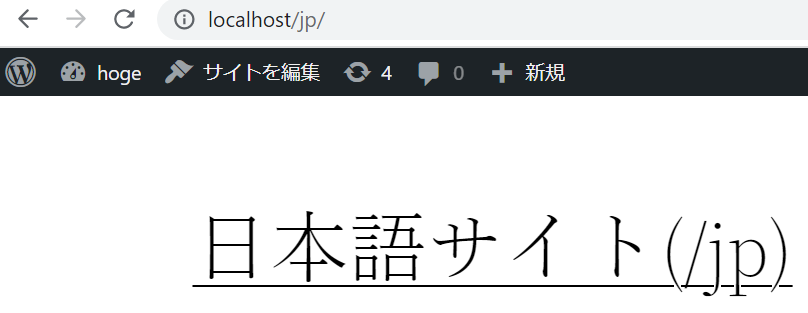
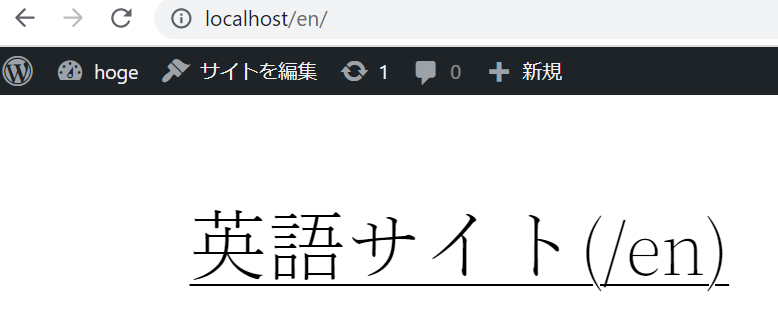
①Check the operation of the website
・http://localhost
・http://localhost/jp/
・http://localhost/en/
②Get a backup
*This information is acquired for the purpose of restoring work, so please use it if a problem occurs.
*If you do not need it, you can skip it.
②-① Move directory
cd /var/www/
②-②Back up the database
mysqldump -u root --single-transaction {database} > {database}_$(date +"%Y%m%d").sql
*If you create .my.cnf in the following directory, you can back it up without a password
cat /root/.my.cnf [client] user=root password='{password}'
②-③Back up your content
tar -czvf html_$(date +"%Y%m%d").tar.gz html/
③ Copy “index.php” and “.htaccess”
cp -ip /var/www/html/jp/index.php /var/www/html/ cp -ip /var/www/html/jp/.htaccess /var/www/html/
④ Edit “index.php”
Edit the destination file
vi /var/www/html/index.php
*Before editing
<?php /** * Front to the WordPress application. This file doesn't do anything, but loads * wp-blog-header.php which does and tells WordPress to load the theme. * * @package WordPress */ /** * Tells WordPress to load the WordPress theme and output it. * * @var bool */ define( 'WP_USE_THEMES', true ); /** Loads the WordPress Environment and Template */ require __DIR__ . '/wp-blog-header.php'; ←ここを【/jp/】に編集
*After editing
<?php /** * Front to the WordPress application. This file doesn't do anything, but loads * wp-blog-header.php which does and tells WordPress to load the theme. * * @package WordPress */ /** * Tells WordPress to load the WordPress theme and output it. * * @var bool */ define( 'WP_USE_THEMES', true ); /** Loads the WordPress Environment and Template */ require __DIR__ . '/jp/wp-blog-header.php';
⑤ Edit “.htaccess”
*Edit the destination file
*At this point, you will be able to view the site in both the root directory and subdirectories.
vi /var/www/html/.htaccess
*Before editing
<IfModule mod_rewrite.c>RewriteEngine On RewriteRule .* - [E=HTTP_AUTHORIZATION:%{HTTP:Authorization}] RewriteBase /jp/ ←Edit this to [/] RewriteRule ^index\.php$ - [L] RewriteCond %{REQUEST_FILENAME} !-f RewriteCond %{REQUEST_FILENAME} !-d RewriteRule . /jp/index.php [L] ←Edit this to [/index.php]</IfModule>
*After editing
<IfModule mod_rewrite.c>RewriteEngine On RewriteRule .* - [E=HTTP_AUTHORIZATION:%{HTTP:Authorization}] RewriteBase / RewriteRule ^index\.php$ - [L] RewriteCond %{REQUEST_FILENAME} !-f RewriteCond %{REQUEST_FILENAME} !-d RewriteRule . /index.php [L]</IfModule>
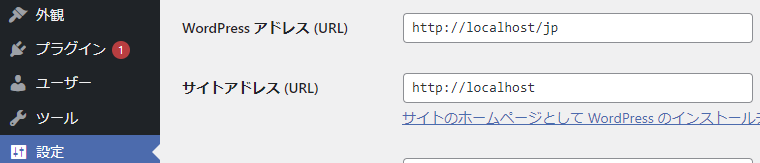
⑥ Change the site address (URL)
*We will introduce two ways, so please use the method you prefer
If you change it from the admin screen
, be sure to delete the (/jp) from the site address (URL) before saving.
If you change the WordPress address (URL), you will no longer be able to access the admin screen.
When changing from the wordpress setting file
*WP_HOME corresponds to the site address (URL), so be sure to specify this
*WP_SITEURL corresponds to the WordPress address (URL), so if you specify it, you will not be able to access the admin screen, and problems such as a blank screen will occur, so please be careful.
vi /var/www/html/jp/wp-config.php define( 'WP_HOME', 'https://{domain}' );
⑦Check the operation of the website
The configuration after the work is as follows:
| [After changing the settings] | ||
| Site Contents | URL | Directory Path |
| Japanese site | http://localhost/ | /var/www/html |
| Nothing is displayed | http://localhost/jp/ | /var/www/html/jp |
| English site | http://localhost/en/ | /var/www/html/en |
・http://localhost
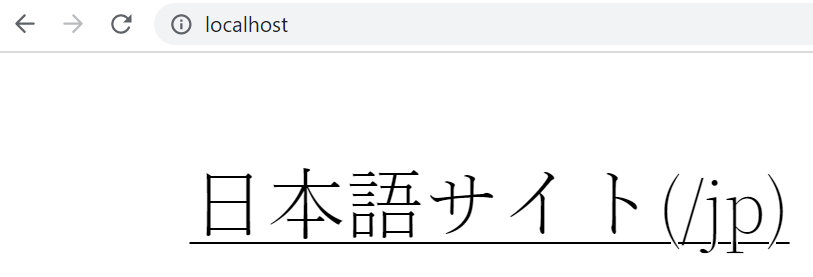
・http://localhost/jp/
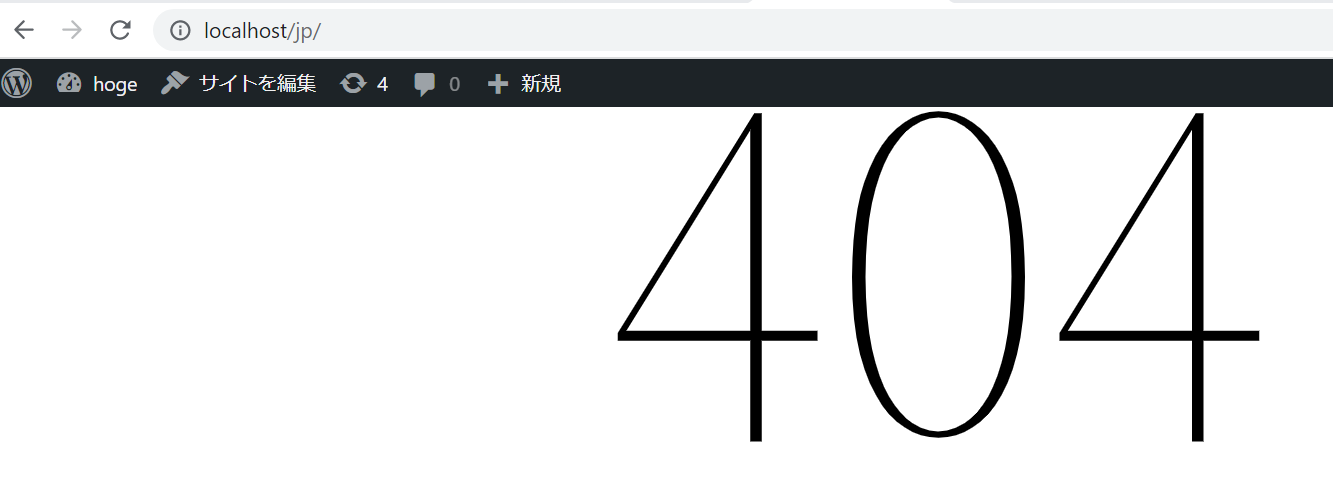
・http://localhost/en/
*The English site will be displayed, but if you do not use it, please delete it or move it from the public directory.
summary
So, how was it?
I think you were able to easily display a site displayed in a subdirectory on the top page, but I hope
you've learned that if you make a mistake in the settings, you may encounter problems such as being unable to access the admin screen or your site turning blank. If you
pay close attention to the points where mistakes are likely to occur, you won't encounter any problems, so please make sure to check everything carefully before setting it up!
Thank you for watching!
22 The person who wrote this article
About the author


