Memo on setting up an OpenVPN server and preventing split tunneling (Ubuntu 22.04 LTS)
2024.11.01
 6
6 
table of contents
Hello,
from the Memory Leak
System Solutions Department.
It's been quite cool lately. These days it feels more like two seasons than four. How are you all doing?
This time, I got stuck trying to install OpenVPN on my Ubuntu machine because I couldn't access the internet, so
I'd like to share my findings as a memo for myself.
What is OpenVPN?
*If you already know, skip this
OpenVPN is open-source VPN software provided by OpenVPN Technologies Inc.
By installing it on a Linux machine or similar system, it can function as a VPN server, enabling VPN connections from clients.
▼OpenVPN Japan Official Website
: https://www.openvpn.jp/introduction/
install
■Environment
# Server: Ubuntu 24.04 LTS OpenVPN 2.5.9 # Client: Windows 11 Pro
This time, we'll proceed using the following page as a reference. It's incredibly convenient because you can easily proceed using the prompt.
https://github.com/angristan/openvpn-install
First, follow the instructions and use curl to retrieve the shell script file.
You can save it anywhere. Change the permissions so that it can be executed.
$ sudo curl -O https://raw.githubusercontent.com/angristan/openvpn-install/master/openvpn-install.sh % Total % Received % Xferd Average Speed Time Time Time Current Dload Upload Total Spent Left Speed 100 40923 100 40923 0 0 282k 0 --:--:-- --:--:-- --:--:-- 281k $ sudo chmod +x openvpn-install.sh
Running the script will start a prompt, so proceed step by step.
Unless you have a specific requirement, the default settings should be fine.
$ sudo ./openvpn-install.sh Welcome to the OpenVPN installer! The git repository is available at: https://github.com/angristan/openvpn-install I need to ask you a few questions before starting the setup. You can leave the default options and just press enter if you are ok with them.
There are several areas to enter information, so if you're not sure what to enter, refer to the commented-out sections in the code block below
# Enter the WAN side (Internet facing) IP address when connecting from an external client. I need to know the IPv4 address of the network interface you want OpenVPN to listen to. Unless your server is behind NAT, it should be your public IPv4 address. IP address: 192.0.2.1 # Enter n (default) unless you are using IPv6. Checking for IPv6 connectivity... Your host does not appear to have IPv6 connectivity. Do you want to enable IPv6 support (NAT)? [y/n]: n # UDP/1194 is used as the listen port by default, so select 1 if this is not a problem. What port do you want OpenVPN to listen to? 1) Default: 1194 2) Custom 3) Random [49152-65535] Port choice [1-3]: 1 # You will be asked whether to use UDP or TCP. If this is not a problem, leave it as the default and select 1 (UDP). What protocol do you want OpenVPN to use? UDP is faster. Unless it is not available, you shouldn't use TCP. 1) UDP 2) TCP Protocol [1-2]: 1 # Select a DNS resolver. In my environment, the default was 11. If you don't need to change it, leave it as is. What DNS resolvers do you want to use with the VPN? 1) Current system resolvers (from /etc/resolv.conf) 2) Self-hosted DNS Resolver (Unbound) 3) Cloudflare (Anycast: worldwide) 4) Quad9 (Anycast: worldwide) 5) Quad9 uncensored (Anycast: worldwide) 6) FDN (France) 7) DNS.WATCH (Germany) 8) OpenDNS (Anycast: worldwide) 9) Google (Anycast: worldwide) 10) Yandex Basic (Russia) 11) AdGuard DNS (Anycast: worldwide) 12) NextDNS (Anycast: worldwide) 13) Custom DNS [1-12]: 11 # It seems that there is a vulnerability called the VORACLE attack in environments where communication data is compressed. Since NO is recommended for this option, we will leave it as the default. # Reference: https://openvpn.net/security-advisory/the-voracle-attack-vulnerability/ Do you want to use compression? It is not recommended since the VORACLE attack makes use of it. Enable compression? [y/n]: n # The encryption settings are set to ECDSA with prime256v1 by default, which is strong enough, so leave it as is. Do you want to customize encryption settings? Unless you know what you're doing, you should stick with the default parameters provided by the script. Note that whatever you choose, all the choices presented in the script are safe. (Unlike OpenVPN's defaults) See https://github.com/angristan/openvpn-install#security-and-encryption to learn more. Customize encryption settings? [y/n]: n # This completes. Pressing Enter or similar will start the installation and configuration, so have a cup of tea and wait. Okay, that was all I needed. We are ready to setup your OpenVPN server now. You will be able to generate a client at the end of the installation. Press any key to continue...
Once the installation is complete, proceed to generate an ovpn file (profile) to distribute to clients
# Specify the username for the connection (be careful not to duplicate names if issuing multiple users in the future). Tell me a name for the client. The name must consist of alphanumeric characters. It may also include an underscore or a dash. Client name: test # You will be asked whether to assign a passphrase to the client profile. Go with the default (the process for selecting 2 will be explained later). Do you want to protect the configuration file with a password? (e.g., encrypt the private key with a password) 1) Add a passwordless client 2) Use a password for the client Select an option [1-2]: 1 The configuration file has been written to /home/hamchan/test.ovpn. Download the .ovpn file and import it into your OpenVPN client.
A profile has been generated in /home/hamchan/test.ovpn
If you select option 2 when assigning a passphrase, the process will proceed as follows.
Once you select this option and assign a passphrase, the client will need to enter the passphrase each time they connect.
Therefore, even if the profile is leaked, a third party cannot connect without knowing the passphrase.
Do you want to protect the configuration file with a password? (e.g., encrypt the private key with a password) 1) Add a passwordless client 2) Use a password for the client Select an option [1-2]: 2 # Set a passphrase. You will be asked twice for confirmation. ⚠️ You will be asked for the client password below ⚠️ * Using SSL: openssl OpenSSL 3.0.13 30 Jan 2024 (Library: OpenSSL 3.0.13 30 Jan 2024) * Using Easy-RSA configuration: /etc/openvpn/easy-rsa/vars * The preferred location for 'vars' is within the PKI folder. To silence this message, move your 'vars' file to your PKI or declare your 'vars' file with option: --vars=<FILE> Enter PEM pass phrase: Verifying - Enter PEM pass phrase: ----- Notice ------ Keypair and certificate request completed. Your files are: req: /etc/openvpn/easy-rsa/pki/reqs/test2.req key: /etc/openvpn/easy-rsa/pki/private/test2.key Using configuration from /etc/openvpn/easy-rsa/pki/3e6d0991/temp.484dbf11 Check that the request matches the signature Signature ok The Subject's Distinguished Name is as follows commonName :ASN.1 12:'test2' Certificate is to be certified until Sep 25 03:20:30 2034 GMT (3650 days) Write out database with 1 new entries Database updated Notice ------ Certificate created at: * /etc/openvpn/easy-rsa/pki/issued/test2-chan.crt Notice ------ Inline file created: * /etc/openvpn/easy-rsa/pki/inline/test2.inline Client test2 added. The configuration file has been written to /home/hamchan/test2.ovpn. Download the .ovpn file and import it in your OpenVPN client.
Connection from a client
Download and install the client software from the following link. (My environment is Windows 11.)
https://www.openvpn.jp/
Also, copy the OVPN client profile you created earlier (test.ovpn).
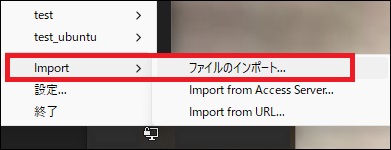
Right-click the OpenVPN icon (which looks like a PC display) in the taskbar and select "Import" and then choose the ovpn file.
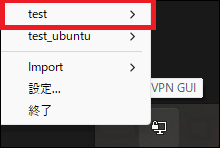
Once the import is complete, connect using the profile name. It's OK if the status turns green (connected).
Web page won't open
Up until this point everything was going smoothly, but then I ran into a problem connecting to the internet
The problems are:
- The web page won't open
- Name resolution (nslookup) fails
- The source IP is the WAN side IP of the OpenVPN server
That was the situation. I think it's probably split-tunneled by default?
With zero route and no internet access, it was a very inconvenient situation. This is no good.
Avoiding split tunneling
We had no choice but to break the split tunneling situation.
After investigating, it turned out that simply adding a few lines to the client profile was enough.
Below is the default profile with no modifications.
client proto udp explicit-exit-notify remote 192.0.2.1 1194 dev tun resolv-retry infinite nobind persist-key persist-tun remote-cert-tls server verify-x509-name server_RsYFZmapV3EjCl7k name auth SHA256 auth-nocache cipher AES-128-GCM tls-client tls-version-min 1.2 tls-cipher TLS-ECDHE-ECDSA-WITH-AES-128-GCM-SHA256 ignore-unknown-option block-outside-dns setenv opt block-outside-dns # Prevent Windows 10 DNS leak verb 3
The following two points will be added to this profile.
*When OpenVPN is installed, 10.8.0.0/24 is configured by default, so if there is a conflict with your existing environment, you will need to rewrite /etc/openvpn/server.conf.
# Route information to the OpenVPN server route 10.8.0.0 255.255.255.0 # Ignore the redirect gateway (do not route traffic destined for the Internet to the VPN destination) pull-filter ignore "redirect-gateway"
By the way, I used method 1 from here:
https://community.openvpn.net/openvpn/wiki/IgnoreRedirectGateway
I thought I was going to win with this! But although the internet connection went through the existing local network and was directed to the OpenVPN server only on 10.8.0.0/24, the problem of name resolution failing and web pages not opening persisted .
After much trial and error, I discovered that the following two default settings were apparently causing the problem. I resolved it by commenting them out
;ignore-unknown-option block-outside-dns ;setenv opt block-outside-dns # Prevent Windows 10 DNS leak
This appears to be a remnant from the Windows 10 era, as can be seen here:
https://openvpn.net/community-resources/reference-manual-for-openvpn-2-4/
----
--block-outside-dns
Block DNS servers on other network adapters to prevent DNS leaks. This option prevents any application from accessing TCP or UDP port 53 except one inside the tunnel. It uses Windows Filtering Platform (WFP) and works on Windows Vista or later.This option is considered unknown on non-Windows platforms and unsupported on Windows XP, resulting in fatal error. You may want to use --setenv opt or --ignore-unknown-option (not suitable for Windows XP) to ignore said error. Note that pushing unknown options from server does not trigger fatal errors.
----
It appears this setting suppresses a DNS leak bug seen in older Windows operating systems. This bug was apparently interfering with tunnel DNS communication (TCP/UDP53).
However, since this option is only recognized by Windows, it seems you don't need to worry about it on other operating systems.
In the end, the profile looked like this:
client proto udp explicit-exit-notify remote 192.0.2.1 1194 dev tun resolv-retry infinite nobind persist-key persist-tun remote-cert-tls server verify-x509-name server_RsYFZmapV3EjCl7k name auth SHA256 auth-nocache cipher AES-128-GCM tls-client tls-version-min 1.2 tls-cipher TLS-ECDHE-ECDSA-WITH-AES-128-GCM-SHA256 ;ignore-unknown-option block-outside-dns ;setenv opt block-outside-dns # Prevent Windows 10 DNS leak route 10.8.0.0 255.255.255.0 pull-filter ignore "redirect-gateway" verb 3
It's so good, it's so good
bonus
In addition, depending on the application and environment, the MTU size and other factors may also have an impact.
In that case, please refer to the following manual:
https://openvpn.net/community-resources/reference-manual-for-openvpn-2-4/
Also, the server side's /etc/openvpn/server.conf does not include a log option by default, so you can make it work by adding the following settings:
# Increase the log level by one verb 4 # Write the connection log to a file log /var/log/openvpn/debug.log
66 The person who wrote this article
About the author


