Adding a disk to CentOS7 using LVM
2017.10.10
 1
1 
table of contents
Hello,
I'm Mandai, the Wild Team member of the development team.
The development server I created on vSphere ran out of disk space, so I tried expanding the disk using LVM
This article focuses on what to do using fdisk (as you can find it easily by searching)
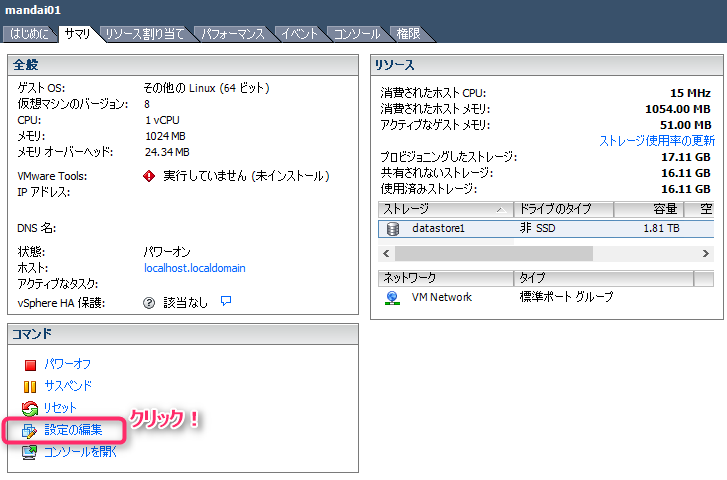
Change the allocated disk size on vSphere
First, you need to allocate disk space in vSphere
On the VM settings screen, click Edit Settings
In the pop-up screen, select the hard disk item on the left and adjust the provisioned size
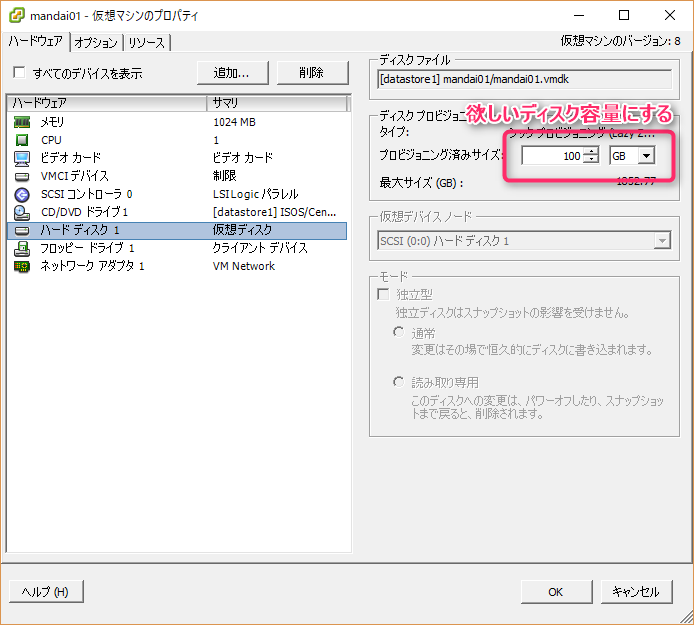
The virtual machine will be reconfigured, and once complete, the new disk will be connected to the machine.
For now, restart the VM.
Create a new partition
Create a partition on the disk you added in the previous step
To create a partition, follow
here This page has the same content as the work we're doing now, so you can refer to it without any problems, but since the part about adding it to LVM is pretty simple, I'll go into more detail in the next section.
Expanding using LVM
When you add a disk for the first time, a partition called /dev/sda3 will be created, so we will assume that the partition we want to expand to LVM is /dev/sda3.
This will depend on your environment, so please read it as appropriate.
First, initialize the partition added with the pvcreate command as a physical volume using LVM
# pvcreate /dev/sda3 Physical volume "/dev/sda3" successfully created
Next, use the pvdisplay command to check the volume group (VG) to be added
# pvdisplay --- Physical volume --- PV Name /dev/sda2 VG Name cl PV Size 15.00 GiB / not usable 3.00 MiB Allocatable yes (but full) PE Size 4.00 MiB Total PE 3839 Free PE 0 Allocated PE 3839 PV UUID N2FEPJ-GjMb-D3OM-8sAE-CeHW-SKHu-KdlyWe
The "VG Name" field is the name of the VG you want to increase the free space for.
In this example, the VG name is "cl".
Next, add and extend /dev/sda3 to cl with the vgextend command
# vgextend cl /dev/sda3 Volume group "cl" successfully extended
Now /dev/sda3 has been added to cl.
However, at this point the available disk space has not increased, so we will extend the logical volume with the lvextend command.
Use the lvdisplay command to check the logical volume (LV) to be expanded
# lvdisplay --- Logical volume --- LV Path /dev/cl/root LV Name root VG Name cl LV UUID yroqAX-k0kh-6NyT-IUaZ-50v3-nZjX-7thw7Y LV Write Access read/write LV Creation host, time localhost.localdomain, 2017-10-05 00:02:04 +0900 LV Status available # open 1 LV Size 13.39 GiB Current LE 3429 Segments 1 Allocation inherit Read ahead sectors auto - currently set to 8192 Block device 253:0 --- Logical volume --- LV Path /dev/cl/swap LV Name swap VG Name cl LV UUID 0Eh5Ss-mFH1-GVME-rfJl-mGR6-hNed-AtHfxo LV Write Access read/write LV Creation host, time localhost.localdomain, 2017-10-05 00:02:11 +0900 LV Status available # open 2 LV Size 1.60 GiB Current LE 410 Segments 1 Allocation inherit Read ahead sectors auto - currently set to 8192 Block device 253:1
All LVs on the system will be displayed, so find the LV you want to increase the capacity of.
In this example, we will increase the capacity of the LV called root.
Now let's run the lvextend command again
# lvextend -l +100%FREE /dev/cl/root Size of logical volume cl/root changed from 13.39 GiB (3429 extents) to 97.39 GiB (24932 extents). Logical volume cl/root successfully resized.
The lvextend command allows you to specify the size to extend using the -L option.
If you want to extend all VGs registered with the LV, as in this case, use "-l +100%FREE".
Finally, to expand the file system, in the case of CentOS7, you can use the xfs_growfs command
# xfs_growfs /dev/cl/root meta-data=/dev/mapper/cl-root isize=512 agcount=4, agsize=877824 blks = sectsz=512 attr=2, projid32bit=1 = crc=1 finobt=0 spinodes=0 data = bsize=4096 blocks=3511296, imaxpct=25 = sunit=0 swidth=0 blks naming =version 2 bsize=4096 ascii-ci=0 ftype=1 log =internal bsize=4096 blocks=2560, version=2 = sectsz=512 sunit=0 blks, lazy-count=1 realtime =none extsz=4096 blocks=0, rtextents=0 data blocks changed from 3511296 to 25530368
Check if it worked with the lvmdiskscan command
# lvmdiskscan /dev/cl/root [ 97.39 GiB] /dev/sda1 [ 1.00 GiB] /dev/cl/swap [ 1.60 GiB] /dev/sda2 [ 15.00 GiB] LVM physical volume /dev/sda3 [ 84.00 GiB] LVM physical volume 2 disks 1 partition 0 LVM physical volume whole disks 2 LVM physical volumes
/dev/cl/root is the LV we are working on this time, and it appears to have been expanded successfully
Now the disk addition is complete.
Check the free space with the df command.
# df -h Filesystem Size Used Remaining Used% Mounted on /dev/mapper/cl-root 98G 14G 85G 14% /devtmpfs 486M 0 486M 0% /dev tmpfs 497M 0 497M 0% /dev/shm tmpfs 497M 6.7M 490M 2% /run tmpfs 497M 0 497M 0% /sys/fs/cgroup /dev/sda1 1014M 139M 876M 14% /boot tmpfs 100M 0 100M 0% /run/user/0 tmpfs 100M 0 100M 0% /run/user/1000
As you can see, the number is increasing successfully
summary
This time, we were adding a virtual disk using LVM, but the process is the same even if it was a physical disk.
The process itself can be easily found by searching, but this article is a kind of warning to myself (maybe my eyes are getting old...) who couldn't tell the difference between the appearance of pvdisplay, vgdisplay, and lvdisplay.
That's all
11 The person who wrote this article
About the author


