[Introduction] Setting up nginx on Kubernetes and displaying the default page

table of contents
Hello.
I'm Infrastructure Wasshoi-man from the System Solutions Department, and I write a lot of articles about [Introduction].
I'm a true gate guardian, and today I'm going to write about Kubernetes.
There are so many detailed introductory articles out there that I feel discouraged even before I start writing, but I'll try to summarize what I've learned in my own way in an easy-to-understand way
.
This time, we will actually set up nginx on Kubernetes and display a welcome page
It may be rare for developers to get involved in it in depth, but in order to maximize application performance in an environment created with Kubernetes, you will need to design your application to a certain extent to be compatible with Kubernetes, so please use this article as a stepping stone to get started!
What is Kubernetes?
Here's the documentation explanation:
Kubernetes is a portable, extensible, open-source platform for managing containerized workloads and services that facilitates declarative configuration management and automation. Kubernetes has a large and rapidly growing ecosystem with a wide range of available services, support, and tools.
Official documentation: https://kubernetes.io/en/docs/concepts/overview/what-is-kubernetes/
Since it may not be very clear, I will explain it step by step. First of all, Kubernetes is a container orchestration tool (it manages many containers like a conductor), so knowledge of containers is required as a prerequisite
Declarative Configuration Management and Automation
In Kubernetes, you can describe (declare) the "desired state" in a file called a manifest file, and it will create a pod (a collection of containers and volumes) based on that content.
For example, if you order "four containers" and then accidentally delete one, Kubernetes will realize "that's one missing" and automatically create an additional one.
With Docker Compose and other tools, once you create a container, it's left alone, but Kubernetes differs in that it adds the management functions mentioned above.
Manage containerized workloads and services
As those of you who have studied Docker may know, Docker runs containers on a single machine.
Kubernetes, on the other hand, manages containers on multiple machines.
Large-scale applications often involve linking multiple machines to distribute load and functionality. Instead of having to run docker run on each machine, you can prepare the manifest file mentioned above and the containers will be deployed to each machine in a neat manner, making it a valuable tool when deploying large-scale services.
merit
In addition to being the de facto standard for deploying large-scale services using containers, it has several other
advantages, such as the ability to deliver configuration files as with Docker, version control using something called a replica set, and the ability to update containers without stopping them. Another
major advantage is that the open source community is active on a global scale.
Kubernetes Glossary
Kubernetes uses a variety of unique concepts and terms.
You have no choice but to memorize them, so I will give a rough explanation.
At this stage, I hope you will read this with the general idea that there are people like that. If you use it, you will remember it whether you like it or not.
Masternode
This is the part where we give commands. We will introduce this later, but there are also worker nodes, and the role of the master node is to give instructions to those worker nodes. It is a group that provides management
functions such as "kube-apierver (receives and processes commands from us)," "
etcd (a database that stores the received "desired state"),"
and "kube-scheduler (assigns pods to worker nodes)."
Worker nodes
This area works in conjunction with the master node and is where pods are actually placed.
It includes "kube-let (which communicates with kube-schedule)"
"kube-proxy (which handles networking)."
Pod
It is a collection of containers and volumes (storage space).
Even if you don't use volumes, Kubernetes manages pods as a single unit.
service
It has the role of grouping Pods.
One IP is assigned to each service, and when you access that IP, the service will load balance to the Pods under it.
This load balancing is per worker node, so load balancing between multiple worker nodes is outside the scope of the Service.
Replica Set
As mentioned above, when a Pod is stopped or deleted, Kubernetes automatically restores the desired number of Pods, but to do this, the number of Pods needs to be managed.
This management is done by a replica set.
Deployment
It manages the deployment of pods.
The above-mentioned "pods", "services", and "replica sets" can be described in a manifest file (YAML format), but "pods" and "replica sets" are often described as being included in this "deployment".
In other words, when creating a pod, it will work as long as you have a manifest for "deployment" and a manifest for "service".
About the environment
Seeing is believing, so let's take a look at the manifest file, which is a mixture of terminology explained in the previous section.
But first, you need a Kubernetes execution environment to apply the manifest file.
You can use the Kubernetes services provided by each cloud (EKS for AWS, GKE for GCP, AKS for Azure, OKE for OCI, ACK for Alibaba Cloud, etc.), but they are expensive for beginners to learn, so we recommend using the extension included with "Docker Desktop."
The setup is simple.
Just go to "settings" in Docker Desktop, click "Kubernetes," and check "Enable Kubernetes."
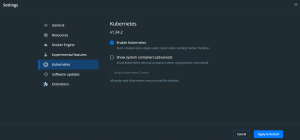
Wait for the various components to be installed. It's awesome!
That's all you need to do to start learning about Kubernetes.
Example of a manifest file
Let's take a look at an example of a manifest file.
As an example, I borrowed
a YAML file from the documentation that describes a deployment to create nginx It looks like this:
apiVersion: apps/v1 kind: Deployment metadata: name: nginx-deployment spec: selector: matchLabels: app: nginx replicas: 2 template: metadata: labels: app: nginx spec: containers: - name: nginx image: nginx:1.14.2 ports: - containerPort: 80 --- apiVersion: v1 kind: Service metadata: name: nginx-service labels: app: nginx spec: type: NodePort ports: - port: 8080 targetPort: 80 nodePort: 30080 protocol: TCP selector: app: nginx
The upper part, separated by "---", describes the deployment, and the lower part describes the service.
It is possible to write them in separate manifest files and manage them separately, but if you write them in the same file, you should write the resources separated by hyphens like this.
Each item is explained from top to bottom as follows.
■ "apiVersion" ⇒ Kubernetes resources have API versions, so enter the appropriate one.
Checking this can be a little complicated depending on the resource, but for deployments and services, you can use the commands "kubectl api-resources | grep Deployment" and "kubectl api-resources | grep Services" to confirm that "apps/v1" and "v1" are listed in the APIVERSION field, respectively.
■ "kind" ⇒ Enter the type of resource. In this case, we are creating a deployment and a service, so the types are "Deployment" and "Service" respectively
■ "metadata" ⇒ As the name suggests, this is metadata. You can attach labels to resources.
For now, just remember "name" and "labels".
■ "spec" ⇒ Describes the contents of the resource. The sub-items vary depending on the resource.
[This deployment includes the following.]
the selector
deployment to manage pods. In the example, a label has been added. We will use this later.
replicaSpecifies
the replica set. In the above example, we are requesting two pods.
spec
The spec of the Pod. It specifies the image and port to use in the container.
[This service includes the following:]
typeThis
item allows you to select from several types to specify how the service will communicate with the outside world.Specific options include
"
ClusterIP (connection possible via ClusterIP. Used for internal communication, external access not possible)",
"NodePort (connection possible via the worker node IP)"
, "LoadBalancer (connection possible via the load balancer IP)",
and "ExternalName (special setting used to connect from a Pod to the outside world)".
When accessing from outside, you would normally use a "LoadBalancer", but since there is no public access this time, we have specified a "NodePort" which connects directly to the worker node.
(For external access, a resource called Ingress is often used, which functions as an L7 load balancer and can terminate SSL, but we will not be using it this time so we will put it aside for the moment. Note that a "LoadBalancer" can also be enabled for SSL, but when created in the cloud, some vendors may not support this due to specifications.)
Also, a "NodePort" can be used not only for testing like this time, but also in situations where you want to perform some kind of operation on a NodePort basis.
ports
are defined.
"port" is the service port,
"targetPort" is the container port, and
"nodePort" is the worker node port.
In this case, NodePort is specified as the type, so nginx will be accessed via this "nodePort".
selector:
This item specifies the label set in the Pod.
Creating Resources
Now that we've covered the basics, let's actually create a manifest file, run it, and create resources.
By the way, you can use any name for the files used in Kubernetes.
Unlike Dockerfile and docker-compose.yml, they don't have to have specific names, so create them according to easy-to-manage rules.
# Open the file with vi, paste the example source, save it, and then create a deployment with the kubectl command vi example.yml kubectl apply -f example.yml
Check the Pods
$ kubectl get po -l app=nginx NAME READY STATUS RESTARTS AGE nginx-deployment-6595874d85-7mt97 1/1 Running 0 52s nginx-deployment-6595874d85-mds2z 1/1 Running 0 52s
You can see that two pods have been created and are "Running."
For example, changing the number of "replicas" in the yml file will increase or decrease the number of pods.
Next, you can check the service with the following command:
$ kubectl get services NAME TYPE CLUSTER-IP EXTERNAL-IP PORT(S) AGE kubernetes ClusterIP 10.96.0.1 443/TCP 26h nginx-service NodePort 10.106.92.238 8080:30080/TCP 21m
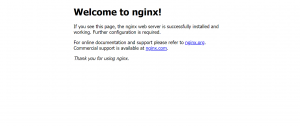
It looks like the nodePort and service port are linked properly, so try accessing the Pod by entering "http://localhost:30080/" in your browser
Yes, the usual welcome page has appeared!
summary
Since this is an "introduction" article, I have only given a brief explanation.
There are other adjustments that need to be made before you can actually open it up to the public and provide the service, but I hope that I have managed to get rid of the feeling that it is somehow confusing. I
would like to write more articles after the introductory section, so please wait for a while.
Thank you very much!
 2121
2121 The person who wrote this article
About the author


